LDFM Introduction
1. Introduction
Lenovo Display Fleet Manager (abbreviated as LDFM) is a tool specifically developed for enterprise users to remotely manage monitors. It supports remote On-Screen Display (OSD) menu settings, firmware upgrades, and control operations for monitors.
This document introduces the installation of the LDFM management system, which includes two parts: the LDFM Server and the LDFM Client.
2. Preparation Work
2.1 Hardware Configuration Requirements
Server:
Processor: Intel i5 - 12400F or a processor with higher performance.
Memory: 16GB or more (The memory will increase by approximately
500k bytes for each additional managed device).
Hard Disk Space: More than 500GB, used for storing service data and log
files.
System: Windows 10, Windows 11 Pro, or Windows Server, 64 - bit, Linux X86.
Client:
System: Windows 10, Windows 11 Home Edition or higher, 32 - bit or 64 - bit
operating
system, Mac OS Sonoma 14.6.1 or later.
Monitor Connection Methods :
The monitor can connect to a PC via USB-C, USB-A/B + HDMI, or USB-A/B + DP cables.
2.2 Required Network Configuration
The client host on which LDFMClient is installed must support https access to LDFMServer.
2.3 Preparation before Installation
First, unzip the downloaded LDFM installation package.
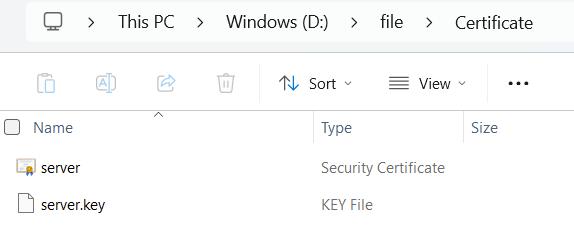
Second, Prepare a valid certificate, rename the CRT file to server.crt and the KEY file to server.key. If your certificates are not in these two formats or you may want to set the certificate's storage path, refer to 6. HTTPS Certificate Configuration. to modify them. If you are using them for testing purposes only, you can download LDFM TestCertificates from https://ldfm.lenovo.com.
3. LDFM Server Installation Process
3.1 Installation process
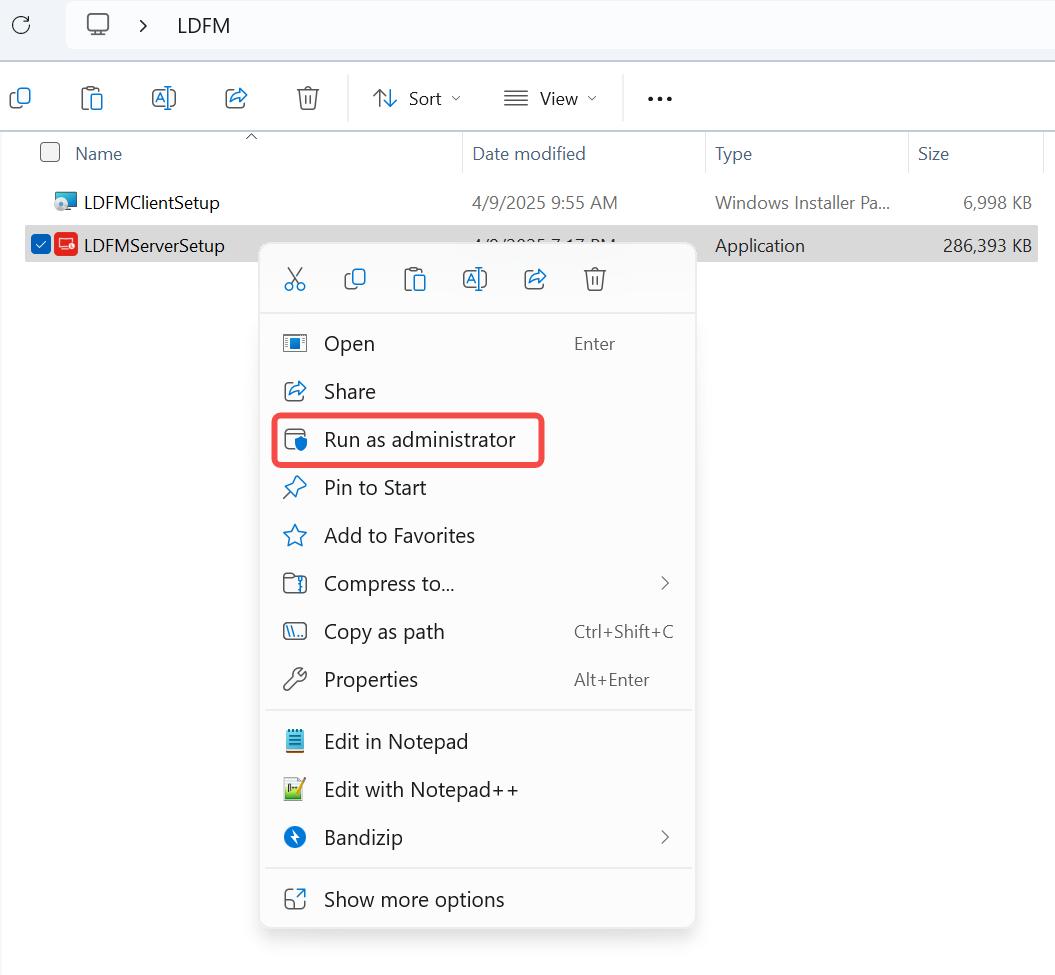
3.1.1 Run the installation process
Right-click and run LDFMServerSetup as an administrator. On the User Account Control page, select "yes" to proceed to the next step.
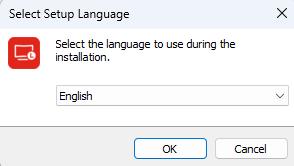
3.1.2 Select a language
In the language setting, select the language. The default language is English. Click "OK" to proceed to the next step.
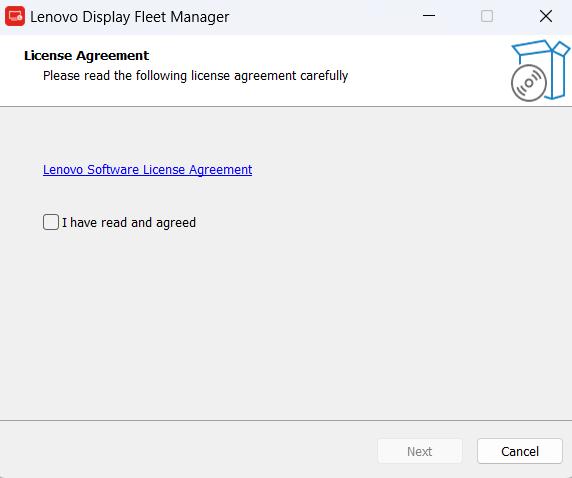
3.1.3 Review the software license agreement
In the license agreement interface, carefully read the "Lenovo Software License Agreement". After confirming that you have fully understood the content of the agreement, check the box "I have read and agreed", and then click "Next" to continue with the subsequent installation process.
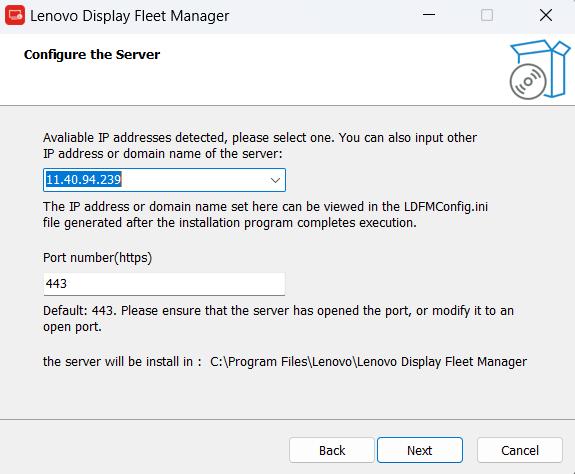
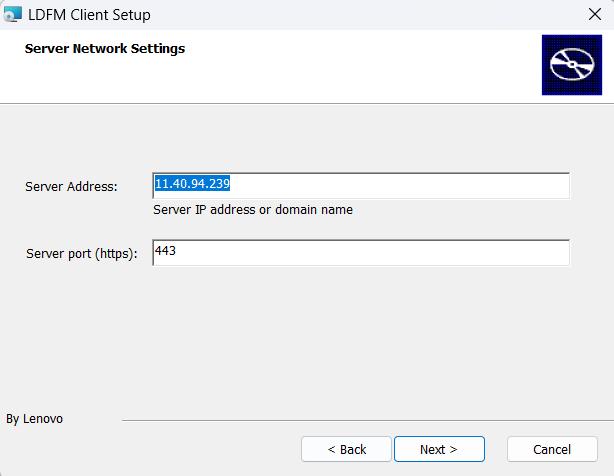
3.1.4 Configure the Server
On the server configuration interface, you can either select or manually enter an IP address or domain name. The default port number is 443, and Copyright © Lenovo 10 Lenovo Display Fleet Manager Installation Guide it can be modified as needed. After confirming that the settings are correct, click "Next".
If the port number is modified, the URL to be entered during login will be:
https://ip:port/
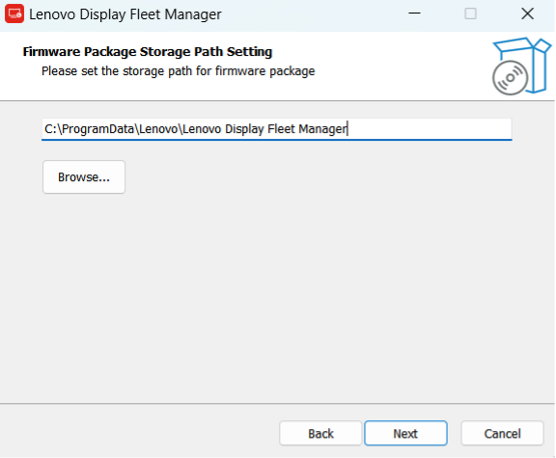
3.1.5 Configure the Storage Path of the Firmware Package
In the setting interface of the firmware package storage path, the default storage path of the firmware package is:
C:\ProgramData\Lenovo\Lenovo Display Fleet Manger.
If you need to change it, click "Browse" and select the storage location of the firmware package you need from the local directory. After the selection is made, click "Next".
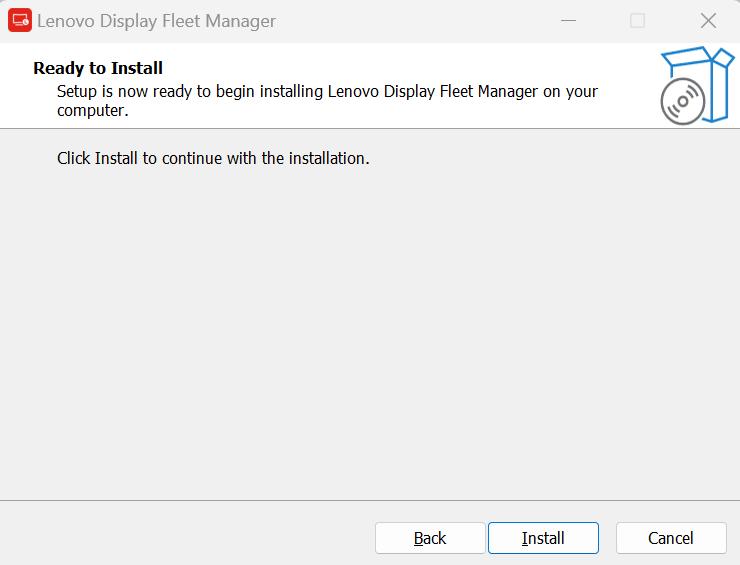
3.1.6 Start the installation
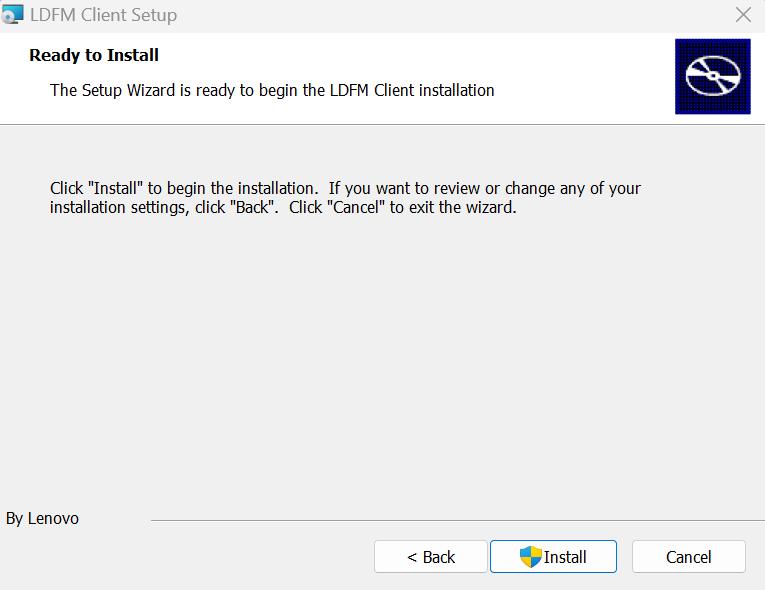
On the "Ready to Install" interface, click "Install" to start the installation.
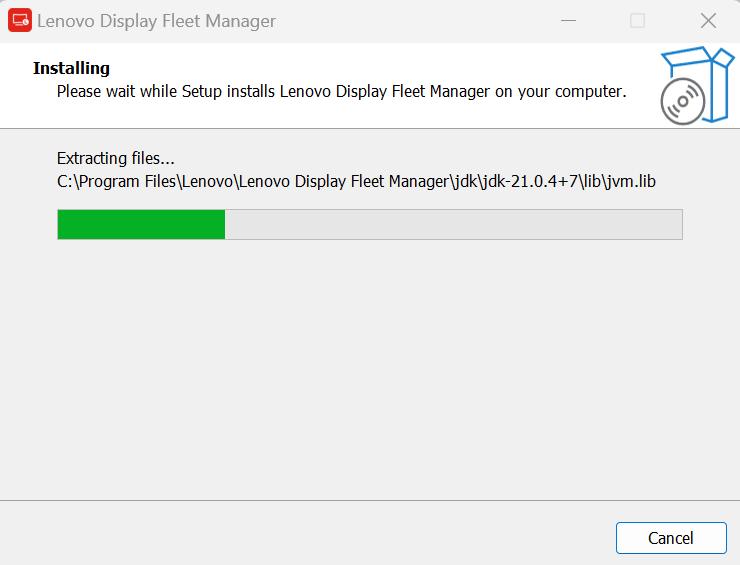
Installing... Showing progress.
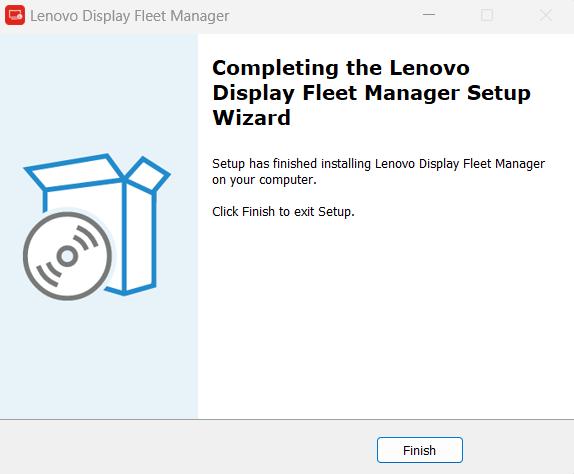
3.1.7 The installation is complete
Installation complete. Click "Finish" to close.
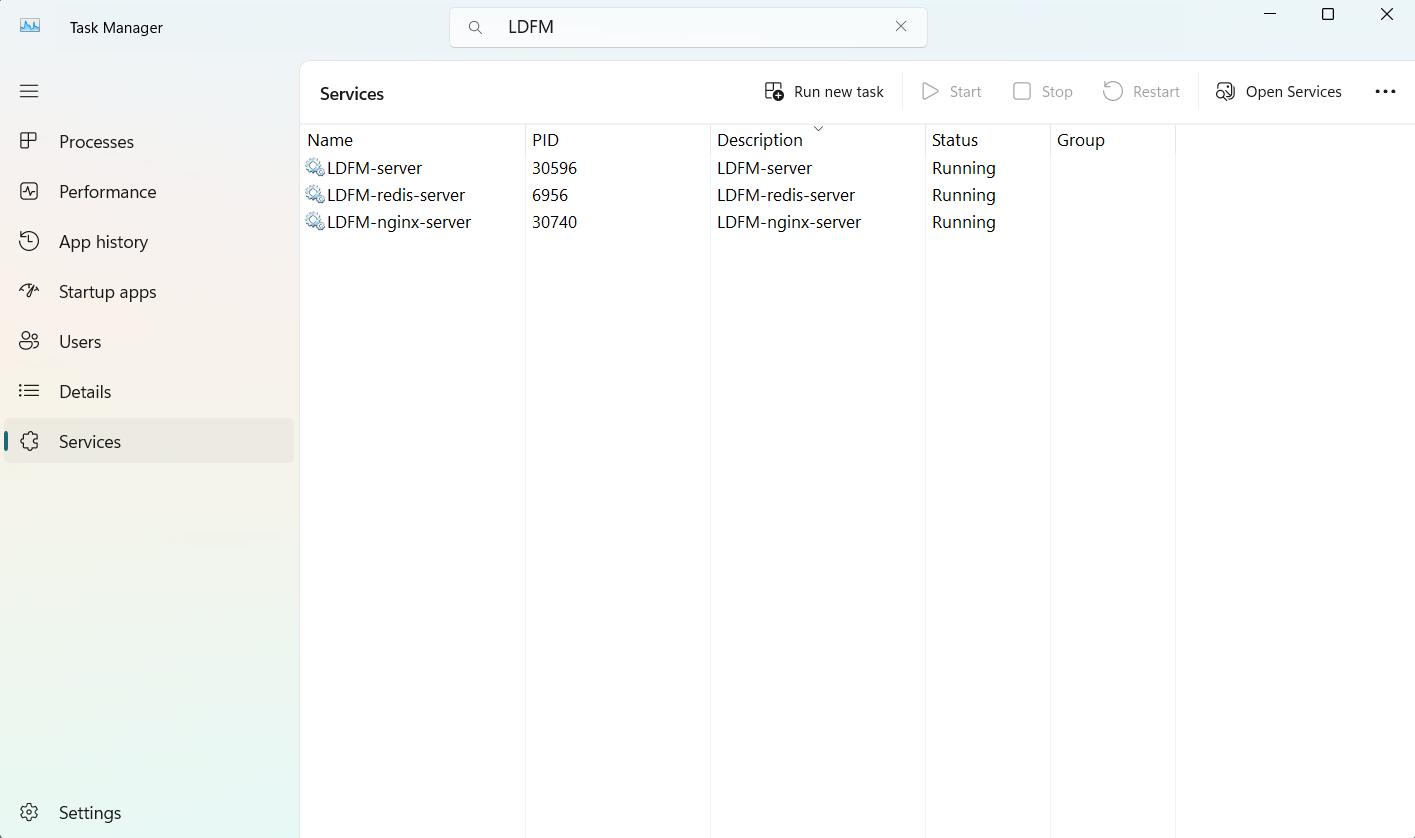
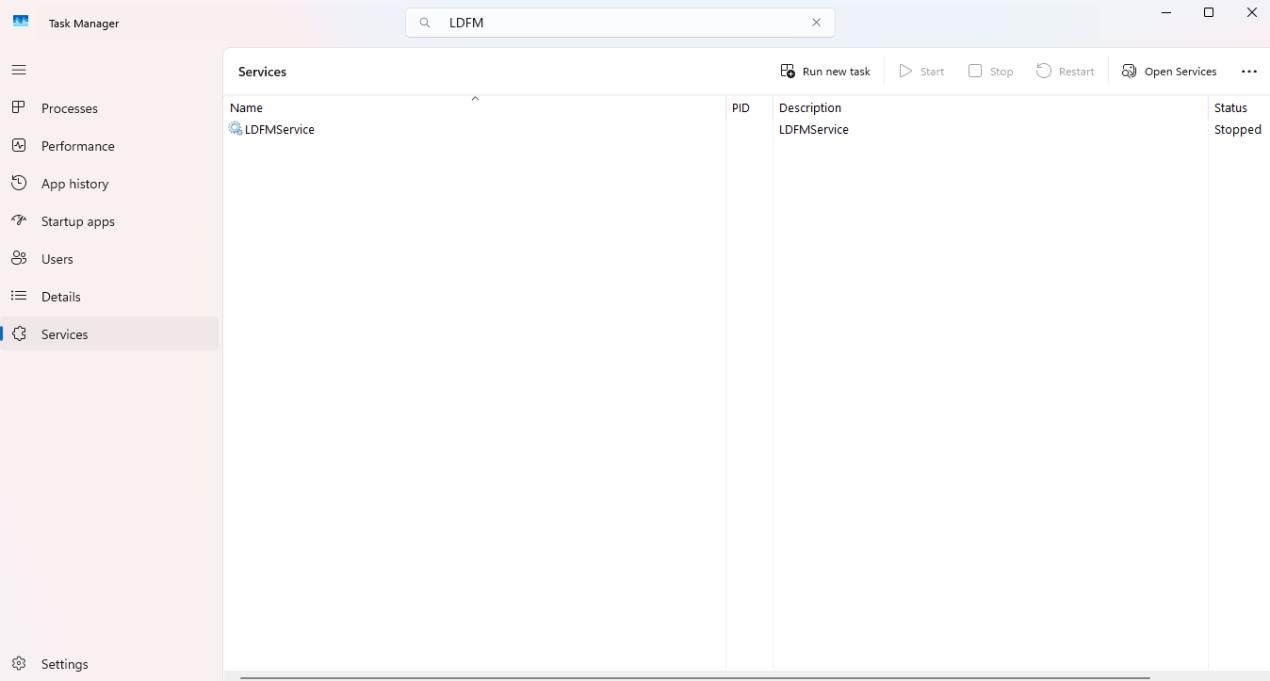
After the installation is completed, the following three services will appear in the Task Manager:
3.2 Configure Certificate
After the installation is complete, you need to copy the server.crt and the
server.key to the path C:\Program Files\Lenovo\Lenovo Display Fleet
Manager\Certificate which you have prepared in advance, to ensure HTTPS
is
available.
If the certificate is not in the above two file formats or you may want to change the certificate's storage path, refer to 6. HTTPS Certificate Configuration.
After the configuration is complete, you need to start the Task Manager as an
administrator and restart the LDFM-nginx-server to access
https://IP correctly.
3.3 Configure Server Parameters (Optional)
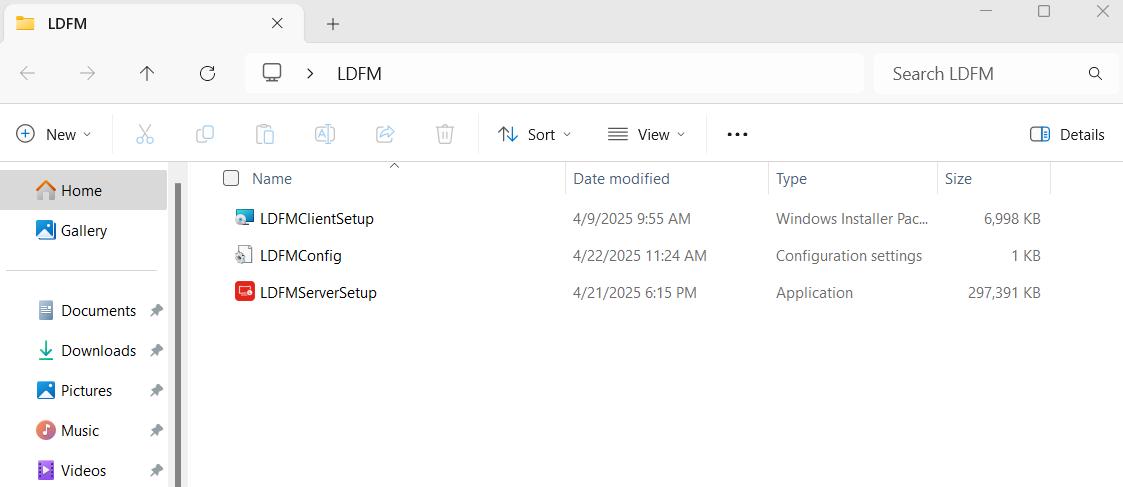
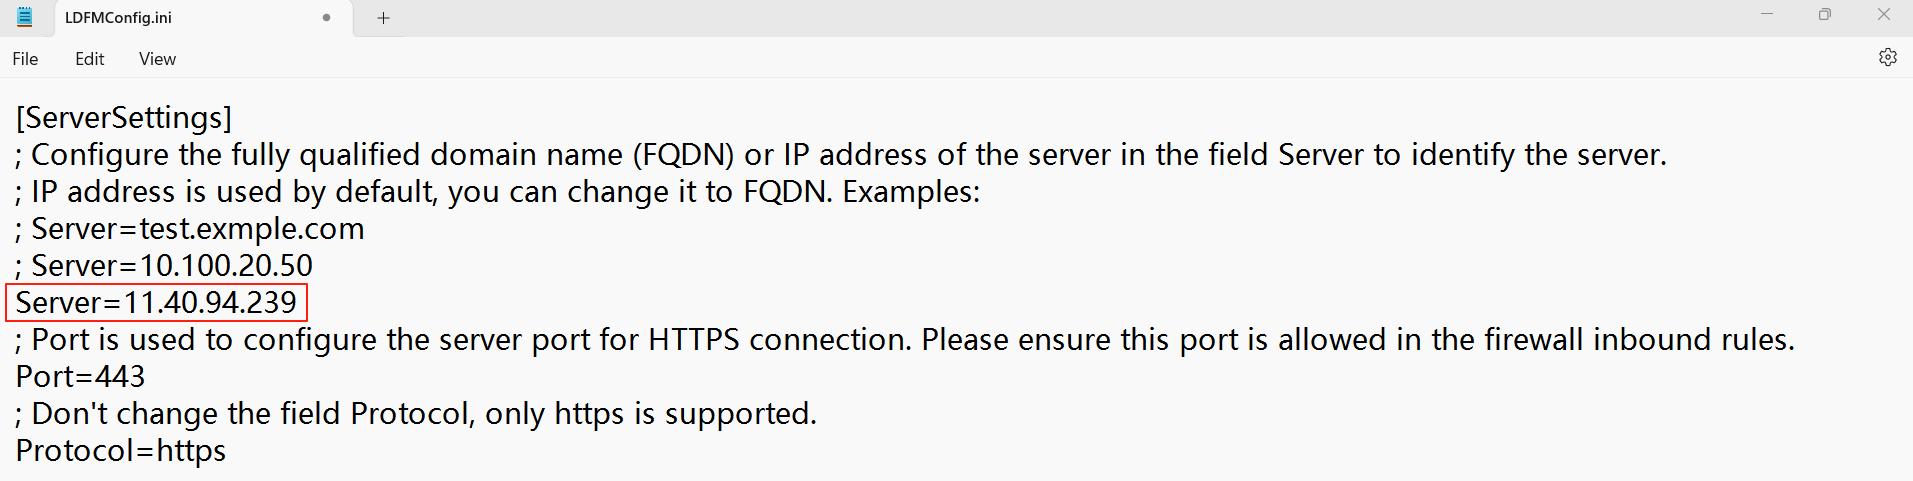
After the installation is completed, an LDFMConfig.ini file will be generated in the same path as LDFMServerSetup.exe. This file will be used during the installation of the LDFMClient.
If you need to modify the IP address and port number, double-click the "LDFMConfig.ini" file, make the necessary modifications and save them.
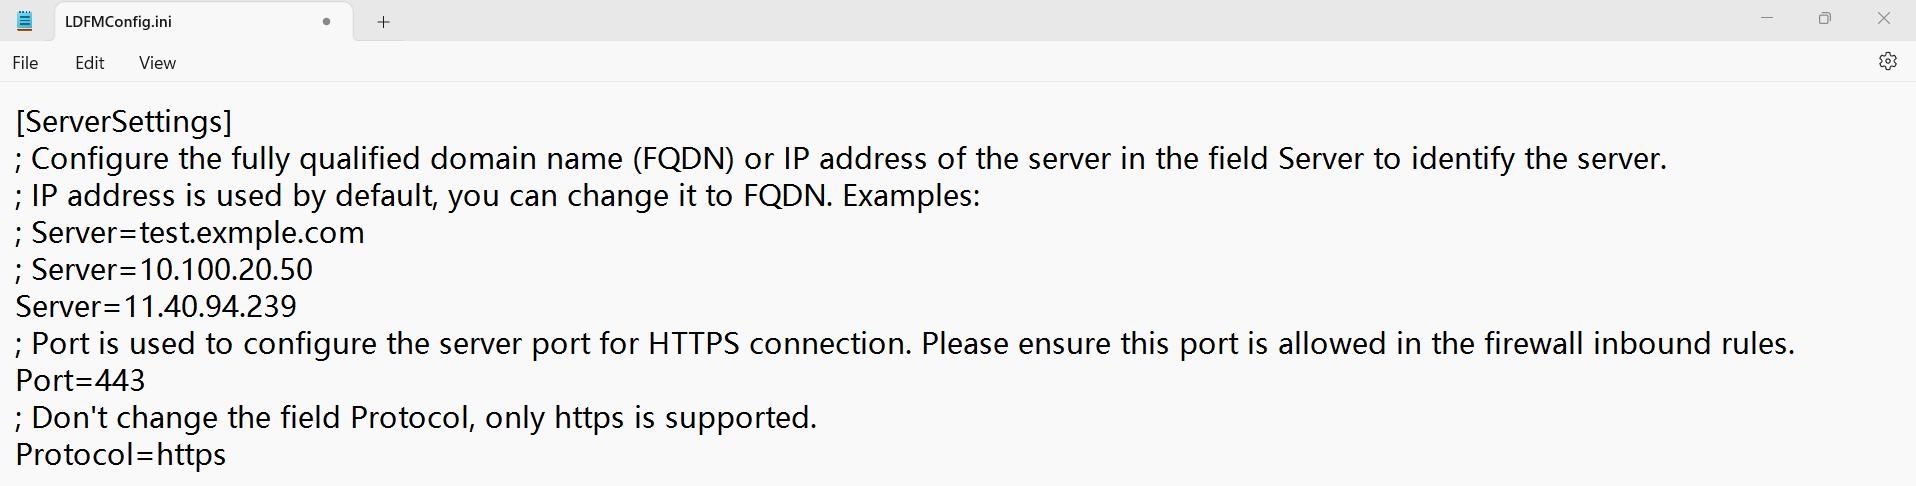
If you need to configure a domain name, replace the IP address with the domain name, then save the changes.
3.4 Uninstall the Service
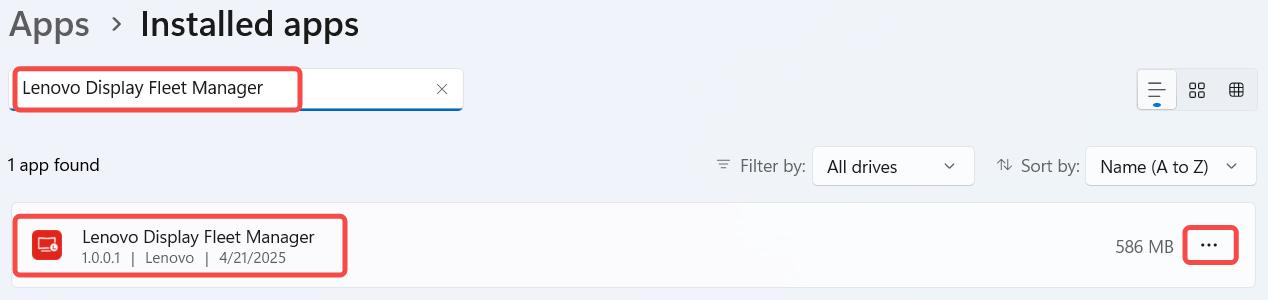
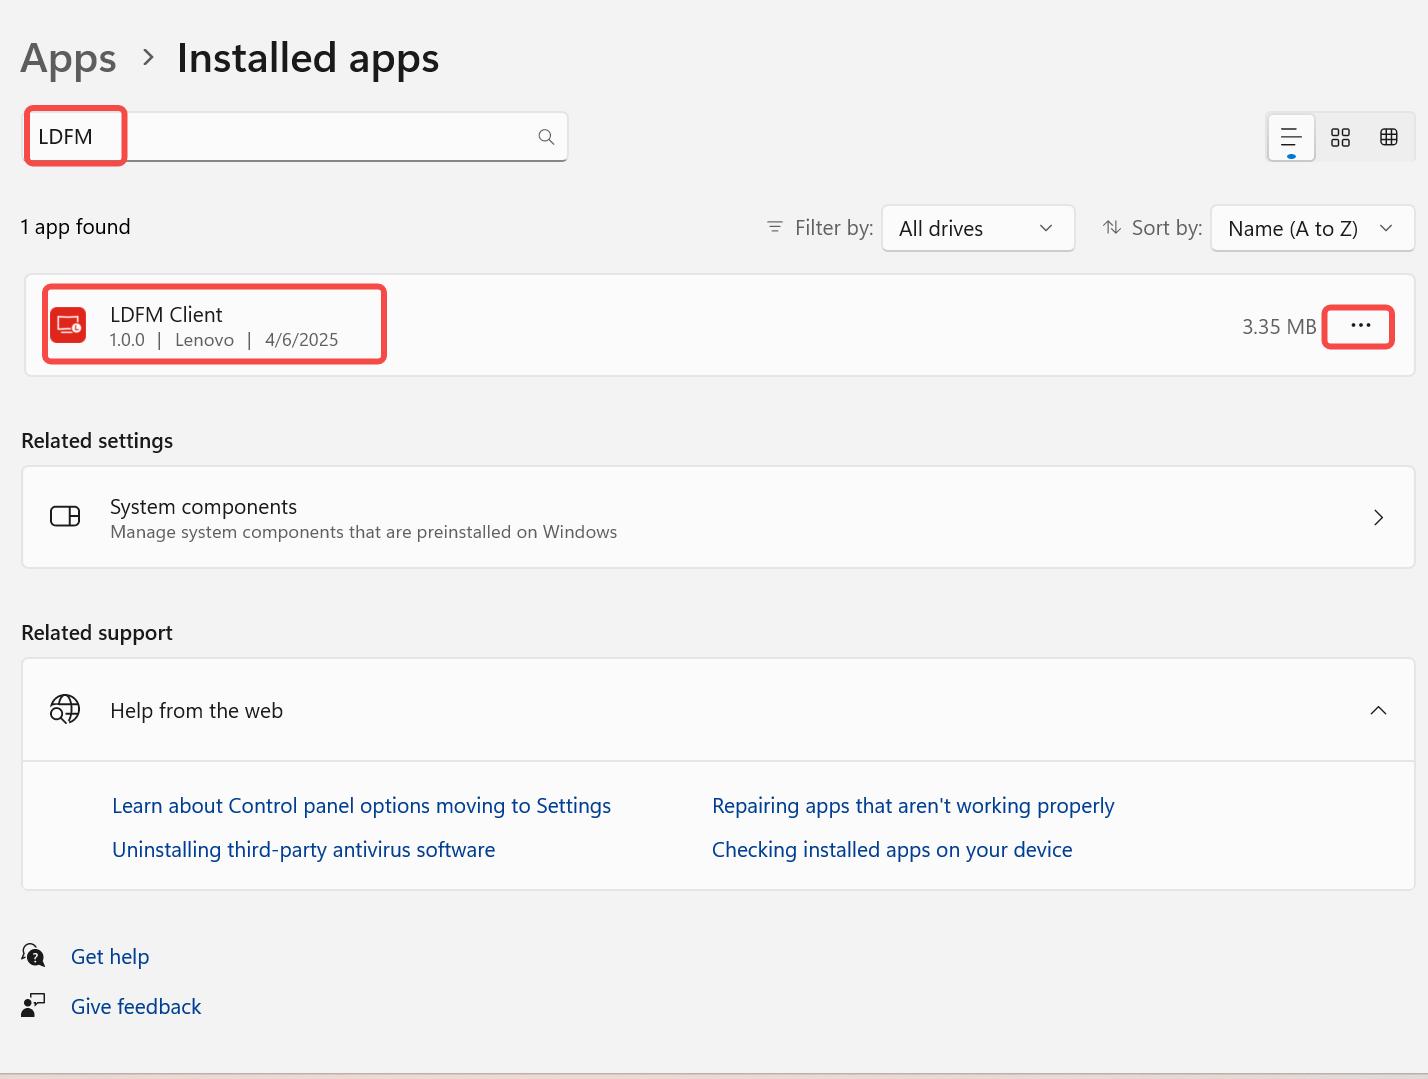
Go to Settings > Apps > Installed apps, find "Lenovo Display Fleet Manager", click on the "..." button, and then click "Uninstall".
3.5 Tips
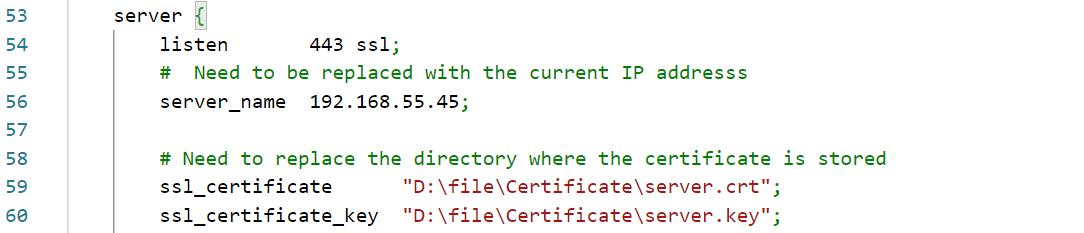
The front - end service of LDFMServer depends on nginx. By default, nginx uses port 80. If there is software running on port 80 on the current server, you need to modify the port configuration of nginx and then restart the LDFM service. The following is the method to modify the nginx port configuration.
Open the directory where nginx is located:
C:\Program Files\Lenovo\Lenovo Display Fleet Manager\nginx\nginx-1.26.2\conf
Then modify the nginx.conf file and set port 80 to another available port, for example, 9300.
After modification:
After saving, restart LDFMServer. Double-click "Lenovo Display Fleet Manager" in the Windows Start menu. Then open a browser, enter "http://localhost:9300/" and press Enter. You can then access the management page.
4. LDFM Client Installation Process
4.1. Installation Process on This Local Machine (Windows)
4.1.1. Installation Preparation
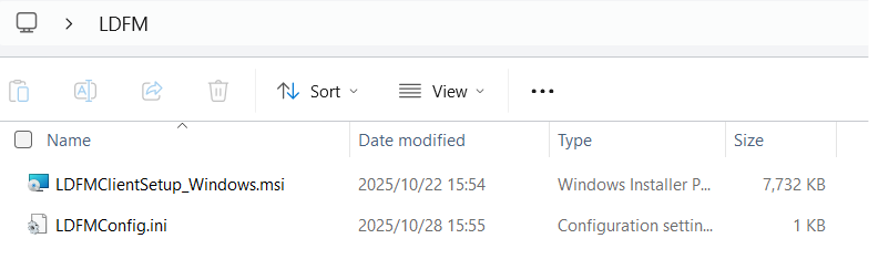
Copy the LDFMConfig.ini file generated during the server
installation to
the same directory as LDFMClientSetup.msi.
In the path
C:\Program Files\Lenovo\Lenovo Display Fleet Manager\Certificate,
copy your server.crt and the server.key which you have prepared in advance, to
ensure HTTPS is available. If the certificate is not in the above two file
formats or you may want to change the certificate's storage path, refer to 6. HTTPS Certificate
Configuration.
Double-click the .crt certificate and copy the fingerprint information from the details.

Copy the fingerprint information of the .crt certificate into the
LDFMConfig.ini
file and save the changes. You need to replace the fingerprint information in
the following two places: 1. The .ini file generated by LDFMServer 2. The .ini
file at this path:
C:\Program Files (x86)\Lenovo\LDFM Client


4.1.2. Run the installation program
Double-click to run LDFMClientSetup.msi.
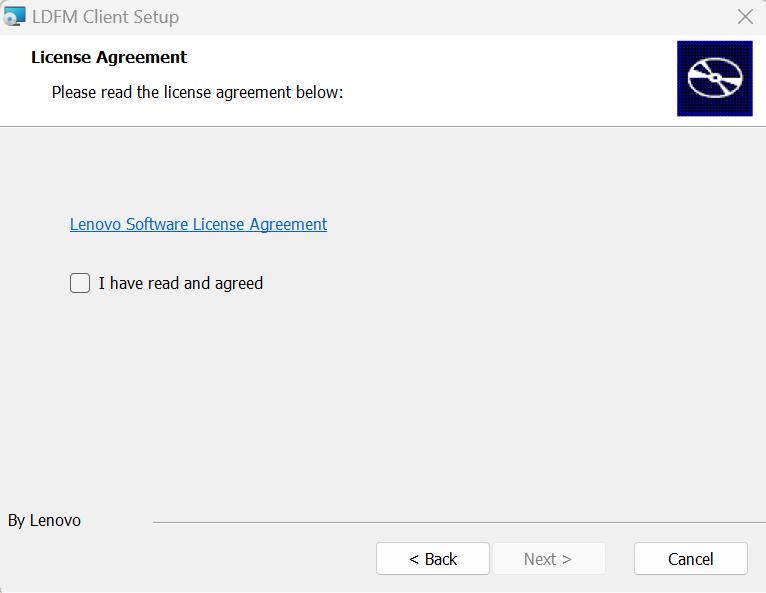
On the license agreement interface, carefully read "Lenovo Software License Agreement". After confirming that you have fully understood the content of the agreement, check the box labeled "I have read and agree", and then click "Next" to proceed with the subsequent installation process.
4.1.3. Configure Server Parameters
The Server Address and Server Port will be automatically retrieved from the
config.ini file.
4.1.4. Start the installation
After confirming that you're ready, click the "Install" button. At this time, the installation progress bar will show the installation process.
Before the installation, the system will request administrative privileges.
Please click "Yes" to continue the installation.
4.1.5. Installation Completed
Installation complete. Click "Finish" to exit.
4.2. Installation Process on This Local Machine (MacOS)
4.2.1. Installation Preparation
Unzip the LDFMClientService.zip file to obtain the root directory of
the installation package, which contains the LDFMClient.pkg
file.
Place the LDFMConfig.mobileconfig file generated during the
installation of LDFMServer in this directory.
Copy your server.crt and the server.key to the path
C:\Program Files\Lenovo\Lenovo Display Fleet Manager\Certificate,
which you have prepared in advance, to ensure HTTPS is available.
IIf the certificate is not in the above two file formats or you may want to change the certificate's storage path, refer to 6. HTTPS Certificate Configuration..
Double-click the .crt certificate and copy the fingerprint information from the Details tab.

Copy the fingerprint information of the .crt certificate into the
LDFMConfig.mobileconfig file and save it after replacing.
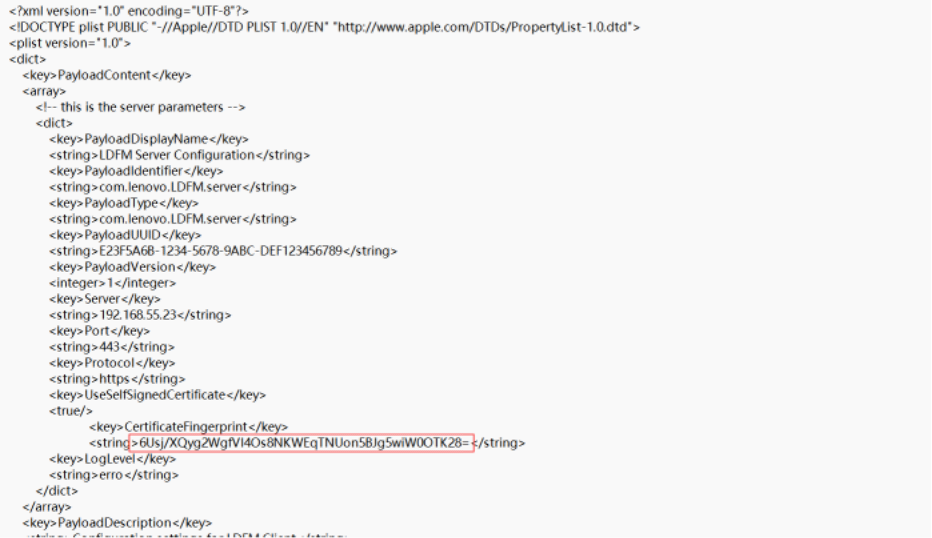
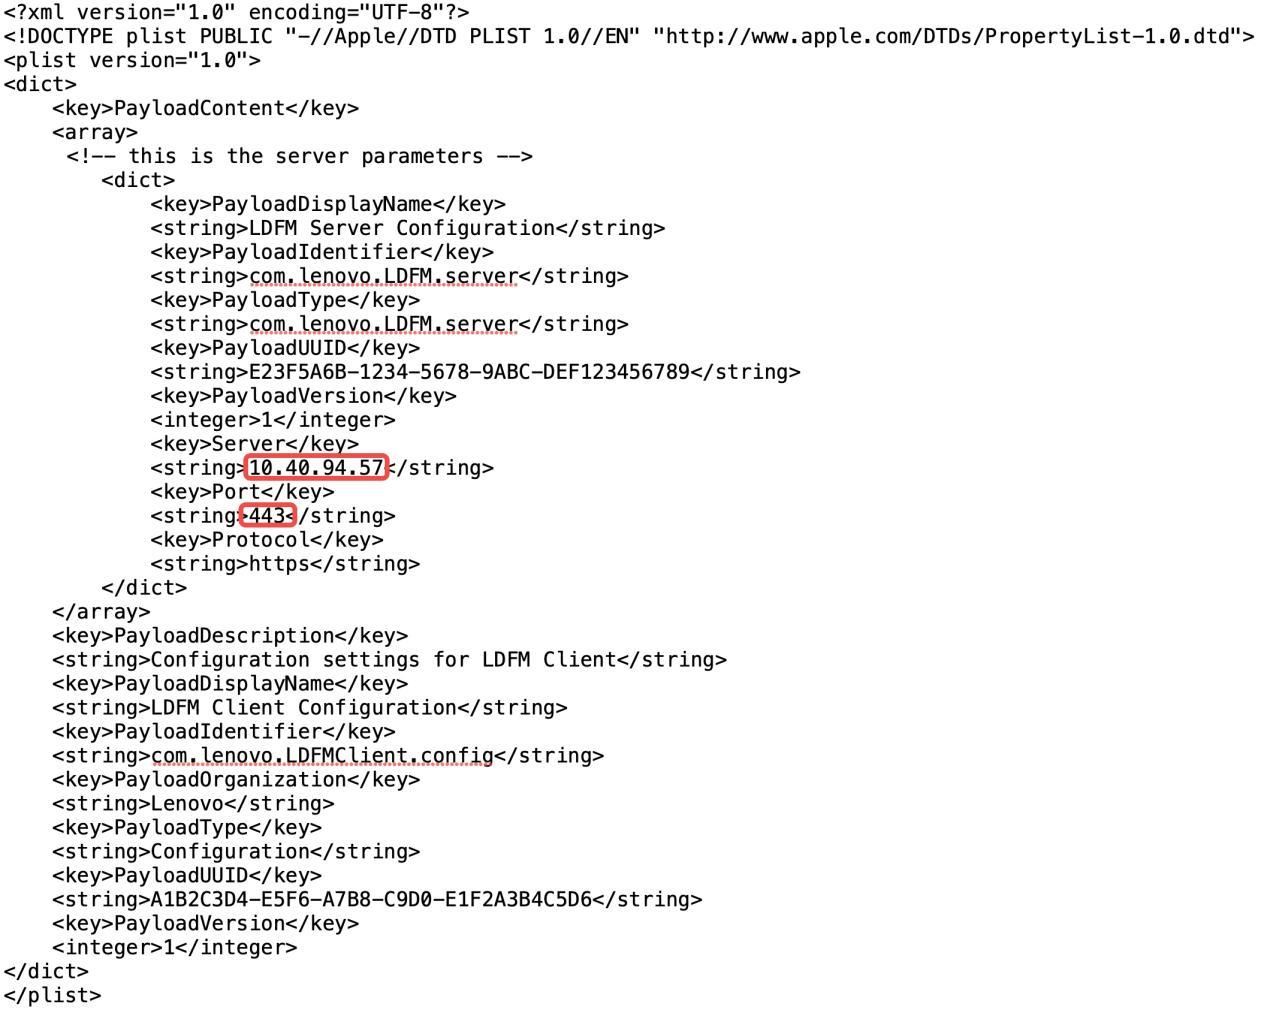
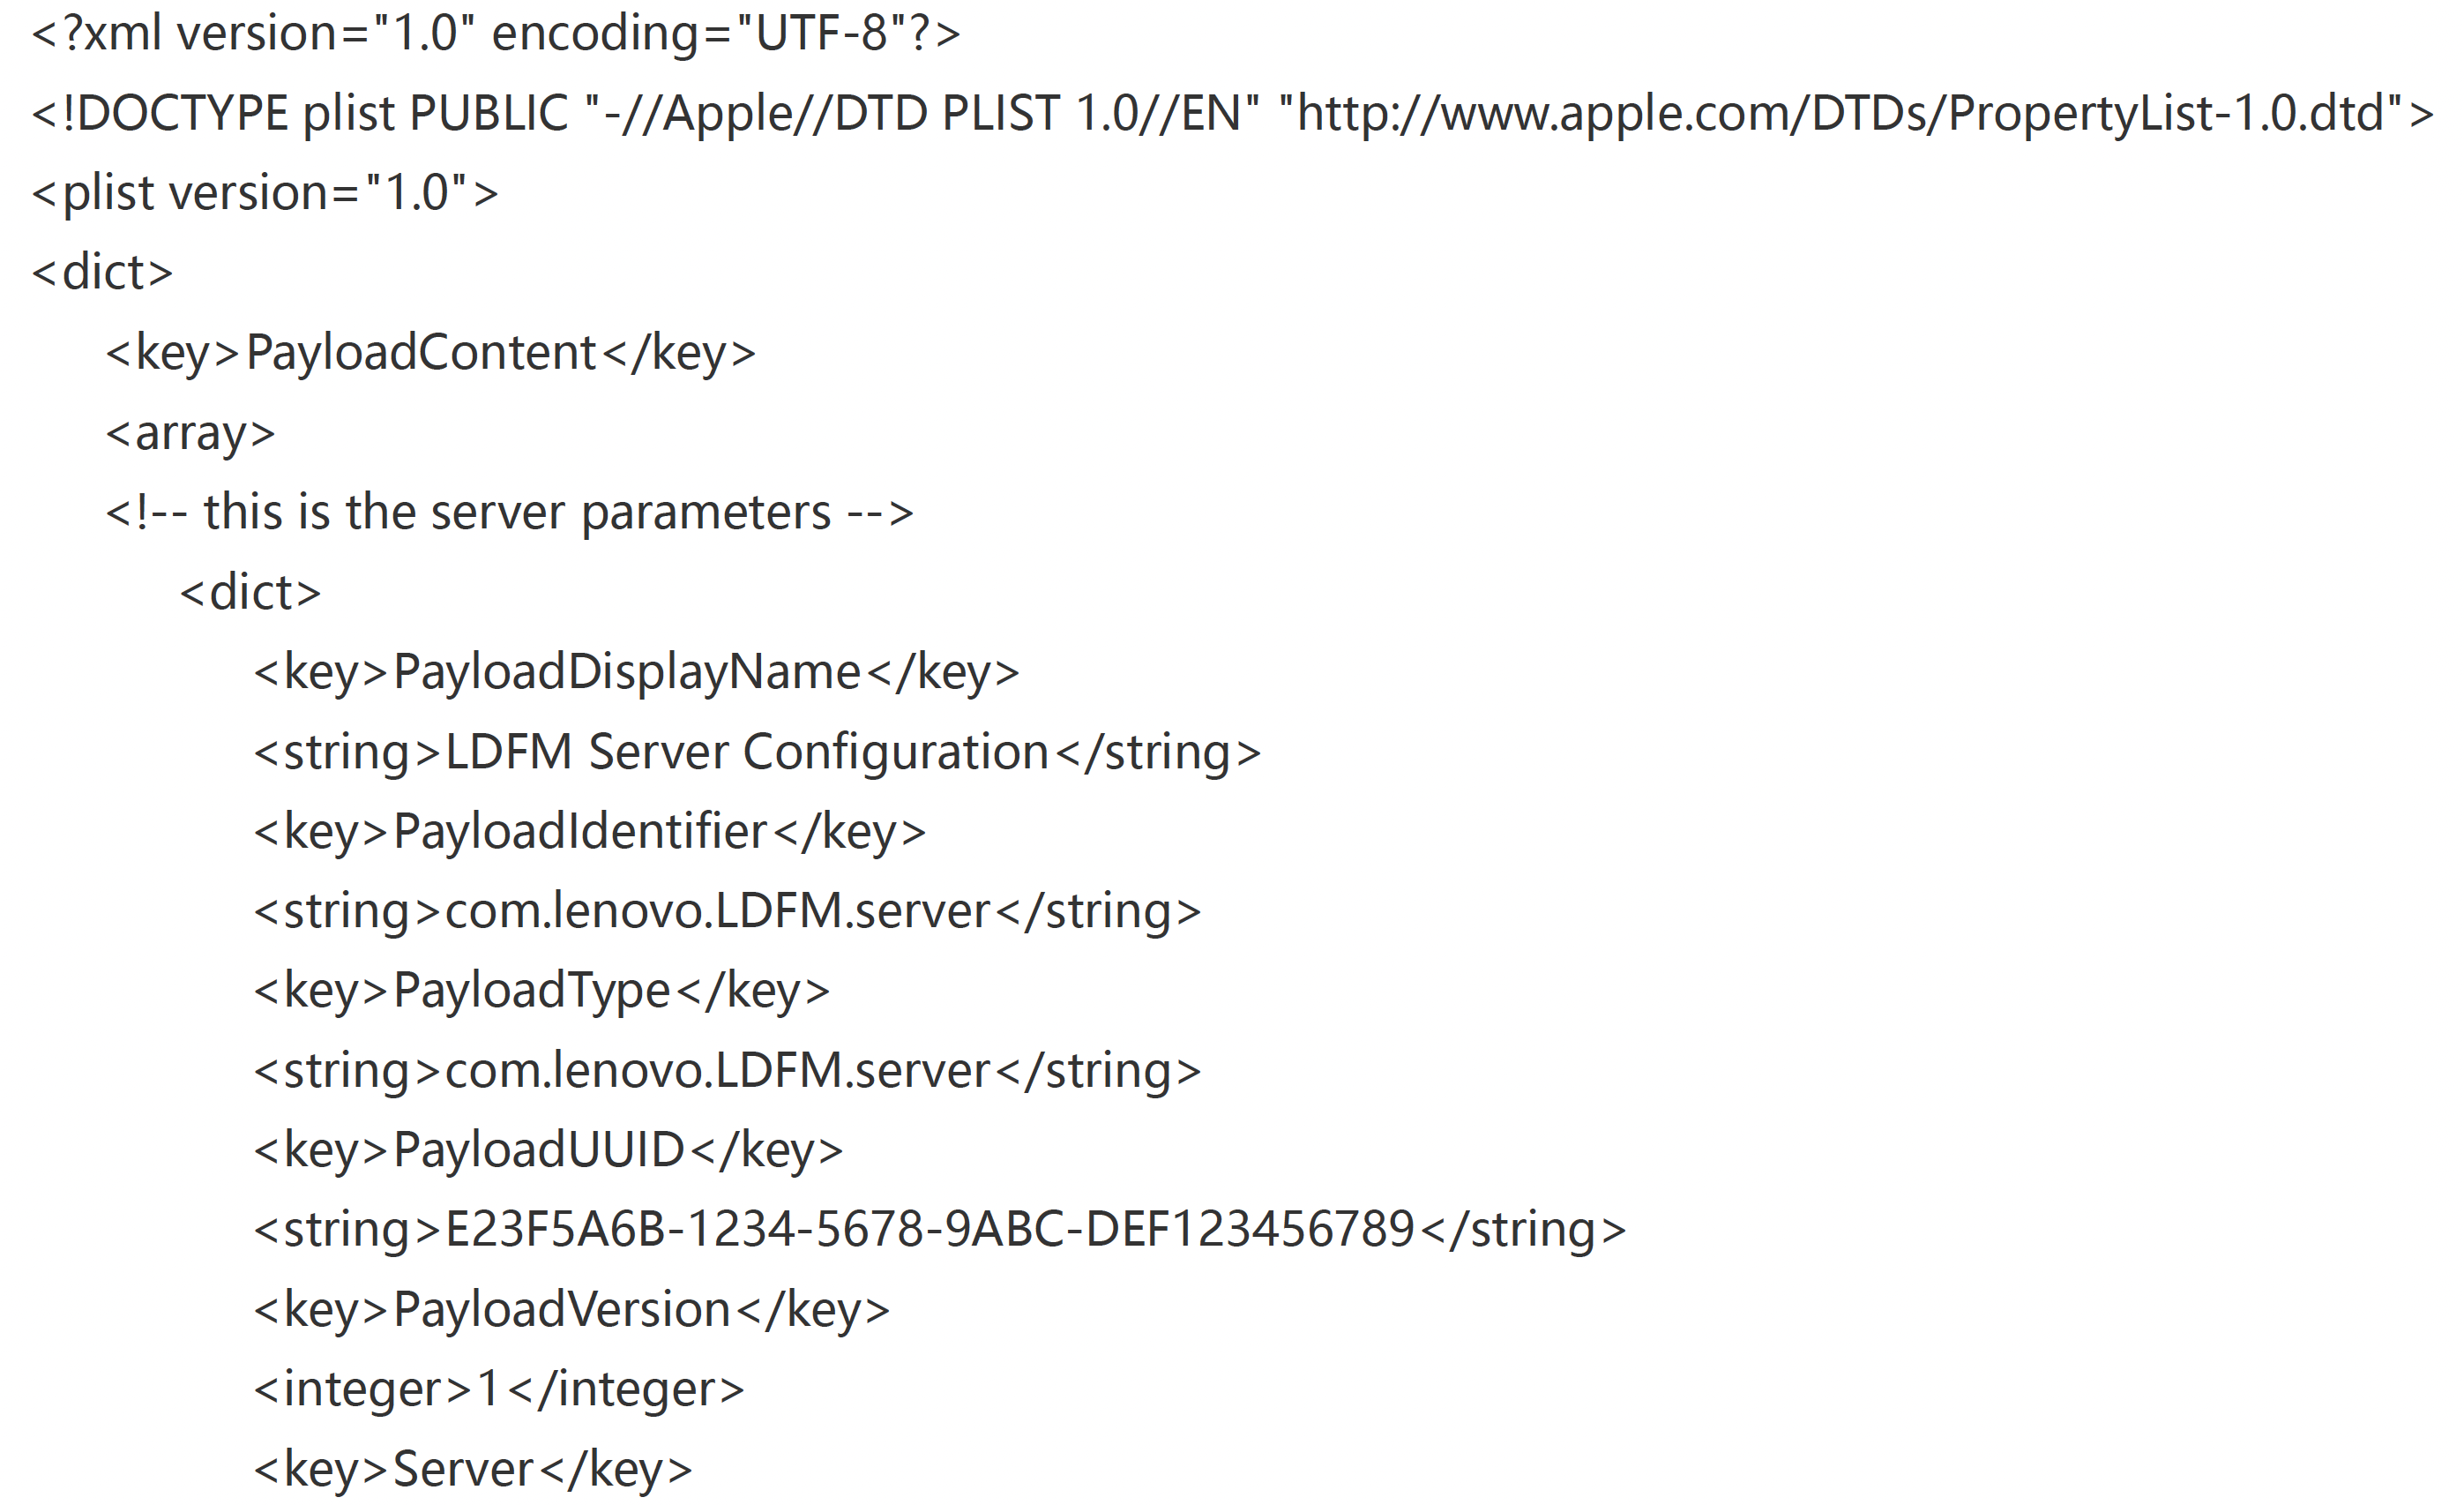
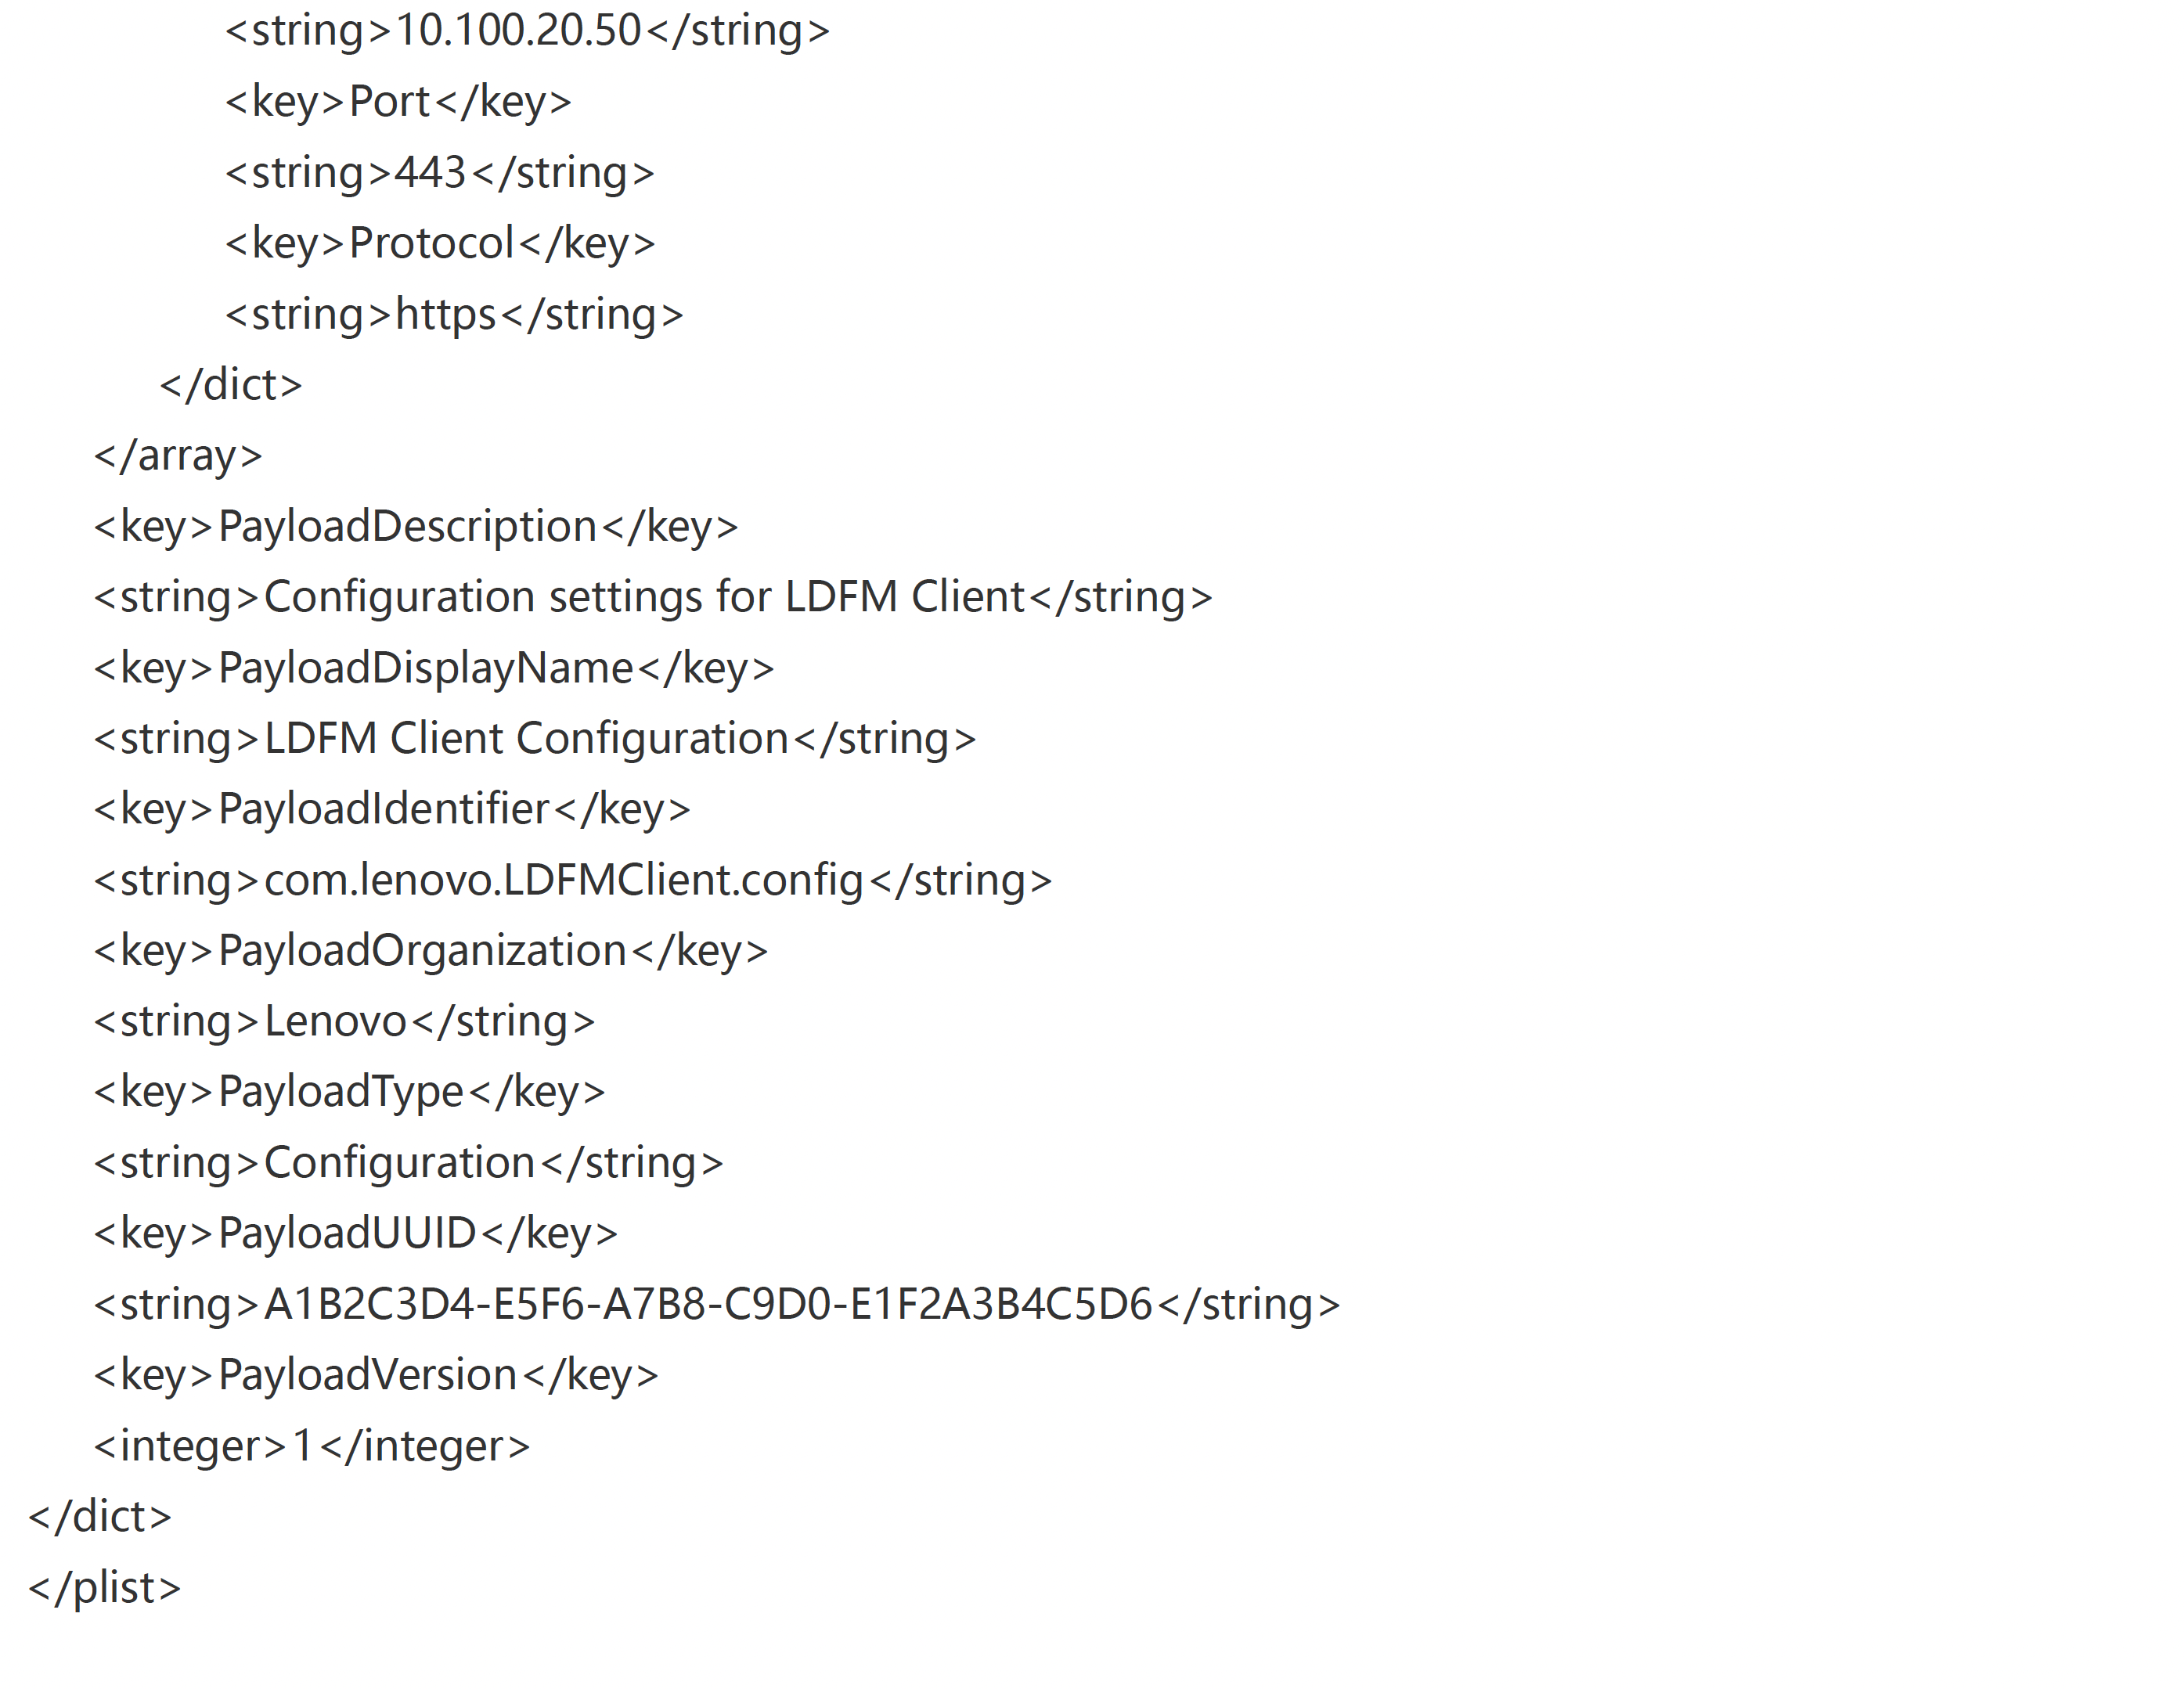
4.2.2. Parameter Configuration
If you need to modify the server address and port information, you can edit the
LDFMConfig.mobileconfig file.
The content of the file is as shown in the figure:
4.2.3. Installer
Double-click the LDFMClient.pkg file to start the
installation.
If the following prompt appears, open System Settings, find Privacy & Security,
click
"Open Anyway", and enter the local machine password.
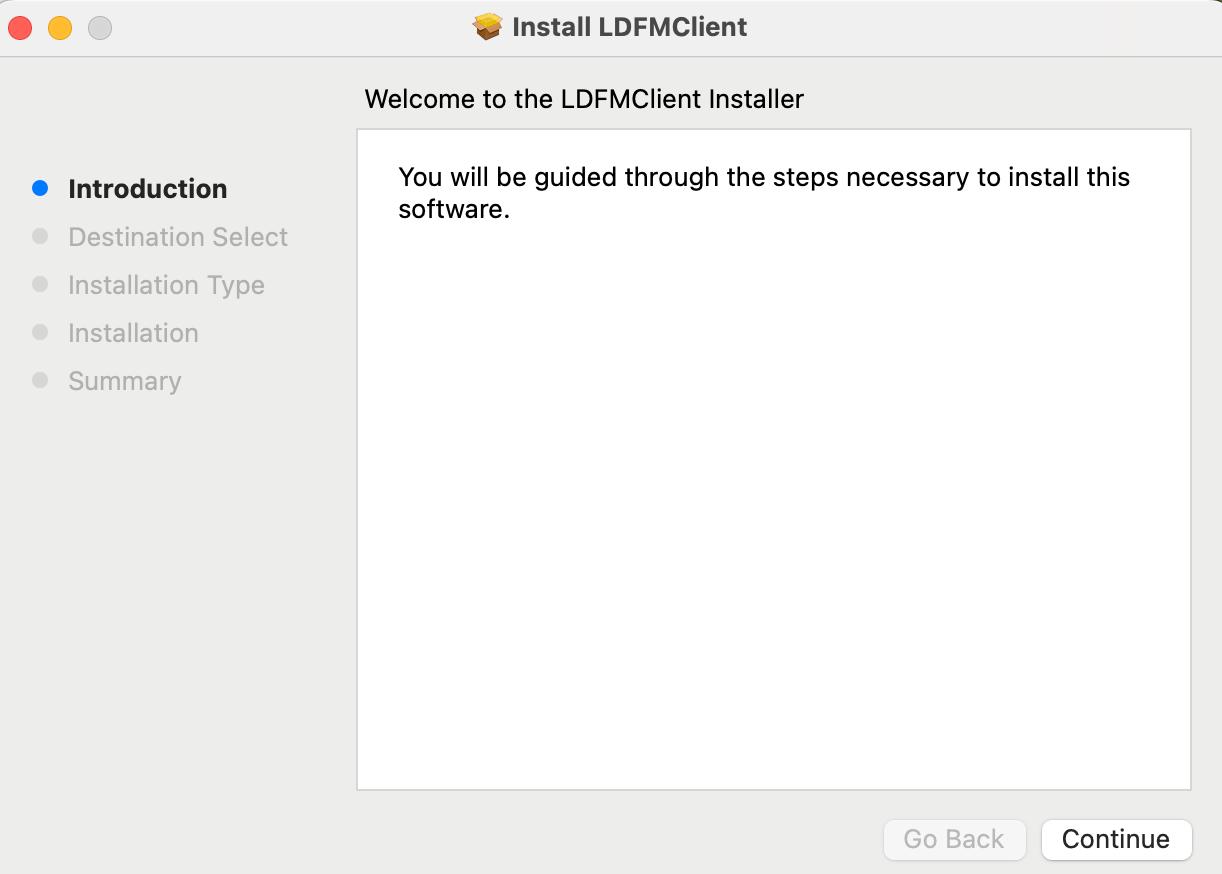
The LDFMClient installation interface will pop up. After reading through it,
click
"Continue".
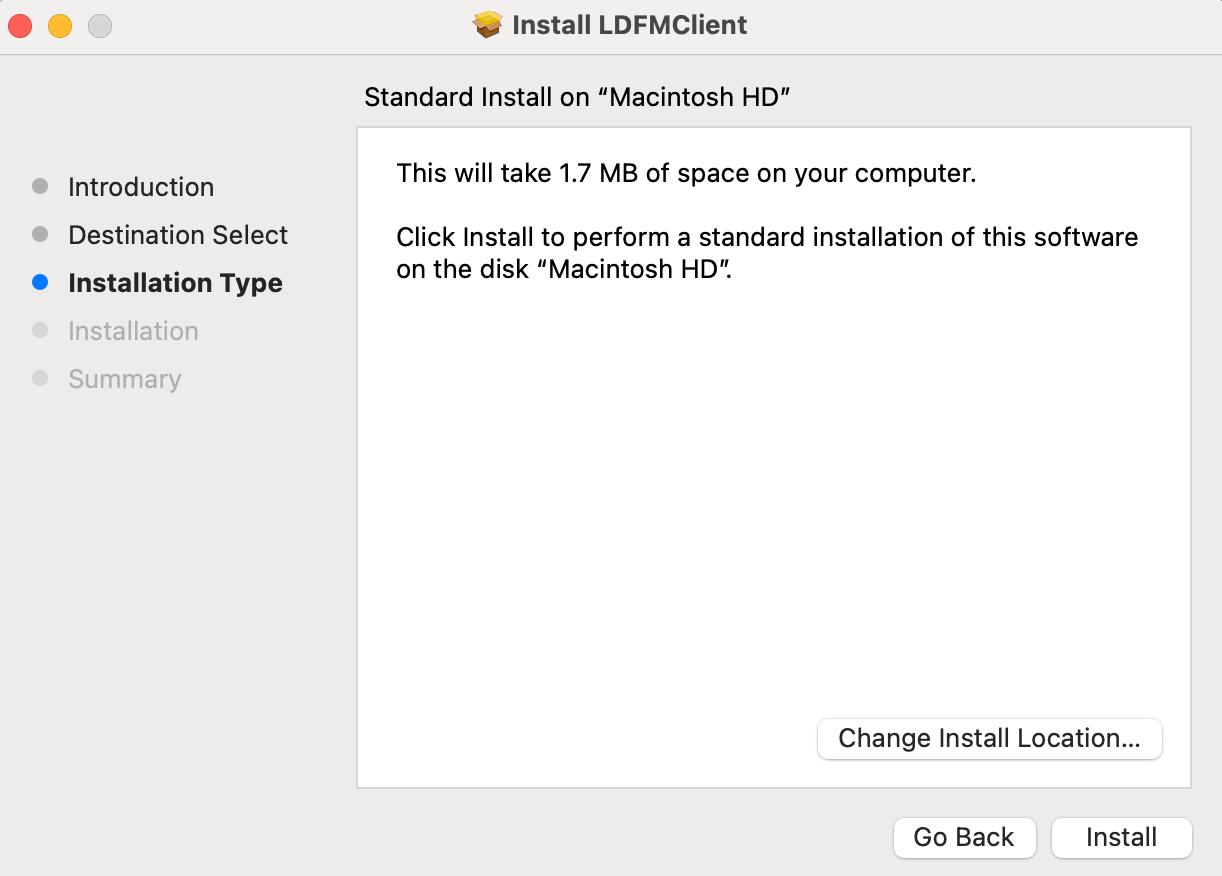
Choose an installation location or use the default one, click "Install", and then you need to enter the local machine password to proceed with the installation.
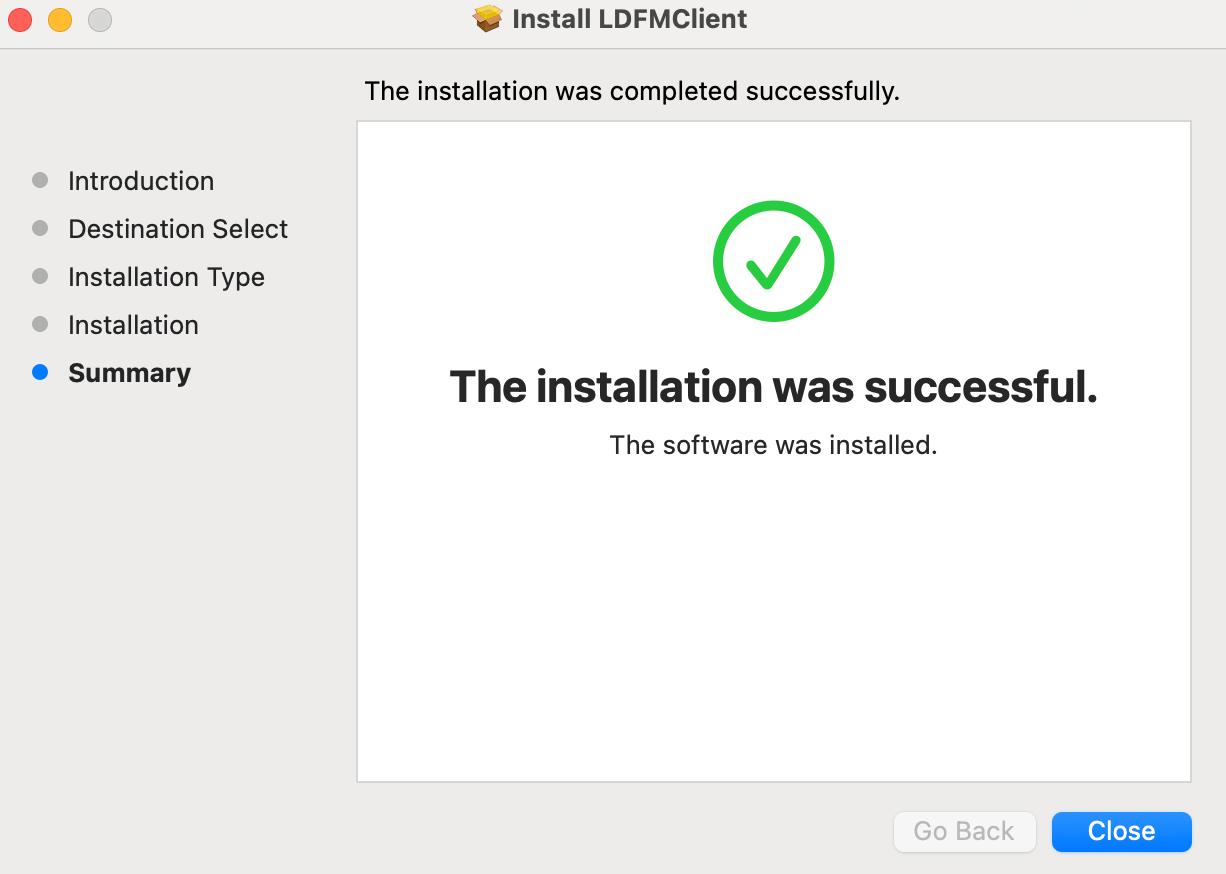
Once the installation progress is complete, the installation will be successful.
Double-click the LDFMConfig.mobileconfig file, then find the profile in Settings to install it.
4.3. Installation Process via SCCM (Windows)
4.3.1. Package Deployment
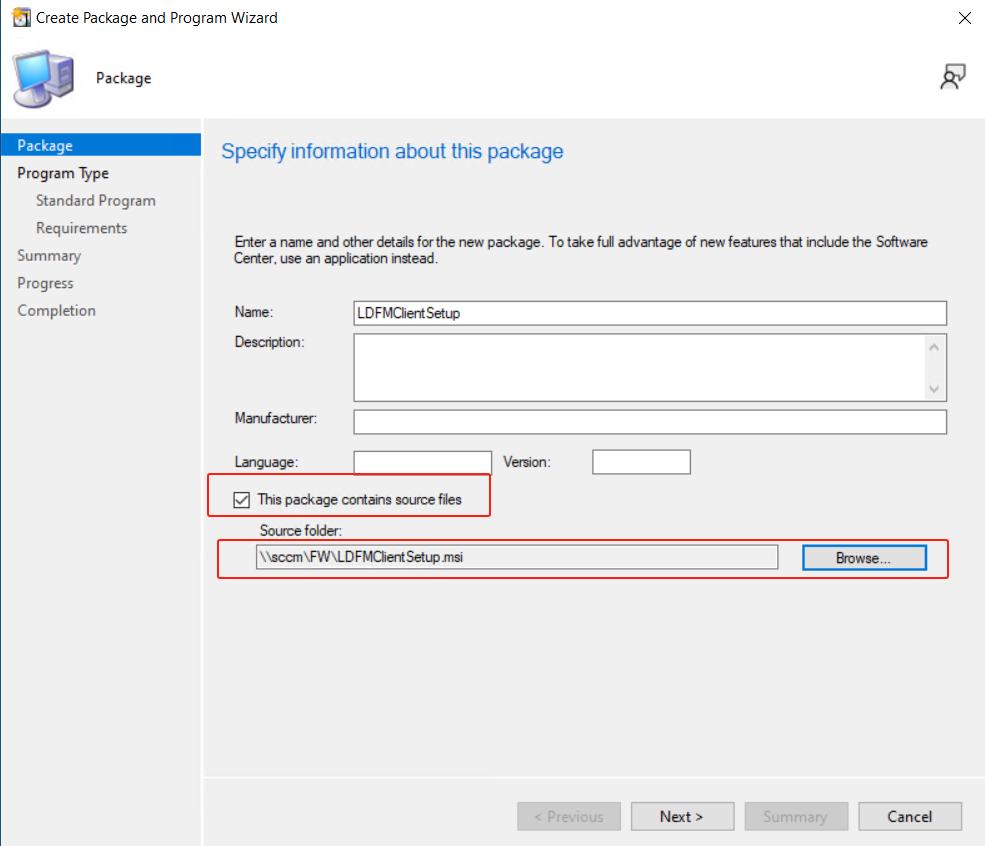
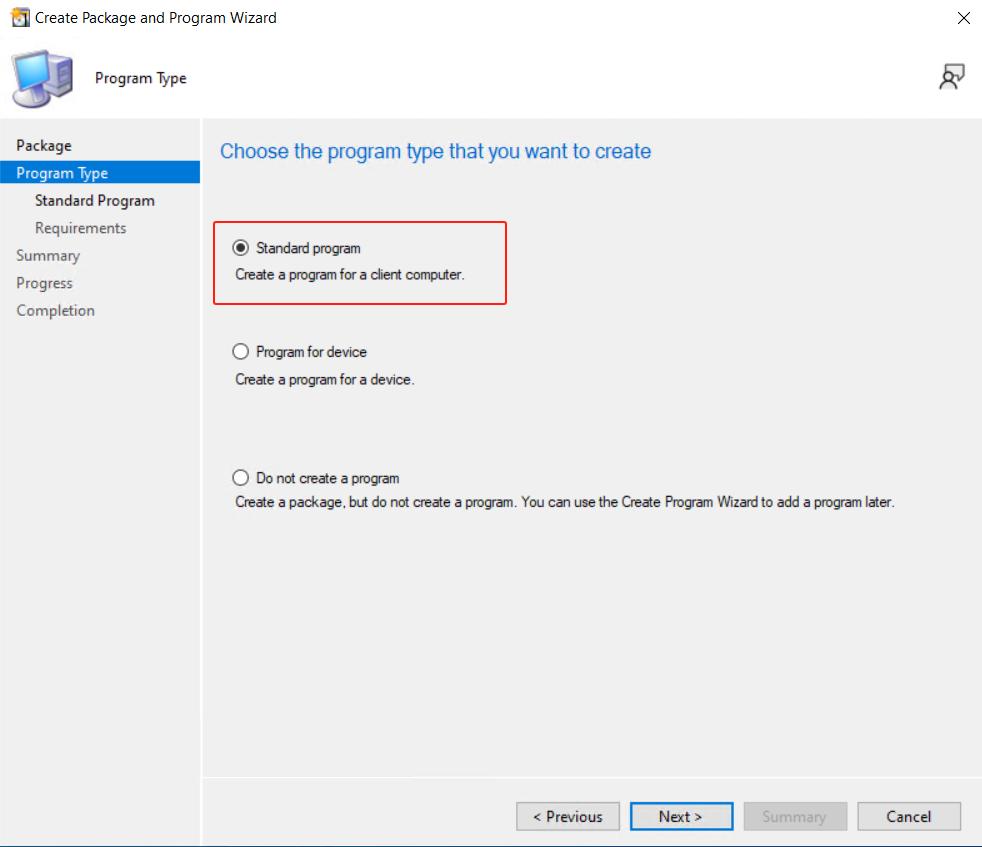
In the Software Library, navigate to Overview > Application Management > Packages, right-click, and select Create Package.
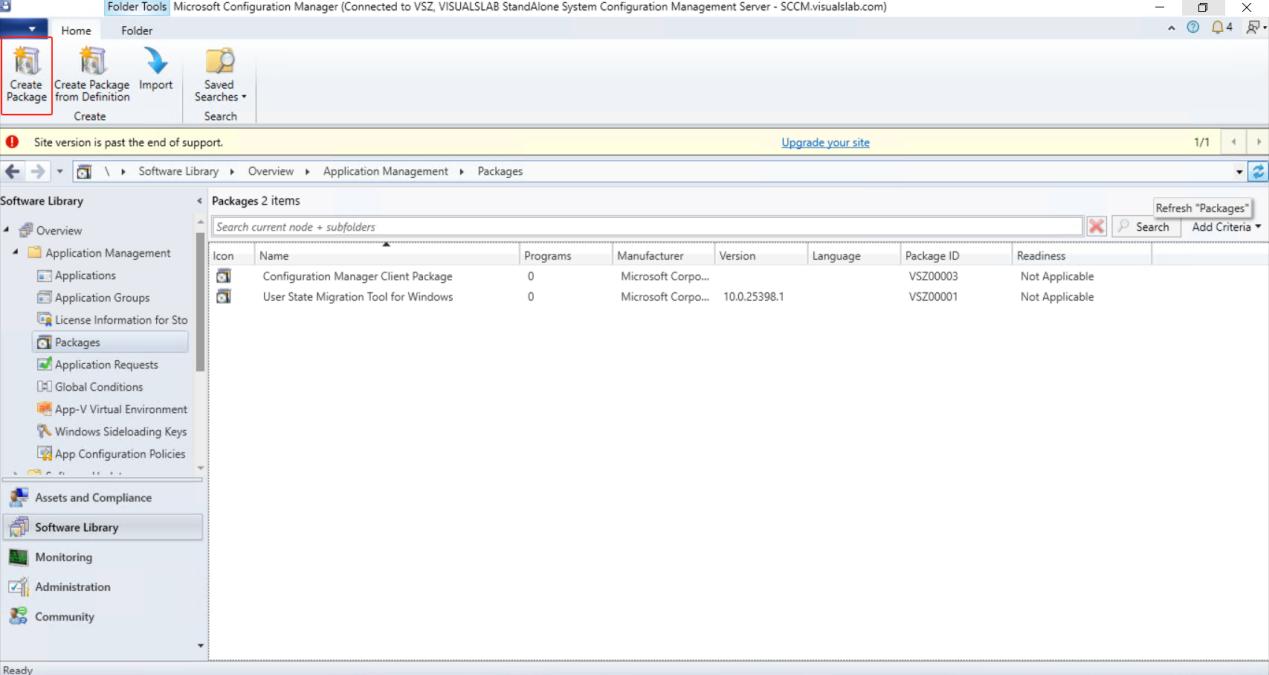
Check This package contains source files, then specify the
actual network path (e.g., \\sccm\gx\ldfm\LDFMClientSetup.msi).
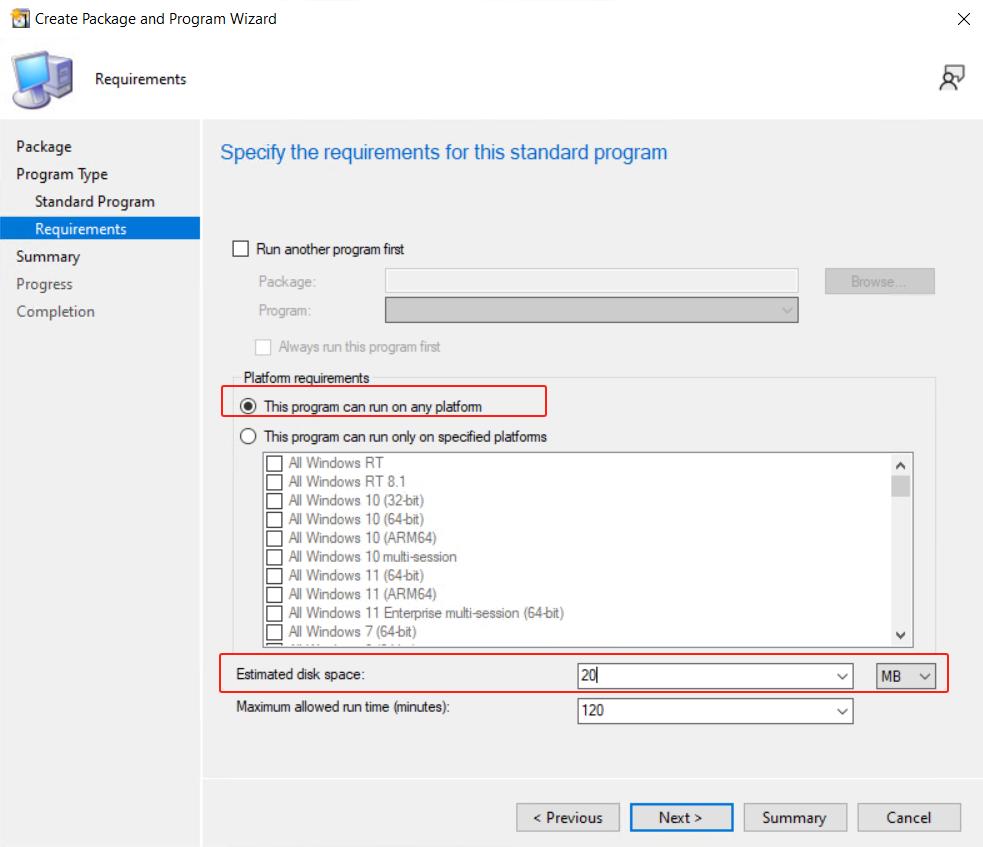
Execute the following command to initiate the installation:
msiexec /i LDFMClientSetup.msi /qn IP="124.205.59.39" PORT="443" PROTOCOL="https"
The IP can be an IP address or a domain name.

[Optional]: Entering "Estimated Disk Space" may execute faster than leaving it unknown.

4.3.2. Distribute Content
In the Software Library, navigate to Overview > Application Management > Applications. Select the application that was just created, then right-click and select Distribute Content.
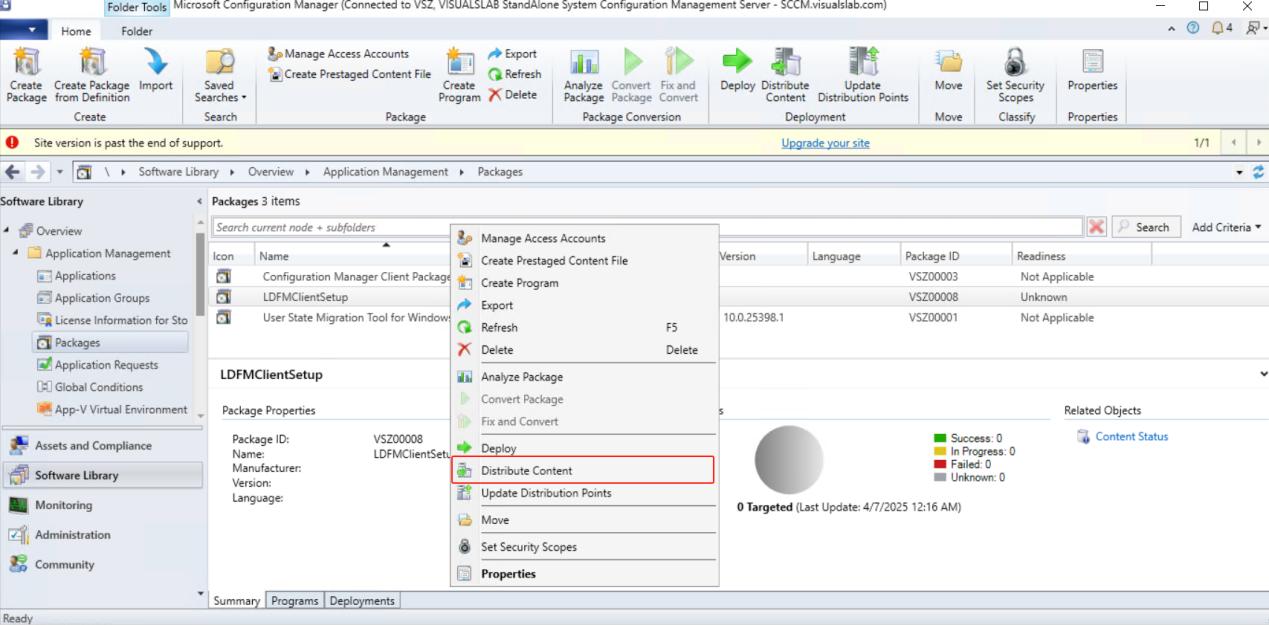
Select Distribution Points.
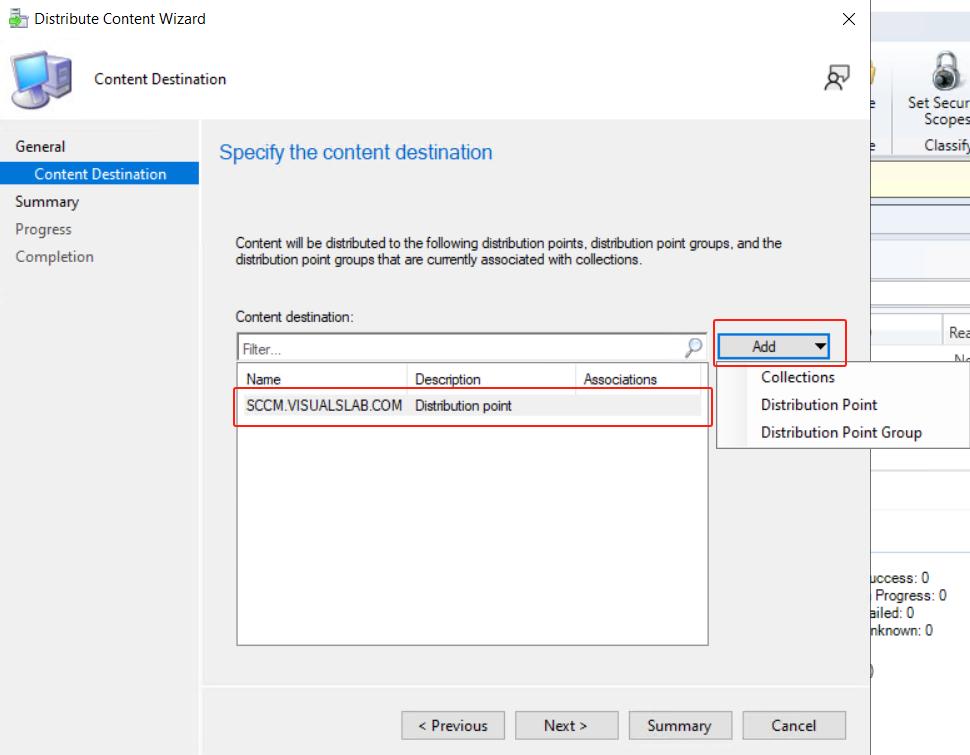
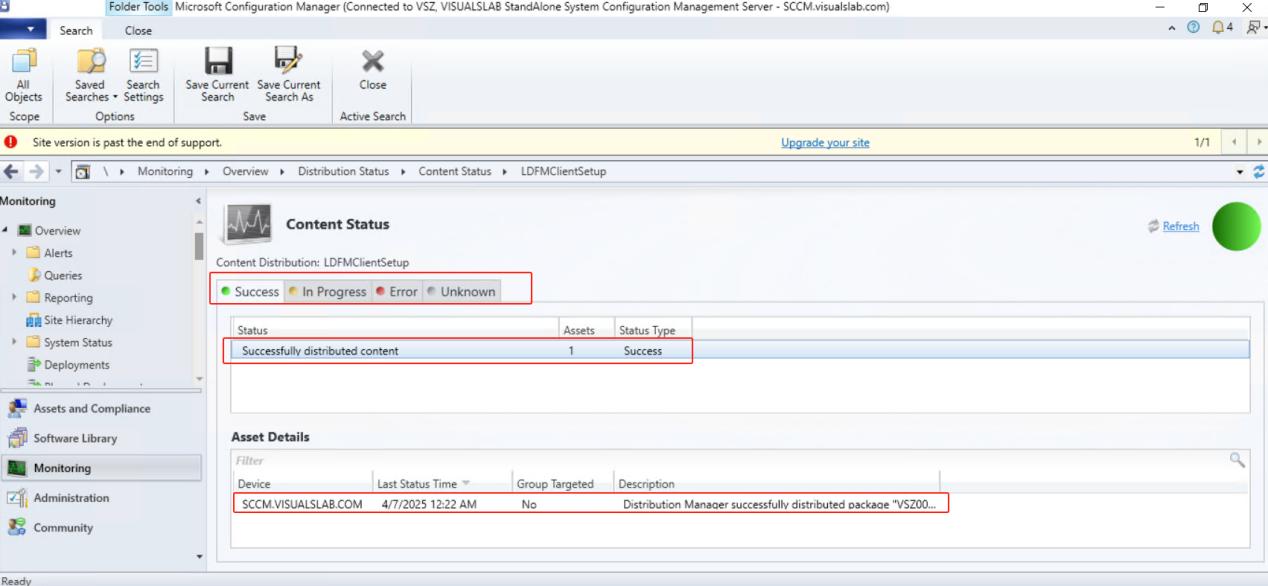
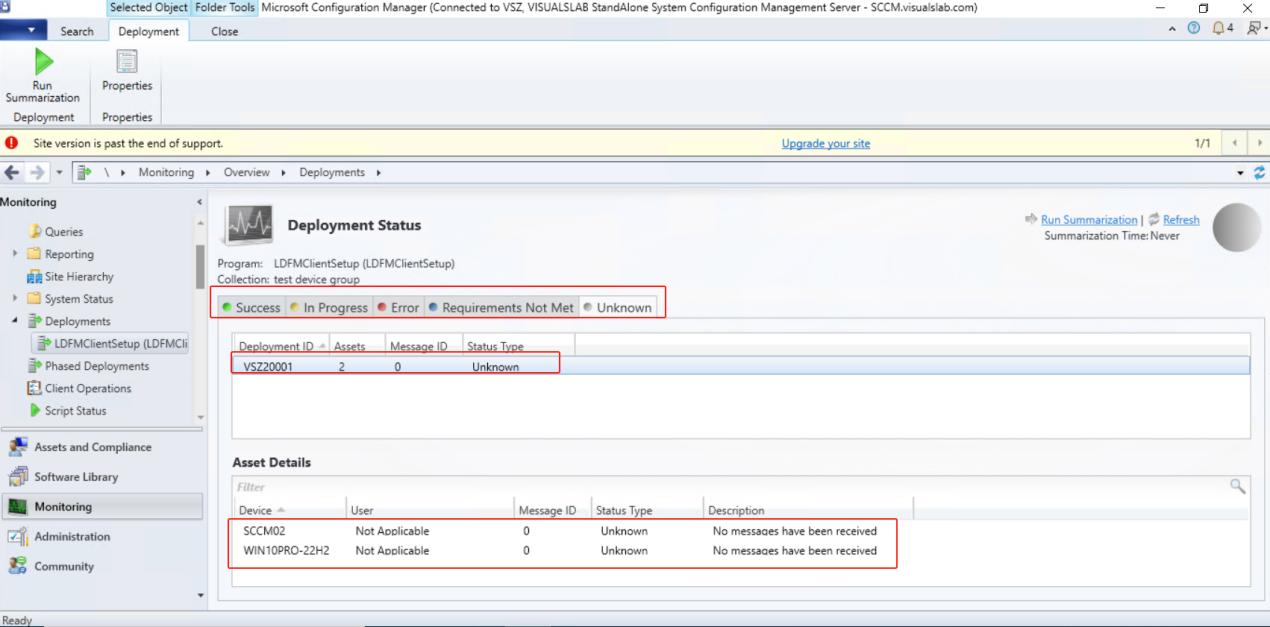
To monitor the distribution, go to Monitoring > Overview > Distribution Status > Content Status. Right-click on the package and select View Status, and wait until the content status changes to Success.
4.3.3. Deployment
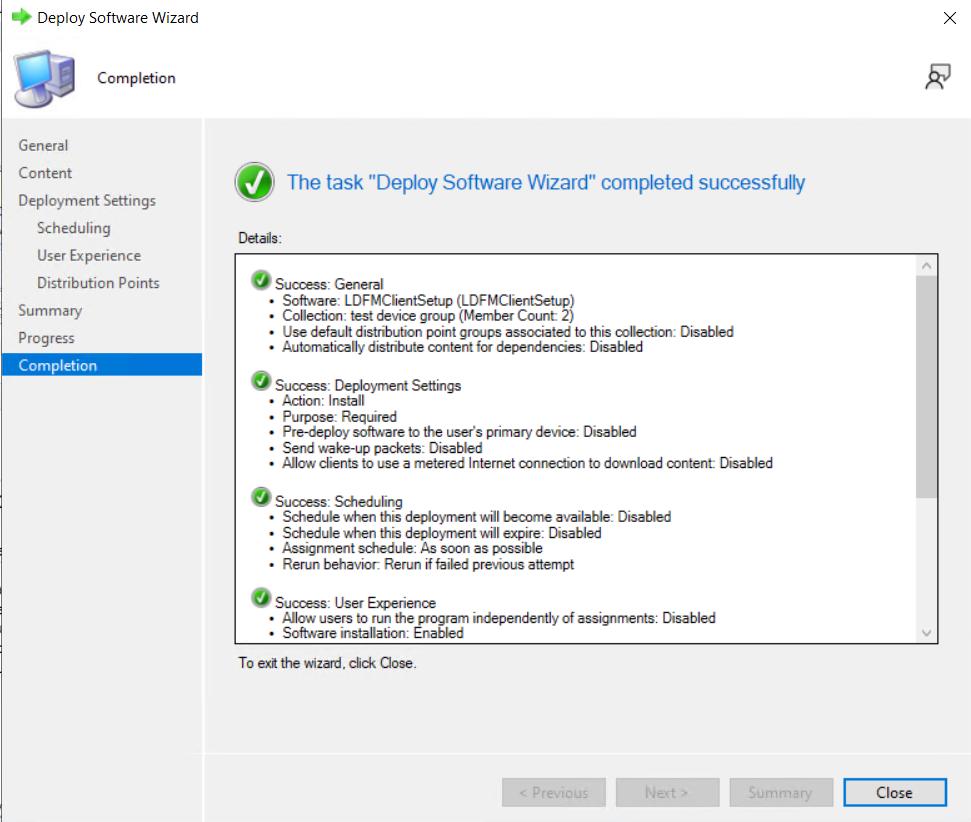
Software Library >Overview > Application Management > Packages. Right-click and select "Deploy".
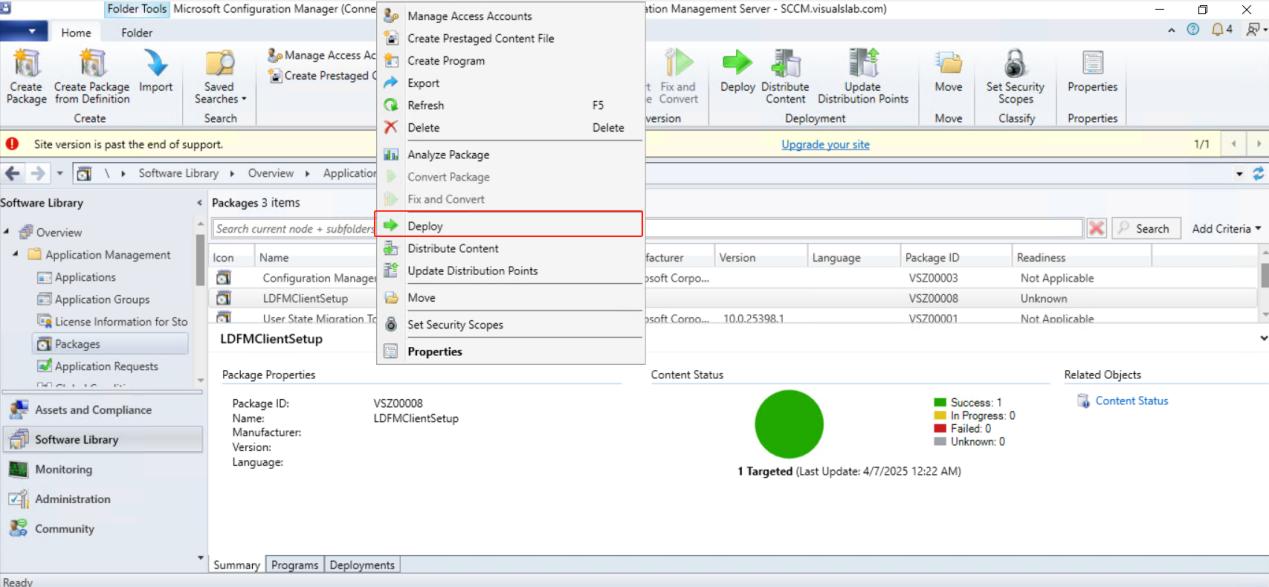
Select the target user/device collection and click Next to proceed with the deployment configuration.
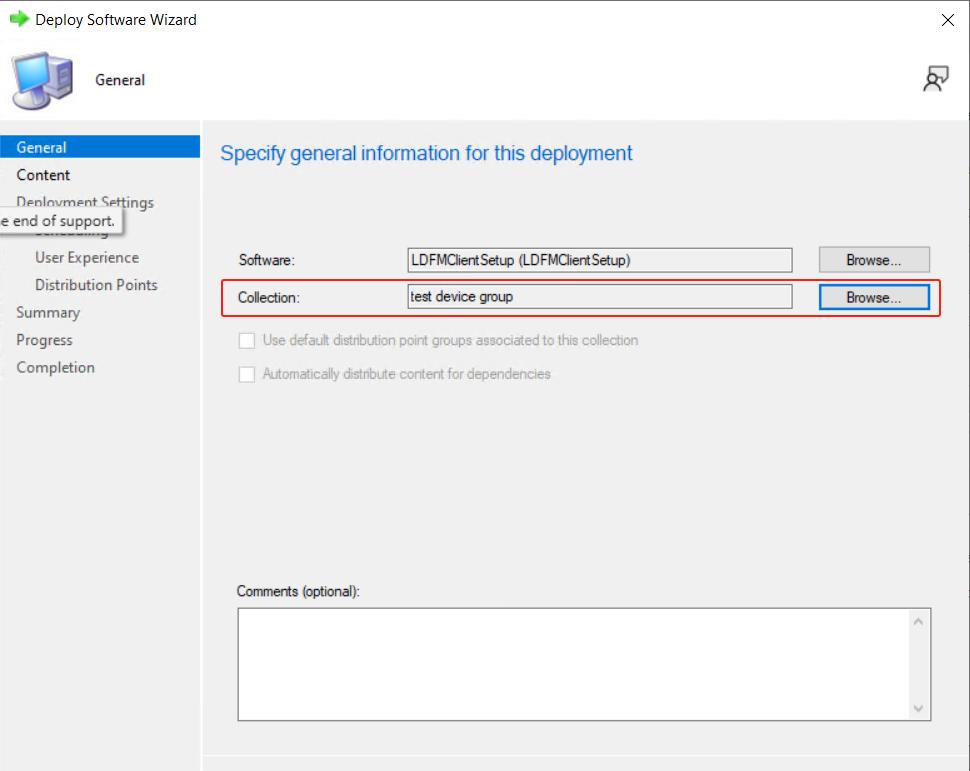
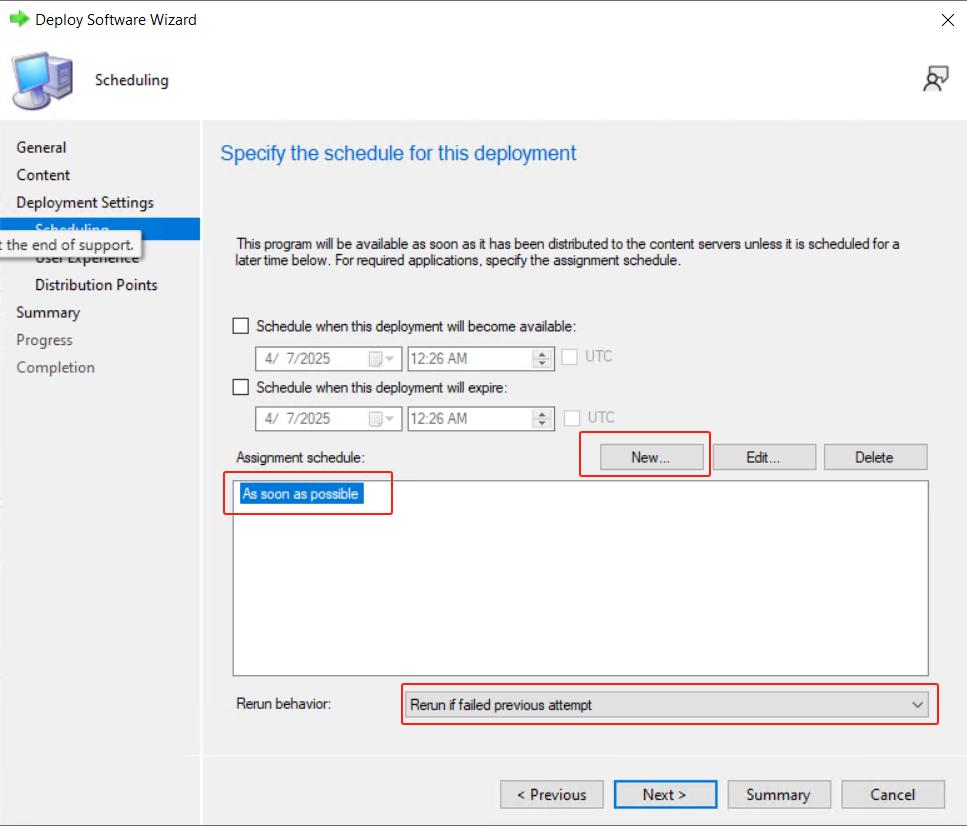
Set the assignment schedule to As soon as possible and select Rerun if failed previous attempt for the rerun behavior.
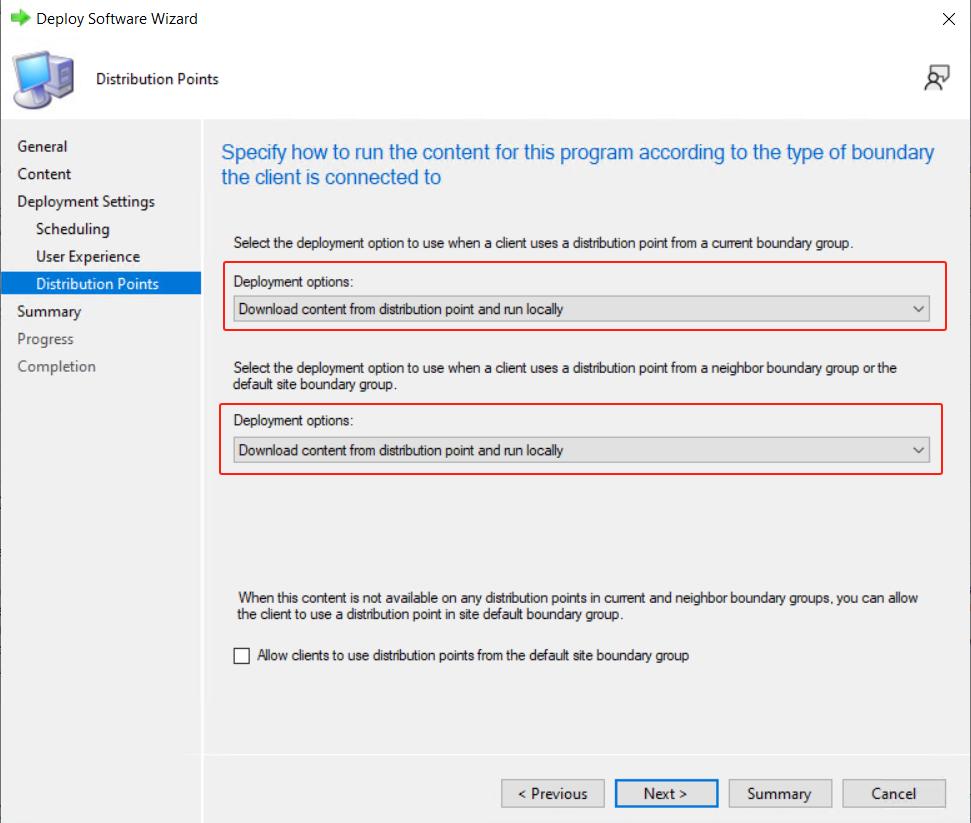
Check Software Installation to download content from the distribution point and run locally.

4.3.4. Deploy Progress Tracking
To monitor the deployment status, navigate to Monitoring > Overview > Deployments. Successful deployments typically transition through 'Unknown' > 'In Progress' > 'Success' states, with detailed progress available in the asset details view.
4.4. Installation Process via InTune (Windows)
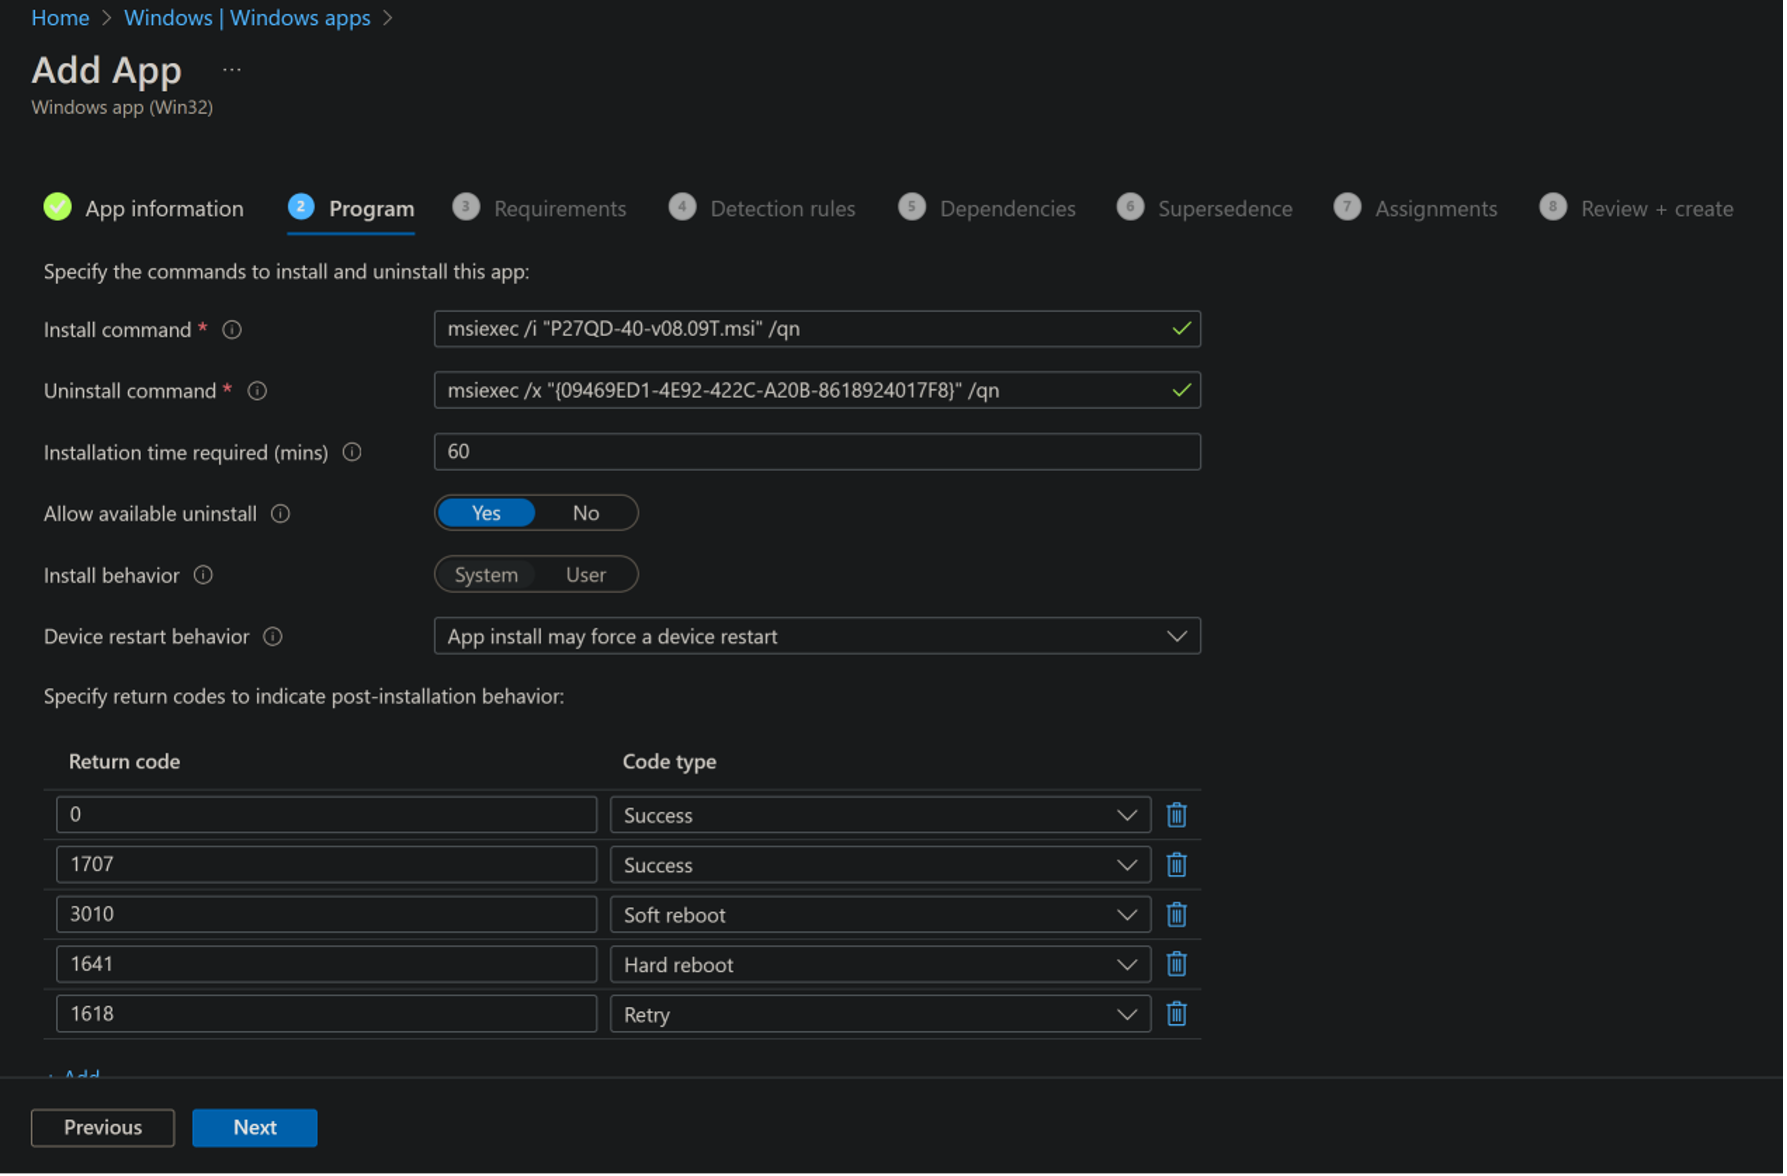
4.4.1 Deliver LDFM FW Upgrade
Create a Windows Application:
In the "App Information" tab, upload the .intunewin file (e.g., "T27QD-40-v11.10T.intunewin") and fill in the relevant information.
Use the default configuration in the "Program" tab:
- The installation command is:
msiexec /i "T27QD-40-v11.10T.msi" /qn - The uninstallation command is:
msiexec /x "{6828A268-4F48-4216-A7BF-C06FAFE6B1C1}" /qn
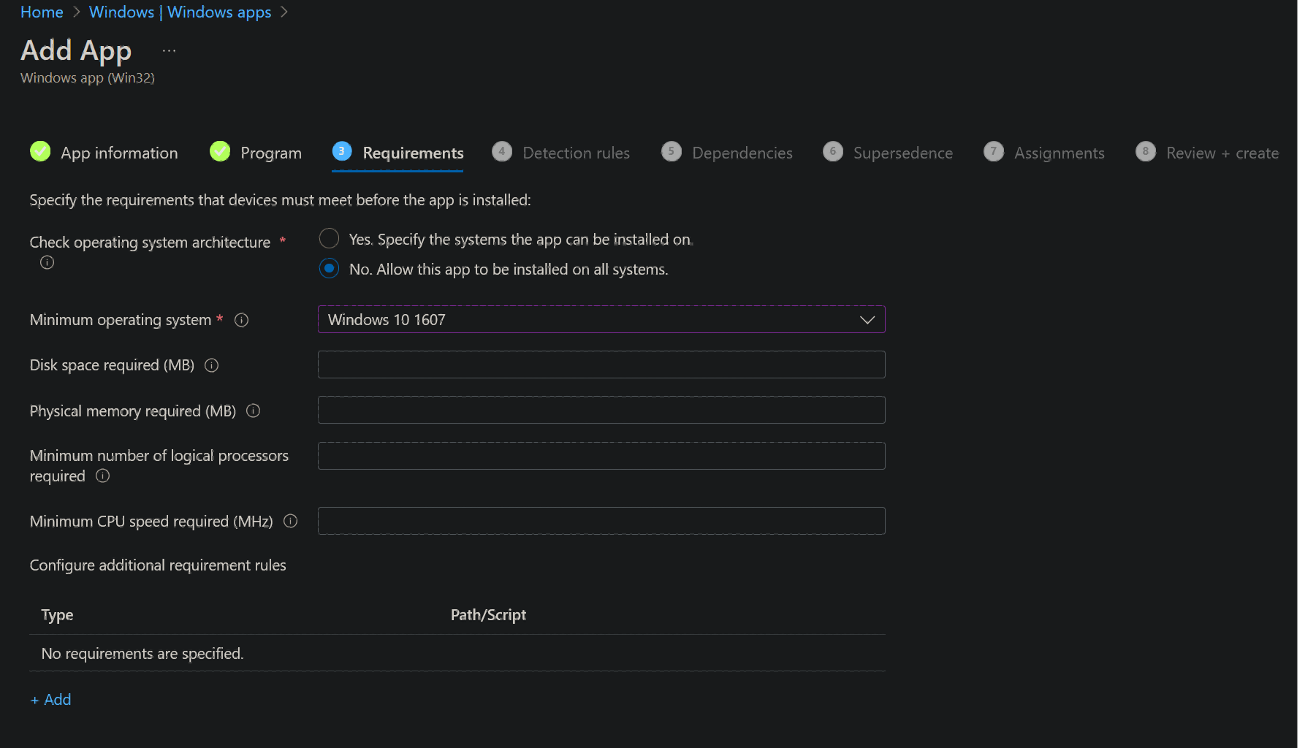
In the "Requirements" tab, enter the minimum operating system version: Windows 10 1607.
In the "Detection Rules" tab, configure the MSI detection rule, then assign the application to the target group.
4.4.2 Deliver LDFM Client
Create a Windows Application:
In the "App Information" tab, upload the LDFMClientSetup.msi file, and fill in the relevant information.
Use the default configuration in the "Program" tab:
- The installation command is:
msiexec /i "LDFMClientSetup.msi" SERVER=127.0.0.1 PORT1=4432 PROTOCOL=https /qn - The uninstallation command is:
msiexec /x "{B80D1F98-1967-4683-A359-AF6A34B99C6F}" /qn
In the "Requirements" tab, fill in the minimum operating system version: Windows 10 1607.
In the "Detection Rules" tab, configure the MSI detection rule, fill in the product code: {B80D1F98-1967-4683-A359-AF6A34B99C6F}, and then assign it to the target group.
4.5. Installation Process via InTune (MacOs)
4.5.1. Create the configuration policy
Log in to the Intune admin center, navigate to Devices --> MacOS --> Configuration in sequence, and then click Create.
Select the configuration profile type as "Template", the template name as "Custom", and click Create.
In the Basics tab, fill in the name and click Next.
In the Configuration settings tab: Fill in the custom configuration name and select the deployment channel as "Device channel".
The configuration profile is as follows:
In the "Assignments "tab, add the group to which the push is needed. Finally, in the "Review" tab, after confirming that everything is correct, click "Create " to complete the process.
4.5.2. Distribute LDFMClientService
Create a MacOS app. Navigate to the Apps --> macOS apps page in sequence, click "Create", and select "MacOS app (PKG)".
Upload the package file "LDFMClient.pkg".
Do not fill in the content in the Program tab.
In the selection of the minimum operating system version, you can choose from MacOSHigh Sierra 10.13 and later versions.
In the Detection rules tab, configure the application package
identifier as com.lenovo.LDFMClient, and the application version as
the current version number, for example: 1.0.6.
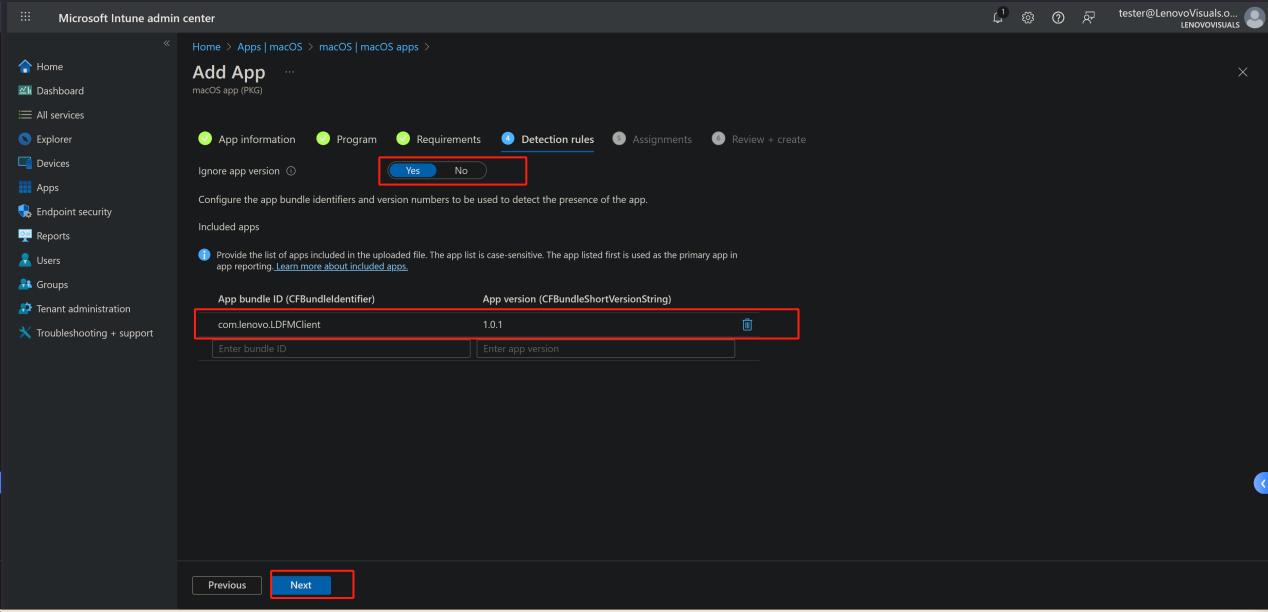
In the Assignments tab, add the corresponding groups, such as macOS devices, etc.
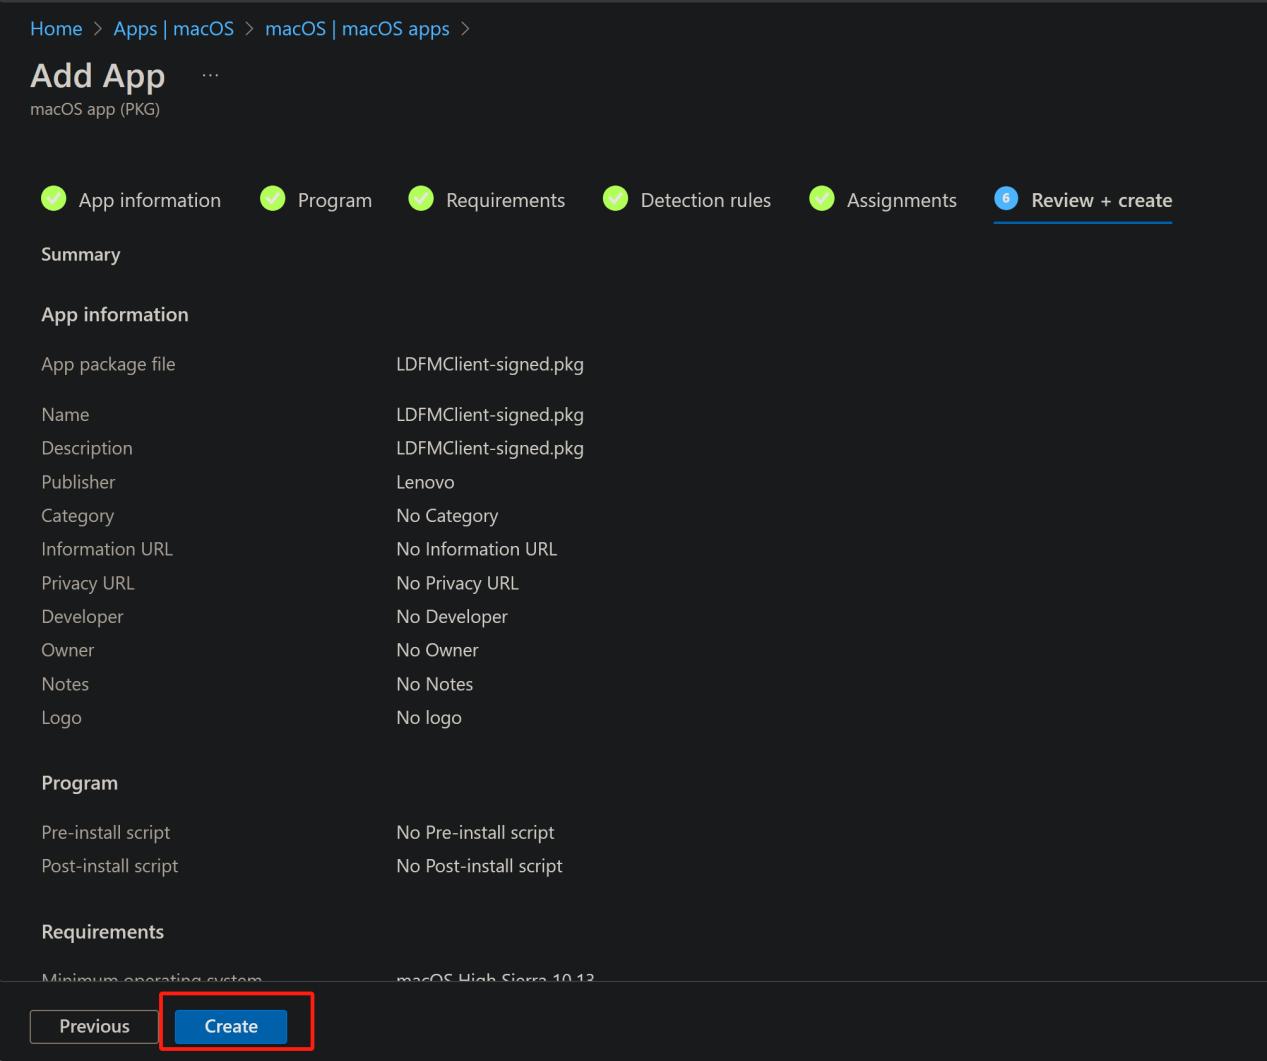
Navigate to the Review + Create page. After confirming that the application information, program, requirements, detection rules, assignments, and other contents are correct, click "Create".
4.5.3. Check the Push Status
-
Intune Management End Verification:
On the device configuration page of Intune, find the device configuration file named "Idfm_sever_config", click "View Report" to check whether the device check-in status is successful.
Check whether the device installation status of the app is "Installed".
-
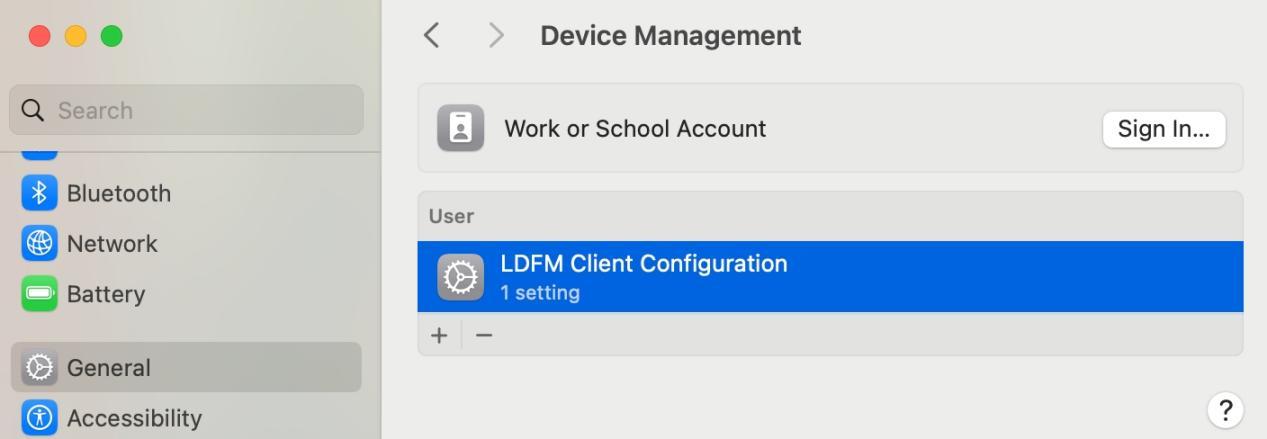
Device End Verification:
Go to General > Device Management page to check whether the configuration profile "LDFM Client Configuration" is installed.
4.6. Verify whether the service is successful
4.6.1. Windows Verification
Look for "LDFMService" in the "Services" section of the Task Manager on the client host. If you can find it and its status is "Running", it indicates that the LDFM Client has been installed successfully.
4.6.2. MacOS Verification
Press the Command + Space keys to open Spotlight Search. Type "Activity Monitor" in the search box, then select the "Activity Monitor" app from the search results and click to open it.
Look for LDFMClient; if the following image appears, it means it is running successfully.

4.7. Uninstallation of LDFM Client Software
Go to Settings --> Apps --> Installed apps. Locate the LDFM Client, click on "..." and then click "Uninstall".
5. Access the LDFM Management System
5.1. Enter the Website Address
According to the configuration during installation, if the port number is not modified, access via browser using https://server IP address or domain name.
If the port number is modified, the URL to enter when logging in is:
https://ip:port/ (This IP address cannot be 127.0.0.1 or localhost).
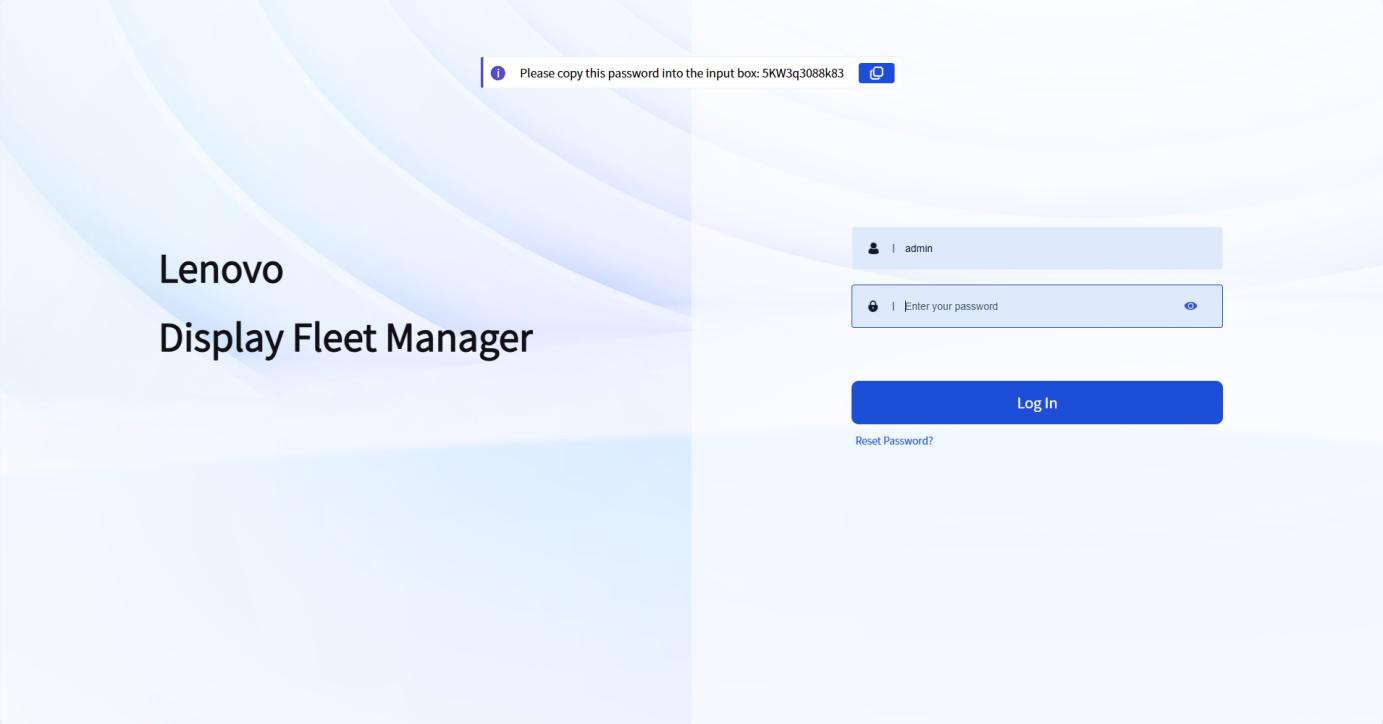
5.2. Enter the username and password
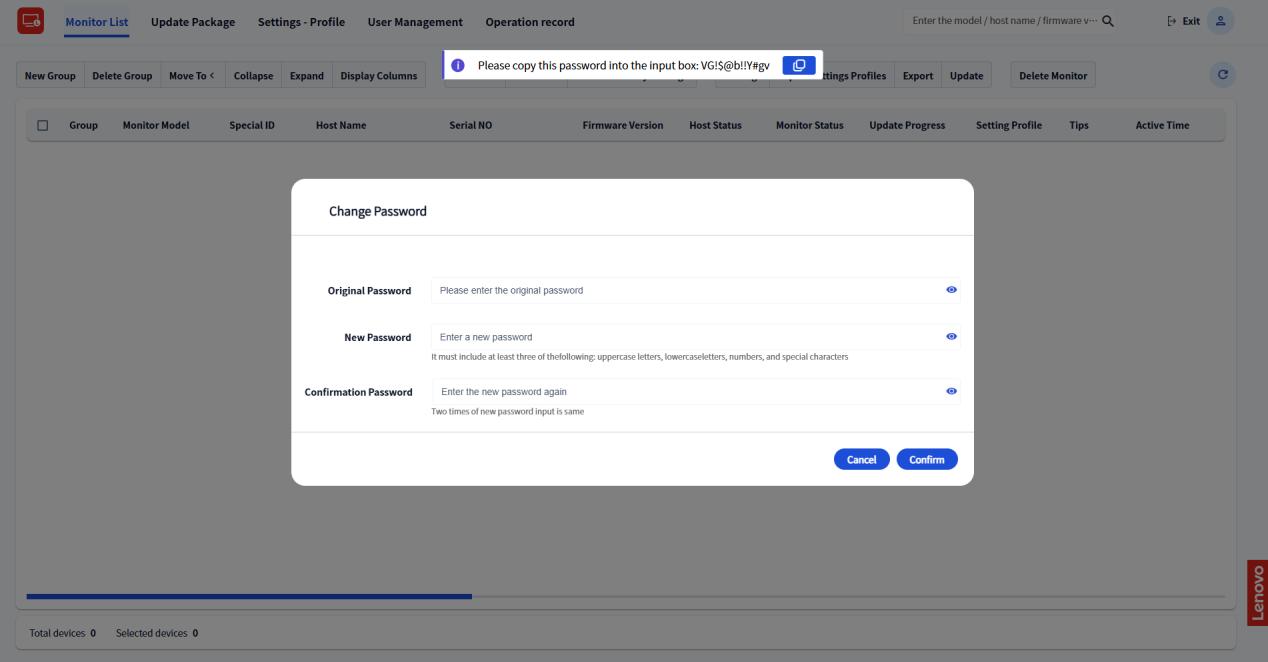
For the first login, enter the "admin" account. Then click on the password input area. The initial administrator password will pop up. Copy the password and click the "Login" button.

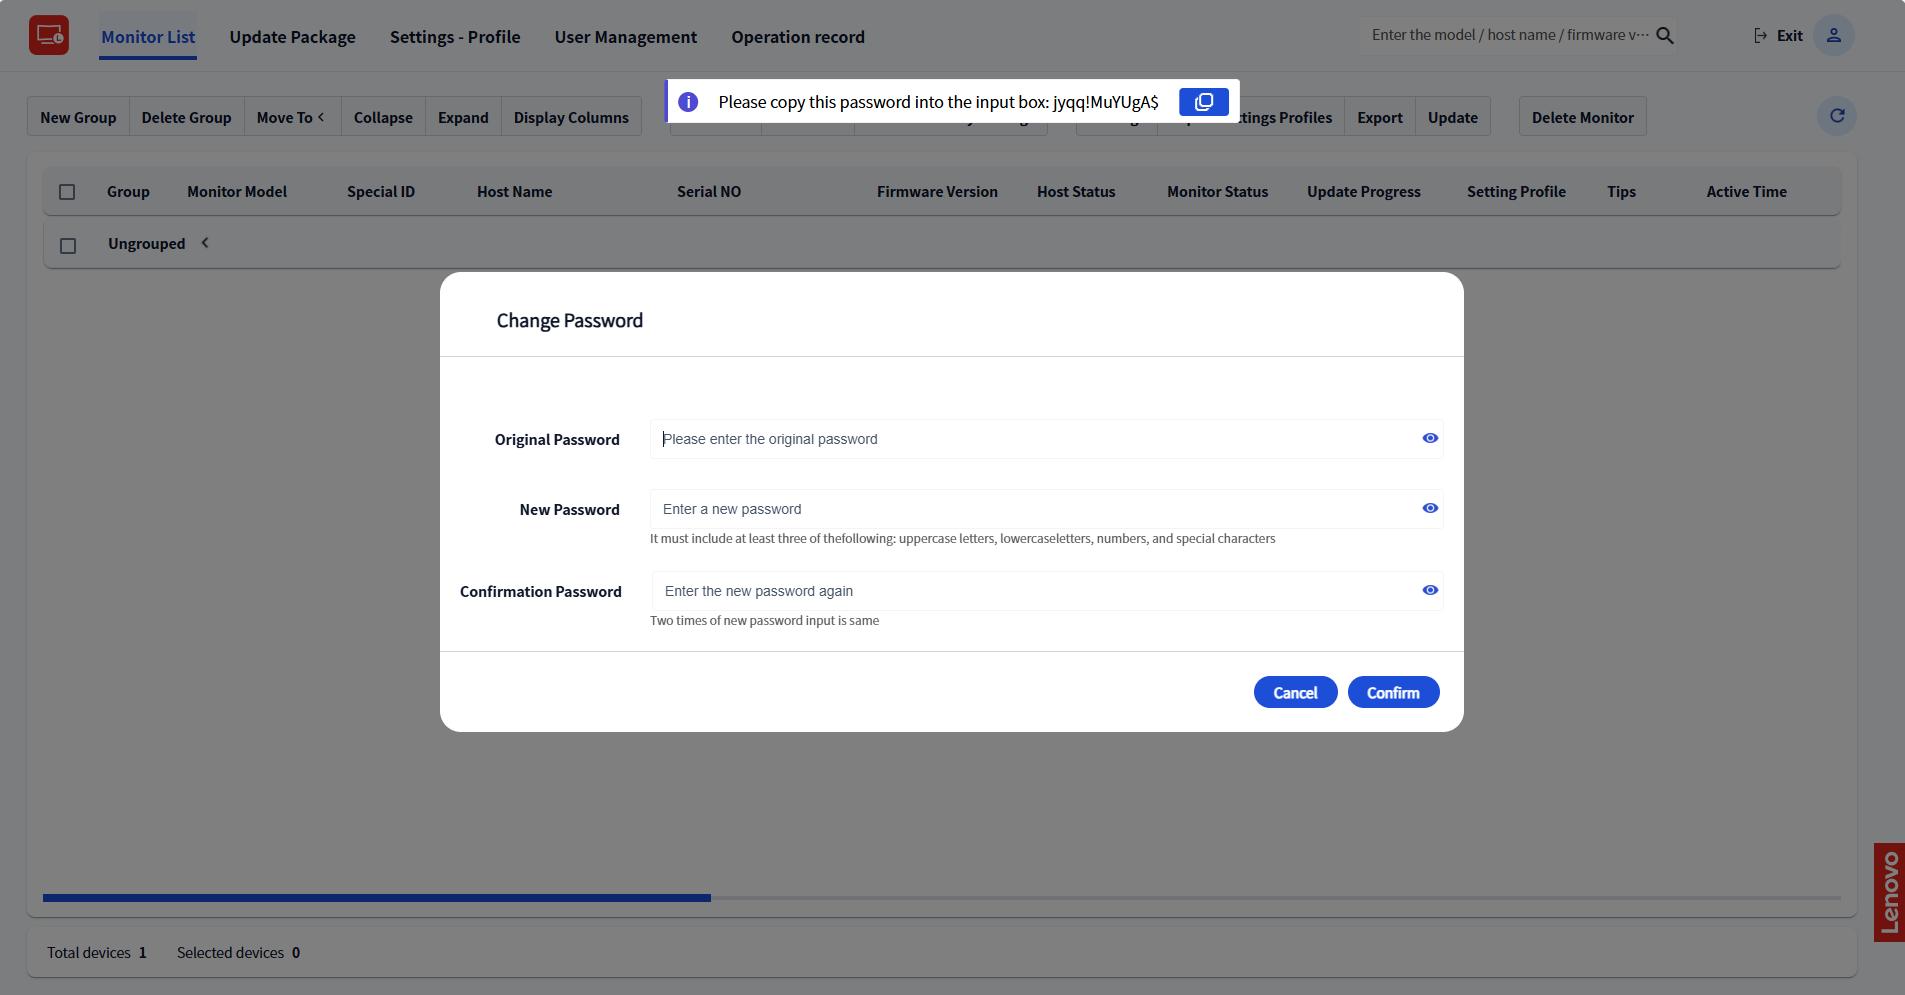
It will jump to the password modification page. For the first login, you will be forced to change the password. Set a new password and then enter the page.
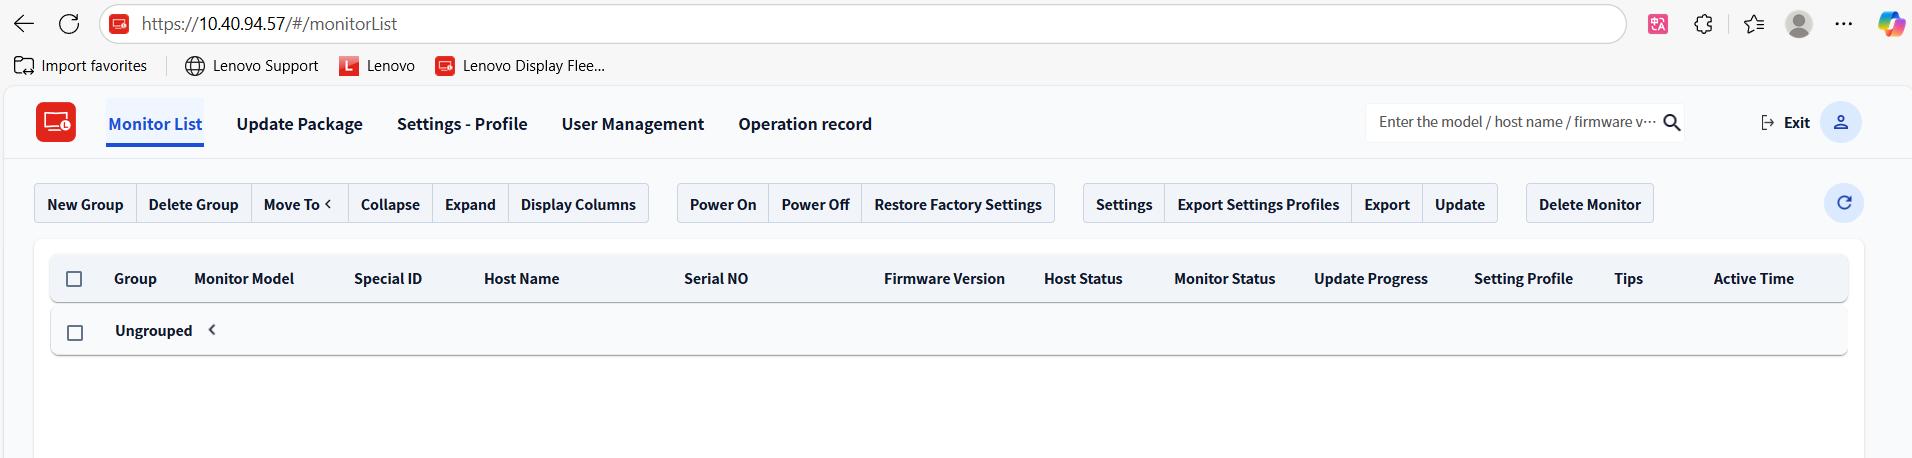
5.3. Start using it
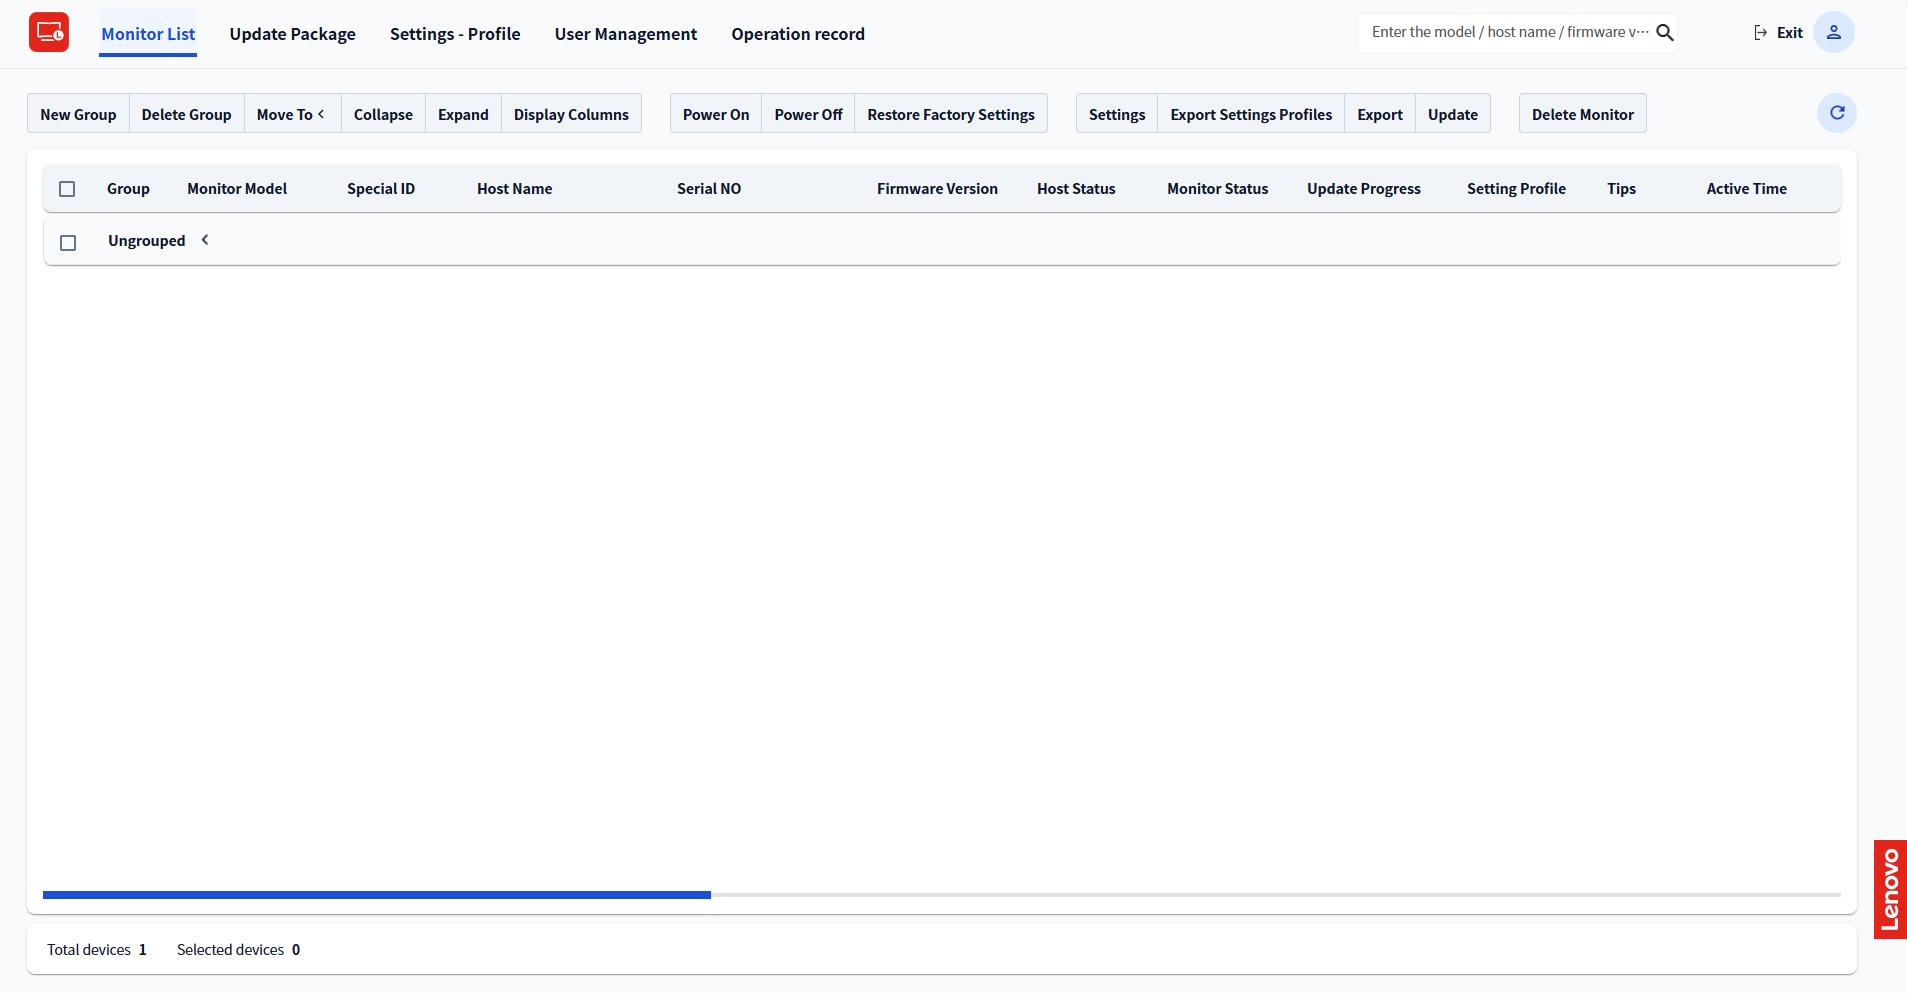
After the login is completed, the "Monitor List" interface will be displayed, and you can start the management of the monitors.
6. HTTPS Certificate Replacement
When the company needs to replace the HTTPS certificate with its own certificate, follow the procedures below. For certificates that are not in PEM/CRT format, tools are required to convert them into a format compatible with Nginx.
6.1. Locate the New Certificate
Example: The new certificate is stored at the following path:
6.2. Modify Nginx Configuration
open the path:
C:\Program Files\Lenovo\Lenovo Display Fleet Manager\nginx\nginx-1.26.2\conf
Edit the nginx.conf file and replace the certificate paths with the locations of the new certificates, as shown below:
Before modification: Original certificate configuration

After modification: New certificate configuration
6.3. Restart the Nginx Service
Open the Task Manager and go to the Services tab.
Locate the LDFM-nginx-server service.
Right-click the service and select Stop. Wait for the service to fully terminate.
Right-click again and select Start. The replacement is complete once the service is running.
6.4. Convert Certificate's Format
The following procedure applies to Windows systems (PowerShell 5.1 and later) and is used to convert PFX/P12 files to the standard CRT/KEY PEM format. Before proceeding, please ensure that OpenSSL (Windows version) is installed.
-
1. Open PowerShell (as an administrator) and navigate to the directory where the certificates are located (example path: C:\cert):
- cd C:\cert
-
2. Extract the private key:
- openssl pkcs12 -in source.pfx -nocerts -out target_key.key -nodes
-
3. Extract certificate:
- openssl pkcs12 -in source.pfx -nokeys -out target_certificate.crt
-
4. Verification, if there are no errors, the conversion was successful.:
- # Verify the KEY file
- openssl rsa -in target_key.key -check
- # Verify the CRT file
- openssl x509 -in target_certificate.crt -text -noout
7. Deploy LDFM Server on Linux
This deployment solution realizes the deployment of LDFM Server with the help of Docker. Containerization technology can avoid many differences among Linux distribution versions and effectively reduce the deployment difficulty.
It should be noted that this content is written by taking the Ubuntu system and x86 architecture as examples. The deployment processes of other Linux systems are similar to it. Only the ways to install Docker and Docker Compose are different, while the operation steps to deploy LDFM Server in Docker are completely the same. Since Docker needs to use root privileges, users need to have root privileges.
7.1. Install Docker
7.1.1. Update the package index
sudo apt-get update
7.1.2. Install dependency components
sudo apt-get install -y \
ca-certificates \
curl \
gnupg \
lsb-release
7.1.3. Add the official GPG key of Docker
sudo mkdir -p /etc/apt/keyrings
curl -fsSL https://download.docker.com/linux/ubuntu/gpg | sudo gpg --dearmor -o /etc/apt/keyrings/docker.gpg
7.1.4. Set up the stable repository
echo \
"deb [arch=$(dpkg --print-architecture) signed-by=/etc/apt/keyrings/docker.gpg] https://download.docker.com/linux/ubuntu \ $(lsb_release -cs) stable" | sudo tee /etc/apt/sources.list.d/docker.list > /dev/null
7.1.5. Install Docker Engine
sudo apt-get update
sudo apt-get install -y docker-ce docker-ce-cli containerd.io docker-buildx-plugin docker-compose-plugin
7.1.6. Install Docker Compose
sudo apt-get update
sudo apt-get install docker-compose-plugin
7.2. Deploy LDFM Server in Docker
7.2.1. Preparation
Create a directory ldfm_server_docker on the server, then change the
directory to it with cd, upload the
ldfm_server_docker.zip
file to this directory, and finally unzip the file using
unzip ldfm_server_docker.zip.
mkdir ldfm_server_docker

cd ldfm_server_docker

unzip ldfm_server_docker.zip
The subsequent commands should all be executed within this directory. Do not enter the `sh` directory to execute them; commands must only be run in the directory where `docker-compose.yml` is located. After unzipping, the directory structure is as shown in the figure:
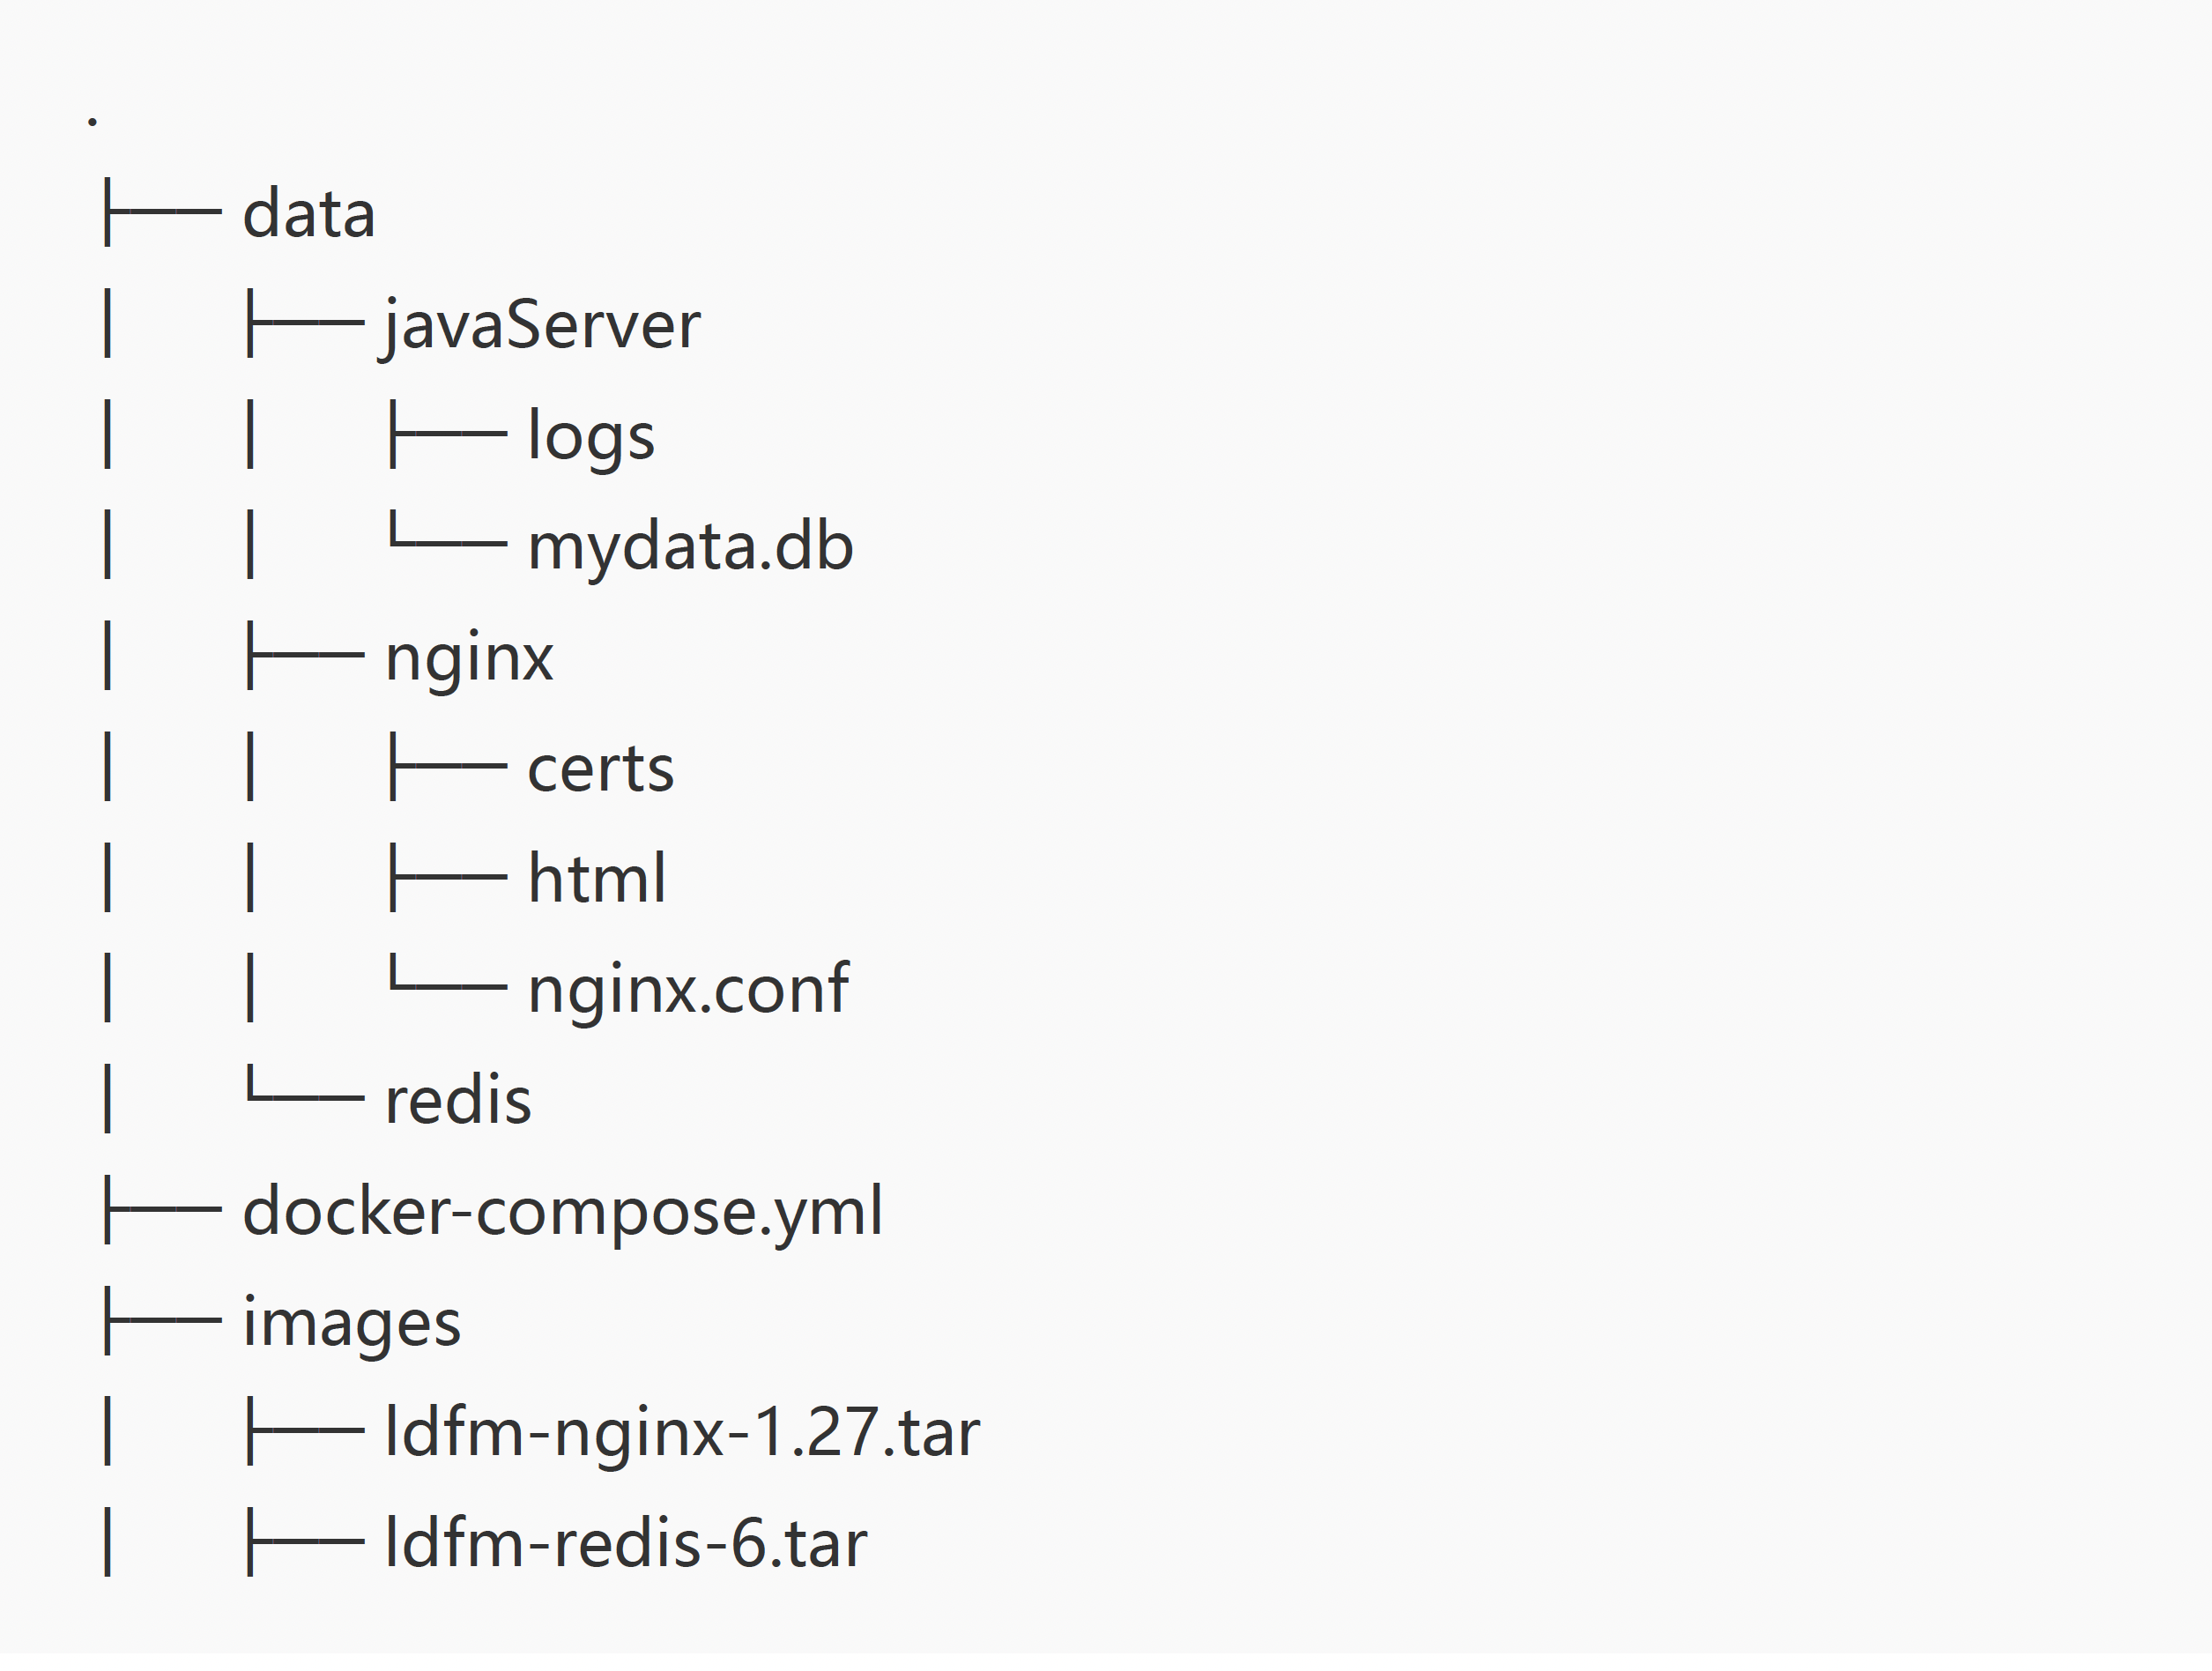
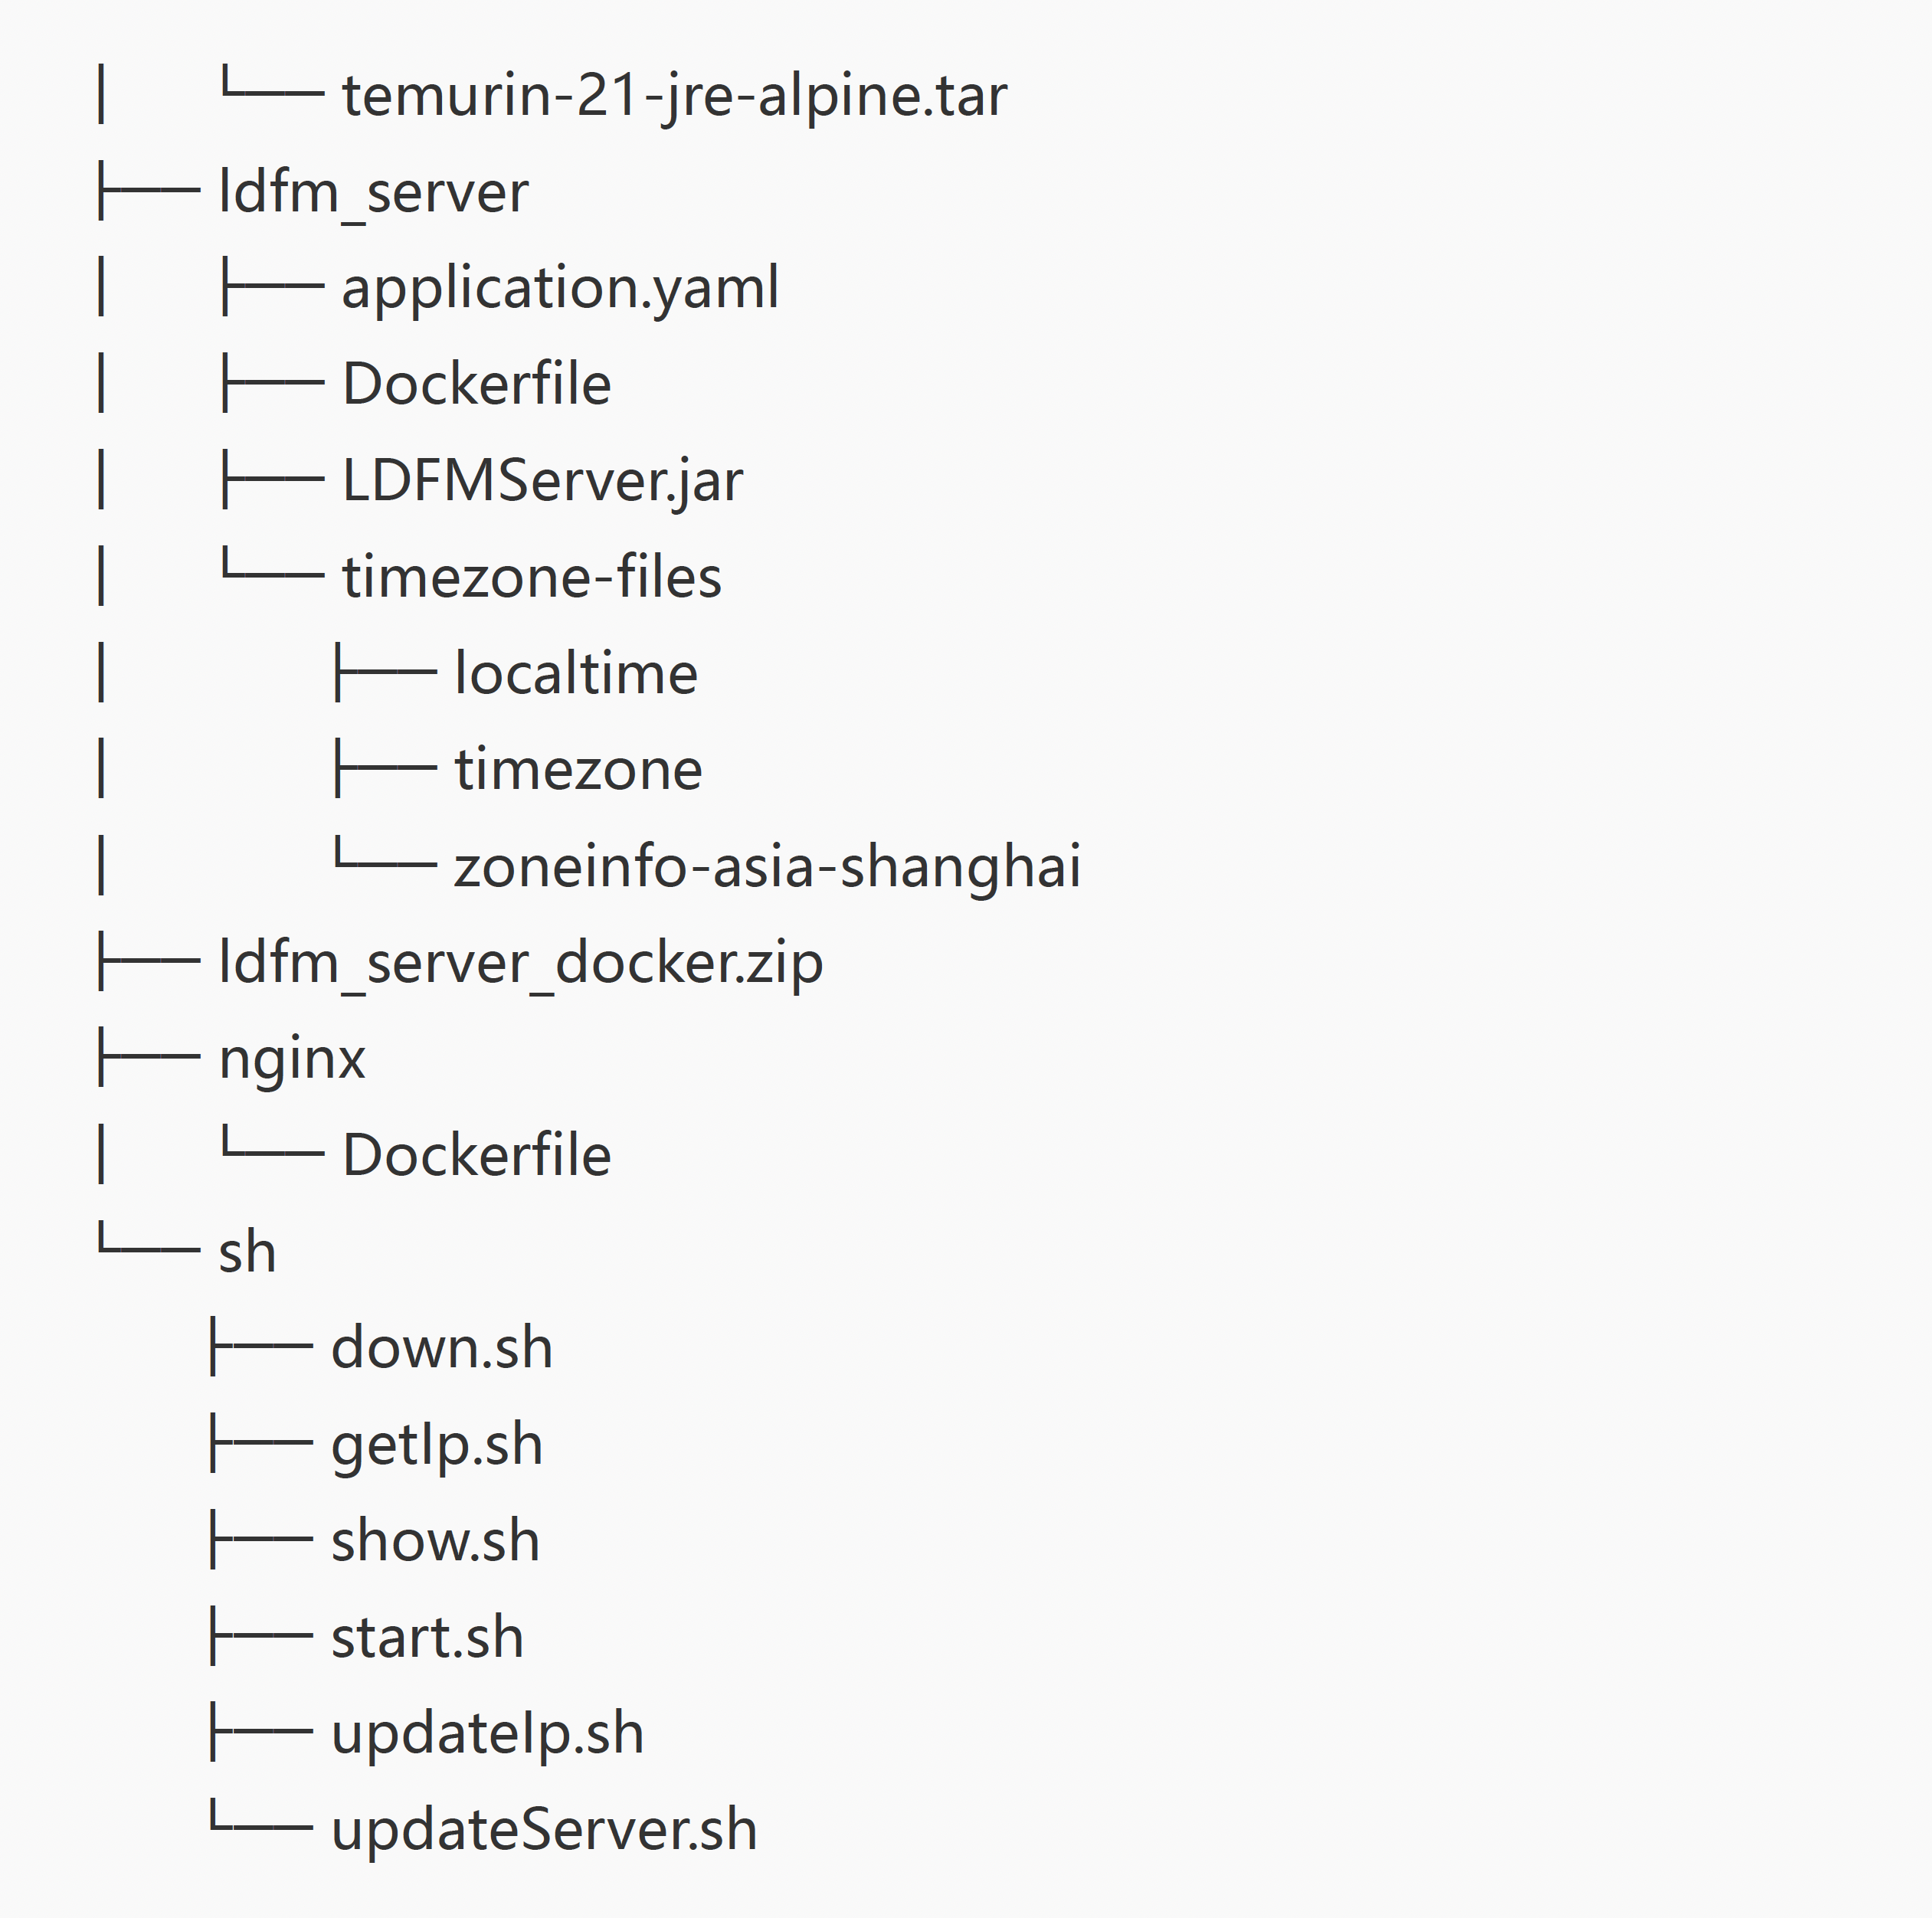
Copy your valid certificate in to the data/nginx/certs/, rename the CRT file to server.crt and the KEY file to server.key. If your certificates are not in these two formats or you may want to set the certificate's storage path, refer to 6. HTTPS Certificate Configuration. to modify them. If you are using them for testing purposes only, you can download LDFM TestCertificates from https://ldfm.lenovo.com.
7.2.2. Add users to the Docker user group
After the operation, you need to log out and log back in to the terminal for the permissions to take effect. This step is to ensure that the current user has the permissions to operate Docker commands.
sudo usermod -aG docker $USER
Please navigate to the extracted target directory (the same level directory as
docker-compose.yml), then execute the following command and enter
the
IP address or domain name according to your actual requirements:
- If using a domain name: Ensure that the domain name has
been
correctly resolved to the current server's IP address (you can verify this
using
the
nslookuporpingcommand). - If using an IP address:
- If providing services to the public network, please enter the server's public IP address.
- If providing services within a private network, please enter the
server's private IP address (e.g.,
192.168.x.x,10.x.x.x, etc.).
sh ./sh/updateIp.sh
7.3. Compile and start the service
Before starting, you should first check whether ports 443,
8099, and 6379 are already occupied. If any of the above
ports
are found to be in use, you need to make corresponding adjustments to the
docker-compose.yml file in the current directory. Specifically, modify
the
configuration items corresponding to these ports (only change the port number before
the
colon, while keeping the port number after the colon unchanged). This operation
ensures
that the service can be correctly deployed and avoids port conflict issues., as
shown in
the figure:
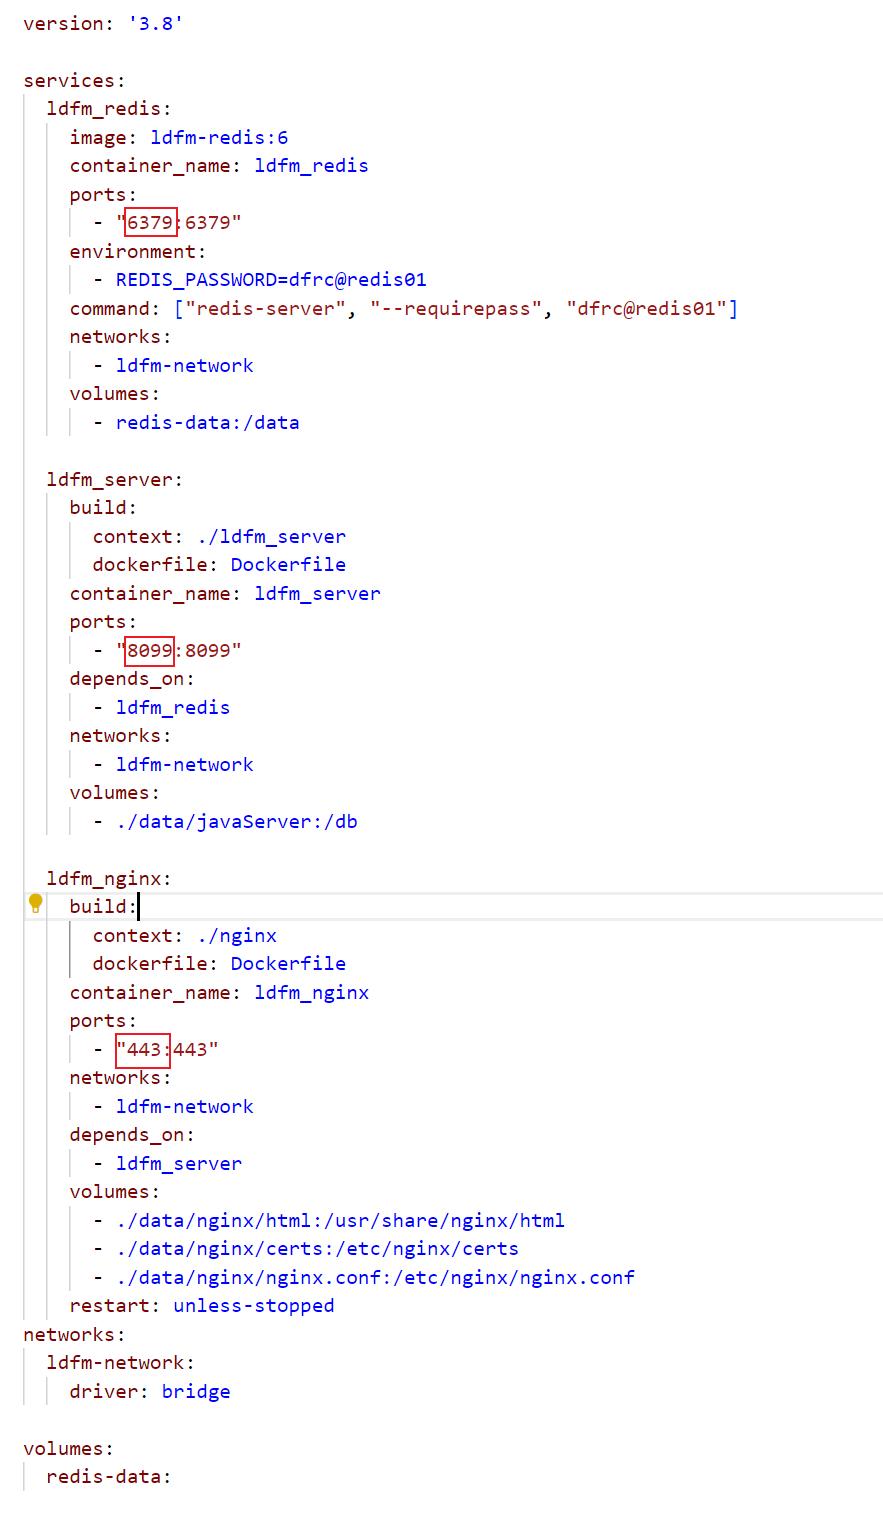
If port 443 is occupied, change it to 580. This
modification
should be applied not only to the docker-compose.yml file but also to
the
data/nginx/html/config.js file in the current directory. Append
:580 after the IP address or domain name as shown below:
window.serverIp = 'https://192.168.55.58/ldfm/';
After modification:
window.serverIp = 'https://192.168.55.58:580/ldfm/';
After all ports are configured, you can execute the startup command. First, switch to
the
directory where docker-compose.yml is located, and then run the
following
command:
sh ./sh/start.sh
After the execution is successful, use the following command to view the service:
docker ps -a
The results are as follows: if the status of all three services is "Up", it indicates that the startup was successful.

To stop the service, execute the following command in this directory:
sh ./sh/down.sh
7.4. Access the LDFMServer service
Startup Waiting:The service takes approximately 30 seconds to fully start up. Please be patient during this time.
Access Verification:After 30 seconds, open a browser and enter the address
https://Server IP address (if using a domain name, ensure it is
resolved to
this IP). If port 443 is changed to another port (e.g.,
550),
enter https://192.168.23.89:550 (replace the IP with the actual one).
The login interface appears, and no error messages are displayed after entering the account and password. If this occurs, the deployment is considered successful.
Firewall Configuration (Critical Step):If the Linux system firewall is enabled, you need to manually allow the HTTPS service
port (default is 443; if modified, use the actual port). For Ubuntu
systems, you can use the following command:
sudo ufw allow 443
8. IP Change
If you need to switch IP for login, you need to make modifications according to the following steps.
8.1 Modify LDFM Server IP
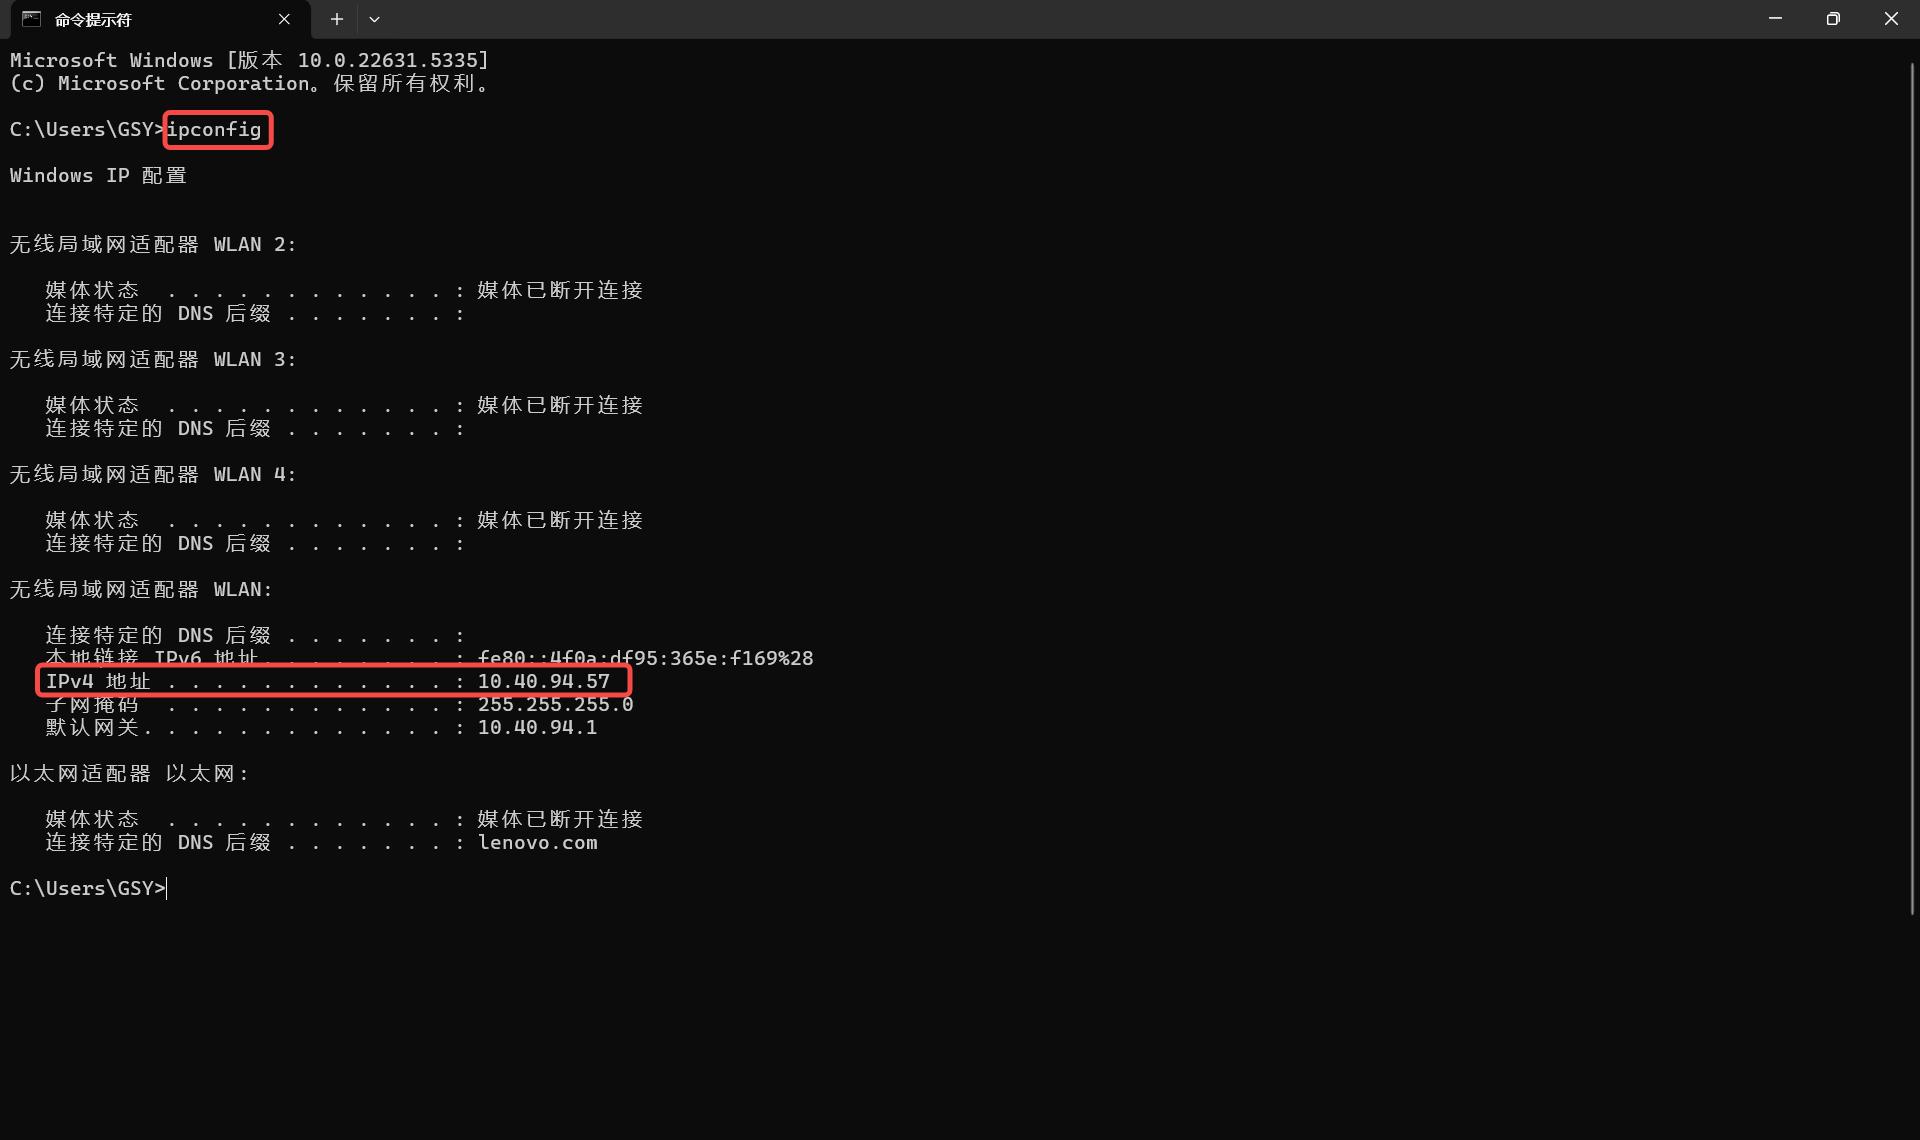
8.1.1 Find the IP address that needs to be modified
Through Command Prompt: Press Win + R, type "cmd"
and
press Enter to open the Command Prompt window. Enter the
"ipconfig"
command, and after pressing Enter, find "IPv4 Address" or
"IPv6 Address" in the output result. The numbers following it
are
the
local IP address.
8.1.2 Modify the nginx configuration file
Find the following path:
C:\Program Files\Lenovo\Lenovo Display Fleet Manager\nginx\nginx-1.26.2\conf\nginx.conf,,
and change the IP address in the figure as shown:

8.1.3 Modify the Server configuration file
Find the following path:
C:\Program Files\Lenovo\Lenovo Display Fleet Manager\nginx\nginx-1.26.2\html\config.js,
and change the IP address in the figure as shown:

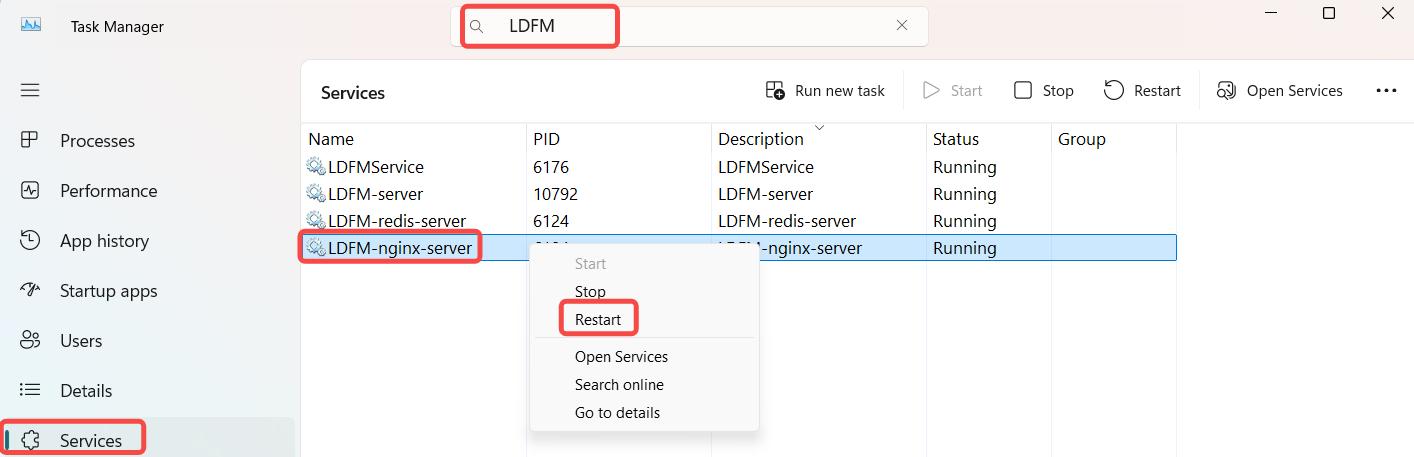
8.1.4 Restart the nginx service
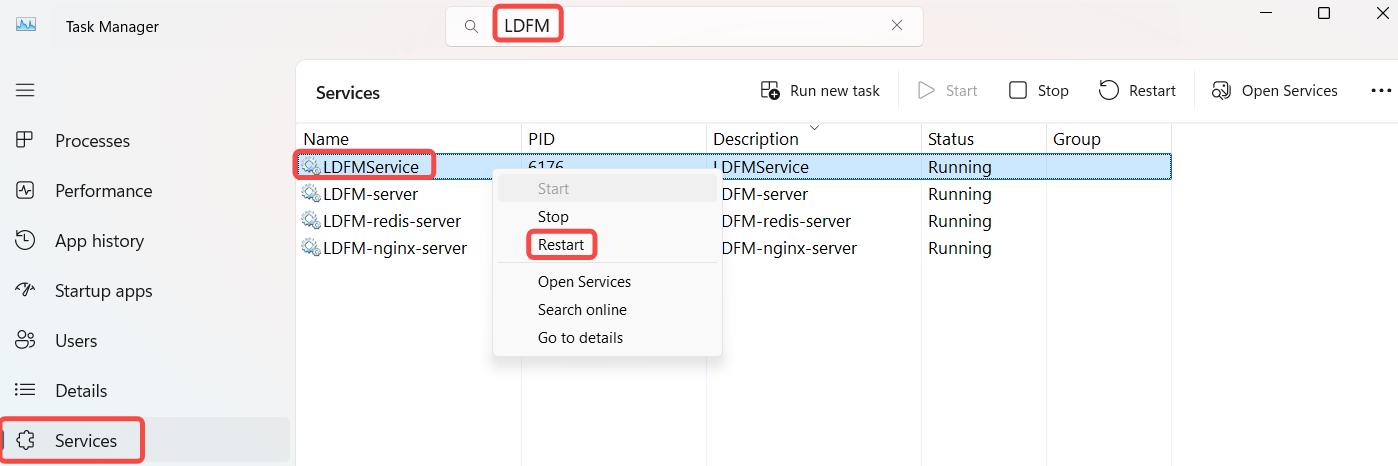
Open Task Manager, find Services, search for LDFM, locate LDFM-nginx-server, right-click it, and select Restart, as shown in the figure:
Note: This modification requires administrator privileges. If
you
don't have the privileges, press Win + R, type
"taskmgr", then press Ctrl + Shift + Enter. In the
User
Account Control prompt, select"Yes" to open it.
8.2 Modify Client IP (Windows)
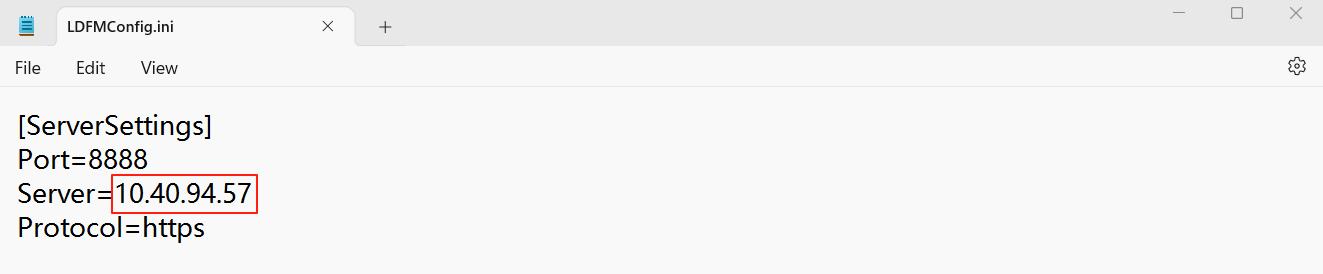
8.2.1 Find LDFMConfig.ini
Find the following path:
C:\Program Files (x86)\Lenovo\LDFM Client\LDFMConfig.ini, and
change
the IP
address in the figure as shown:
8.2.2 Restart the Client service
Open the Task Manager, find Services, search for LDFM, locate LDFMService, right-click it, and select Restart, as shown in the figure:
Note: This modification requires administrator privileges. If
you
don't have the privileges, press Win + R, type
"taskmgr", then press Ctrl + Shift + Enter. In the
User
Account Control prompt, select "Yes" to open it.
8.3 Modify Client IP (MacOS)
8.3.1 Modify IP
If you need to modify the server address and port information, you can edit the
LDFMConfig.mobileconfig file. The content of the file is as shown
in
the figure:

Double-click to reinstall the LDFMClient.pkg file.
Double-click the LDFMConfig.mobileconfig file, find the profile in
Settings, and
install it.
8.4 Open the LDFM Management System
Enter https://IP/#/login in the address bar to access, as shown in the
figure:
User Guide
1. Lenovo Display Fleet Manager (LDFM)
Lenovo Display Fleet Manager (abbreviated as LDFM) is a tool specifically developed for enterprise users to remotely manage monitors. It supports remote On-Screen Display (OSD) menu settings, firmware upgrades, and control operations for monitors.
2. LDFM Deployment
For details, please refer to the "Lenovo Display Fleet Manager Installation Guide".
3. Initial Login
According to the configuration during the installation process, on the server, access
http(s)://localhost/ through a browser. (If you are on another host, enter:
https://server IP address or domain name/).
3.1 Enter the username and password
- Input username: admin.
- Input initial password: When you click on the password input area with the mouse, a set of random passwords will be displayed at the top of the page. You can copy the password and paste it into the password field to complete the input.
- Click the "Log In" button.
3.2 Operation Process of Forced Password Change
- Input initial password.
- Input new password.
- Input confirmation password.
- Click "Confirm".
3.3 Forget Password
Note: only applicable to non-initial login.
3.4 Password Reset
- Click on the "Reset Password" button in the login page
- Then contact administrator to get a random password after you get a prompt message.
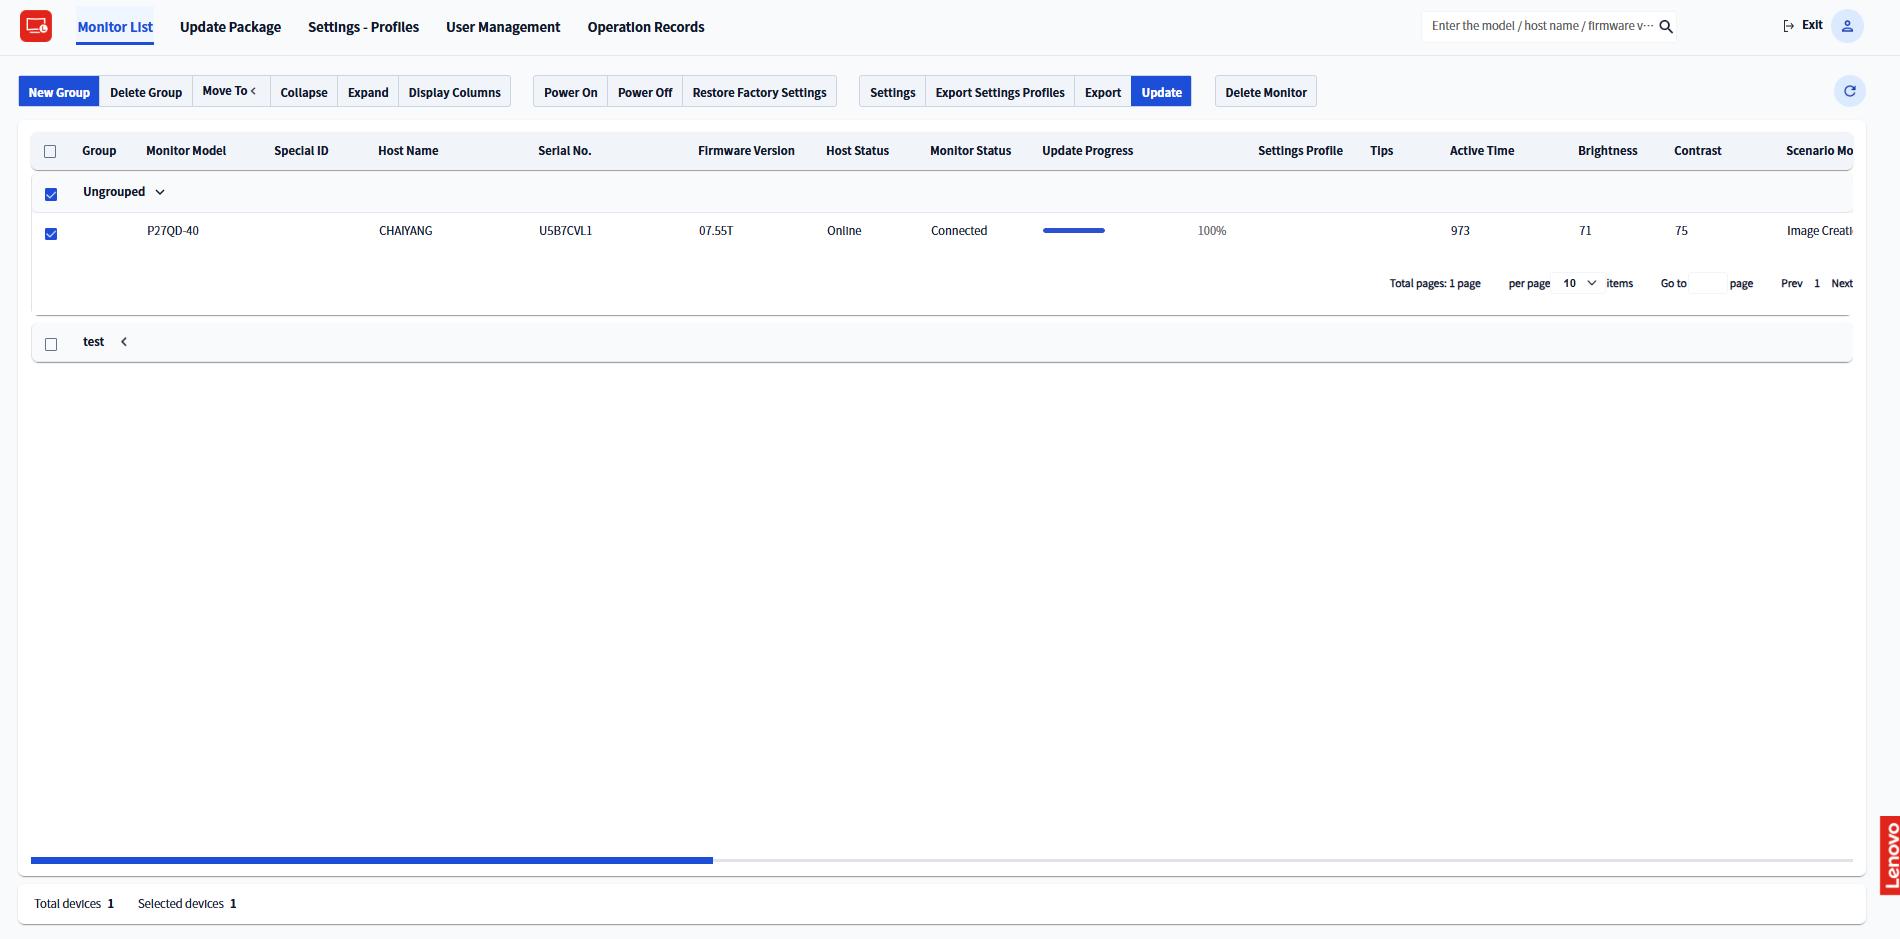
4. Monitor List
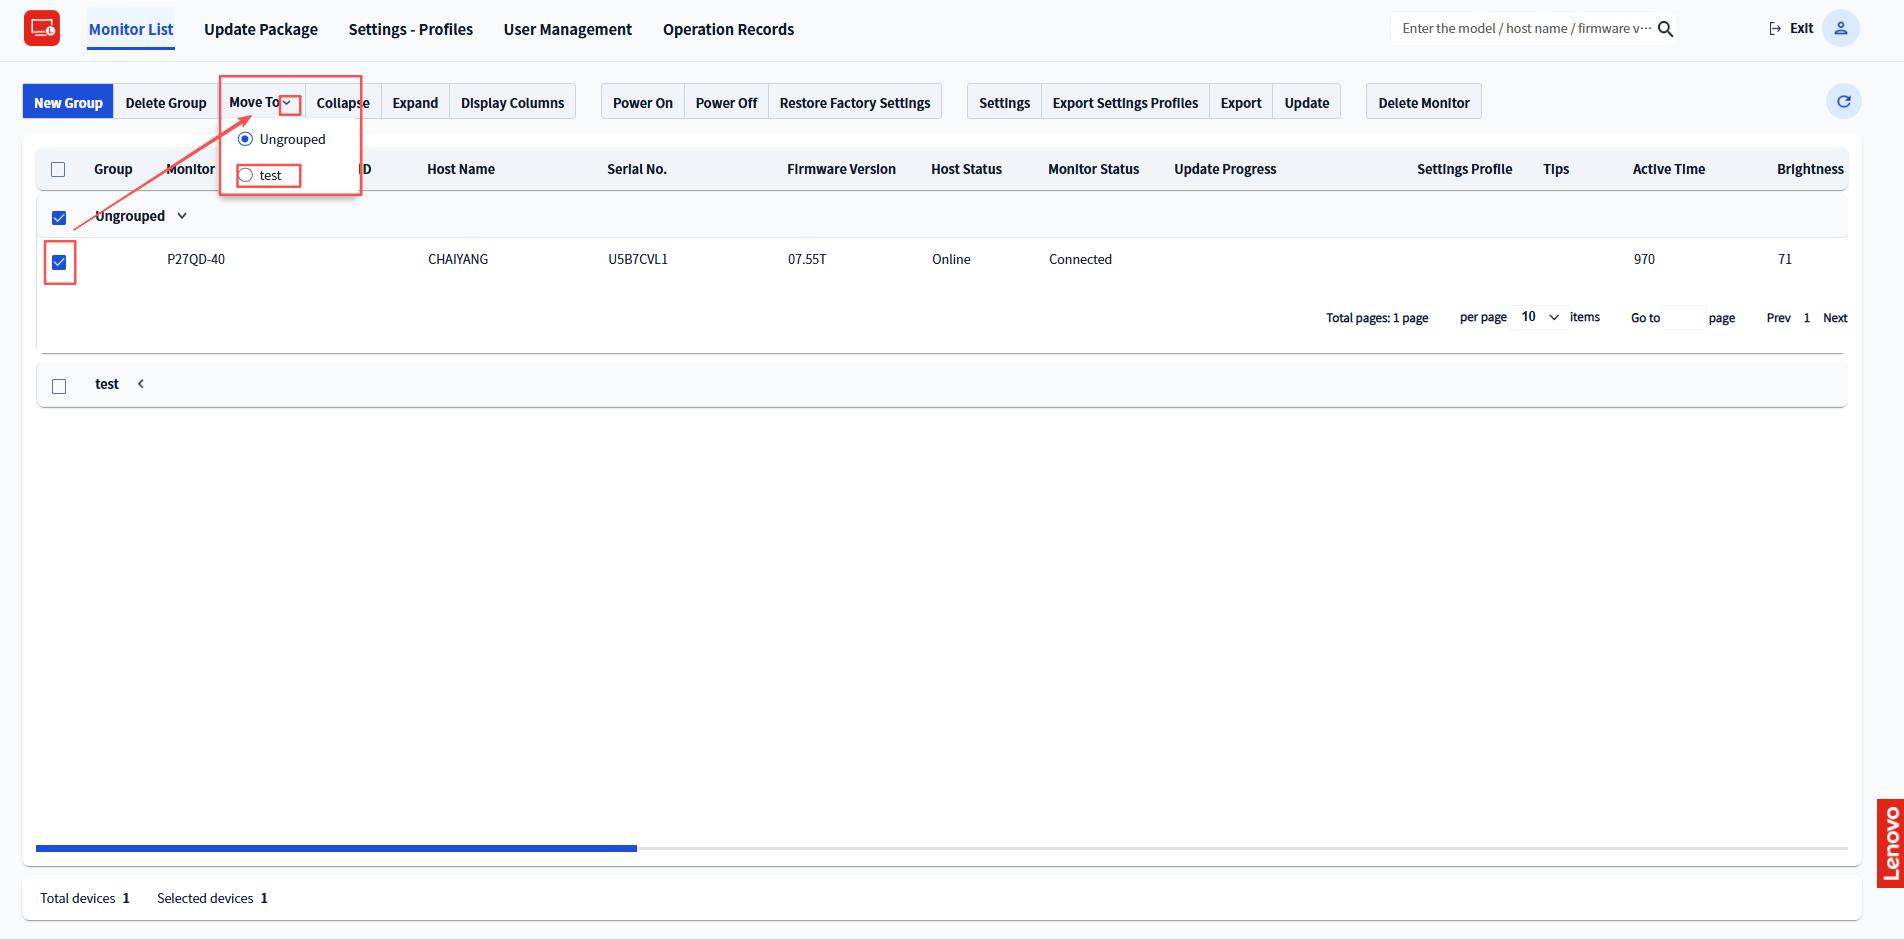
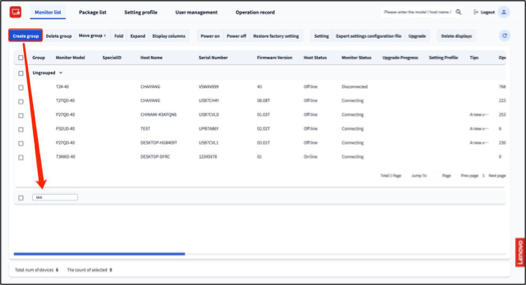
4.1 Create, Move Groups
- Click the "New Group" button to create a group, and then press the Enter key to save it.
- Double-click the group name to modify it if necessary.
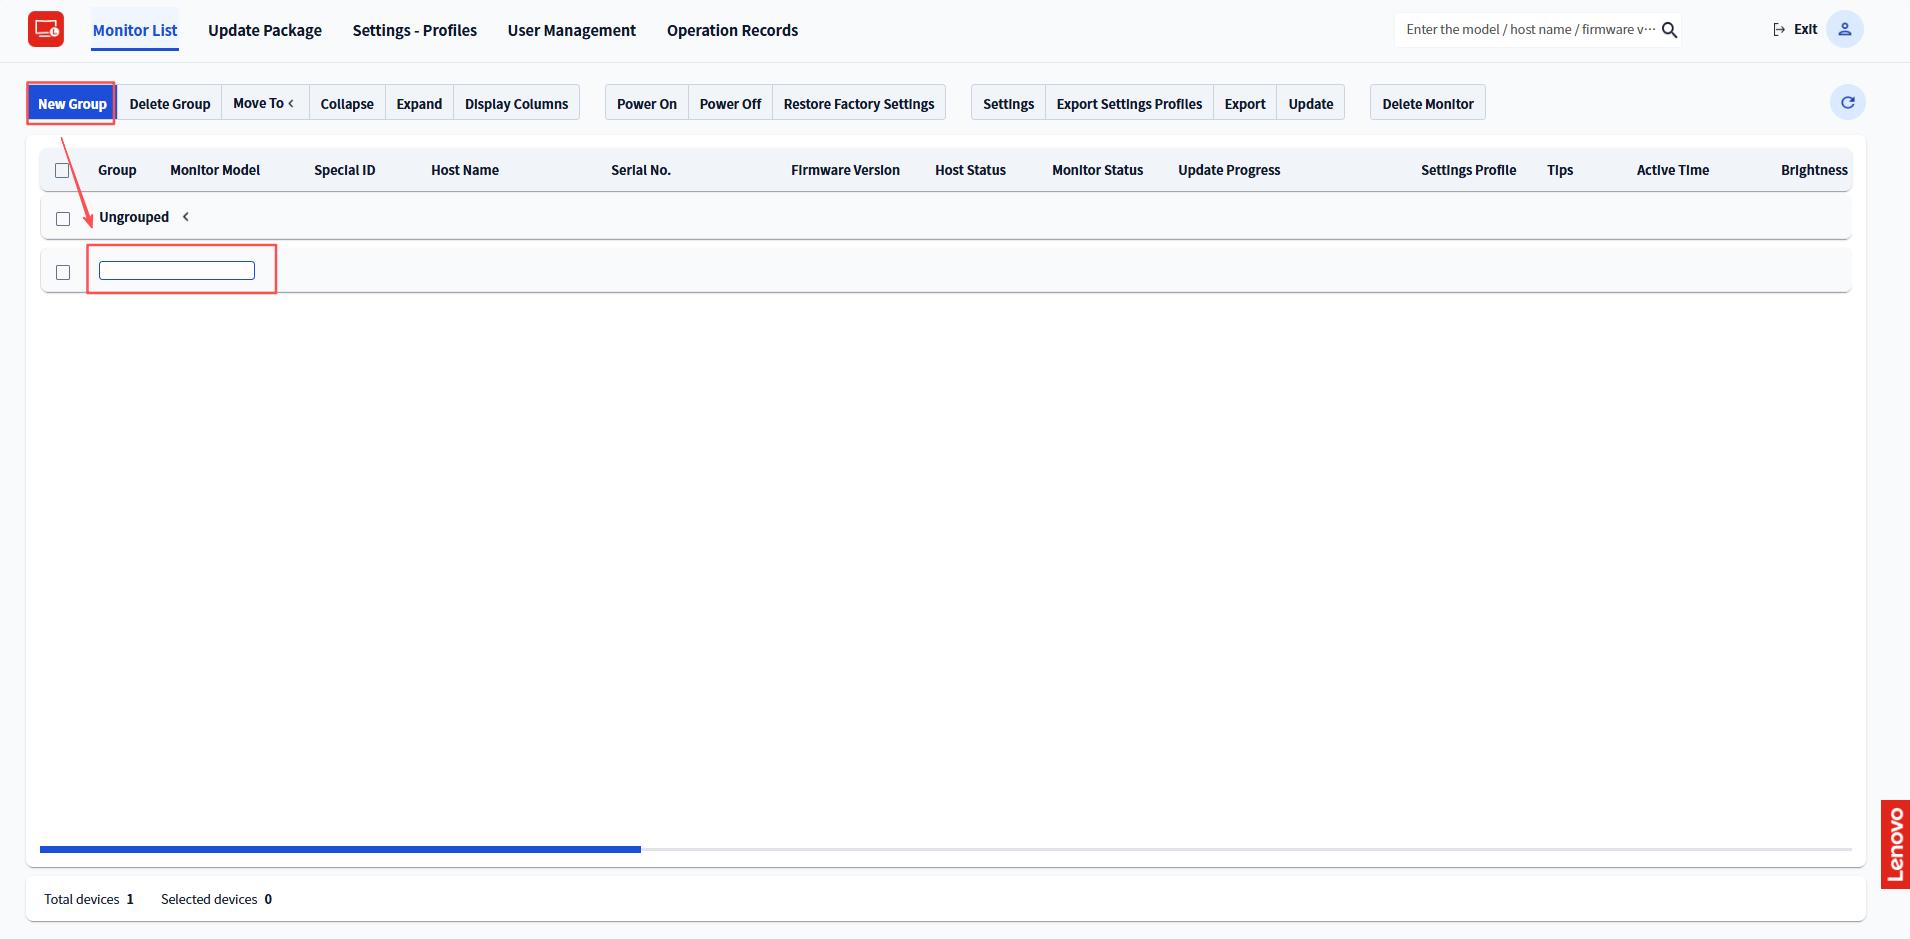
- After creating a group, you can choose the monitors you want to move and then
click
the "Move to" button to select the target group.
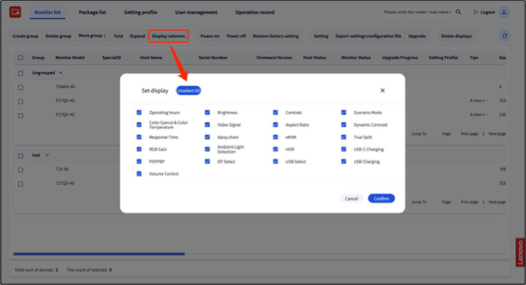
4.2 Display Columns
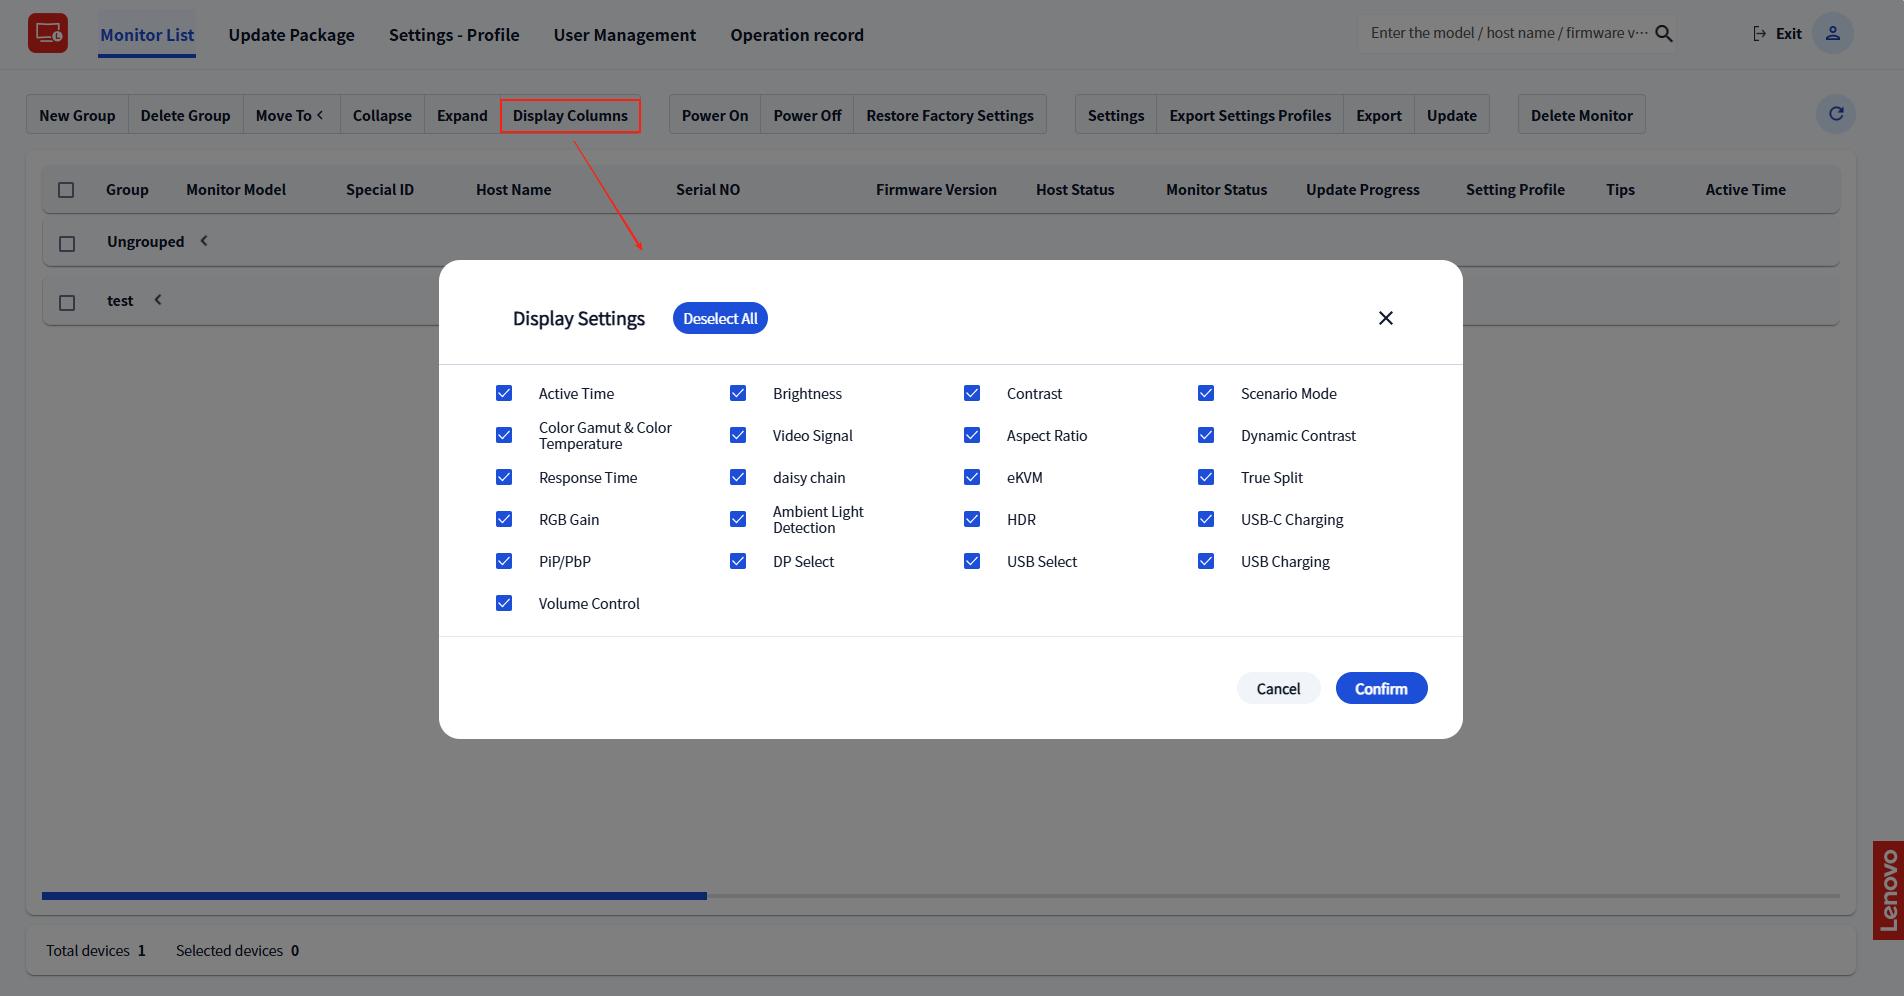
The "Monitor List" displays all On-Screen Display (OSD) setting columns by default. If you want to hide some of the display columns, please click on "Display Columns" and select the columns you wish to show.
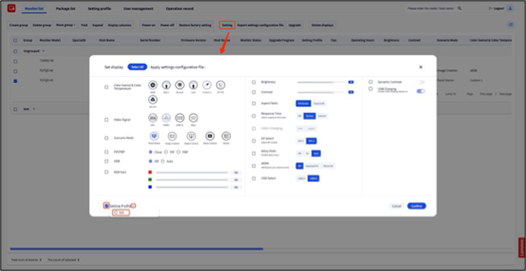
4.3 Settings
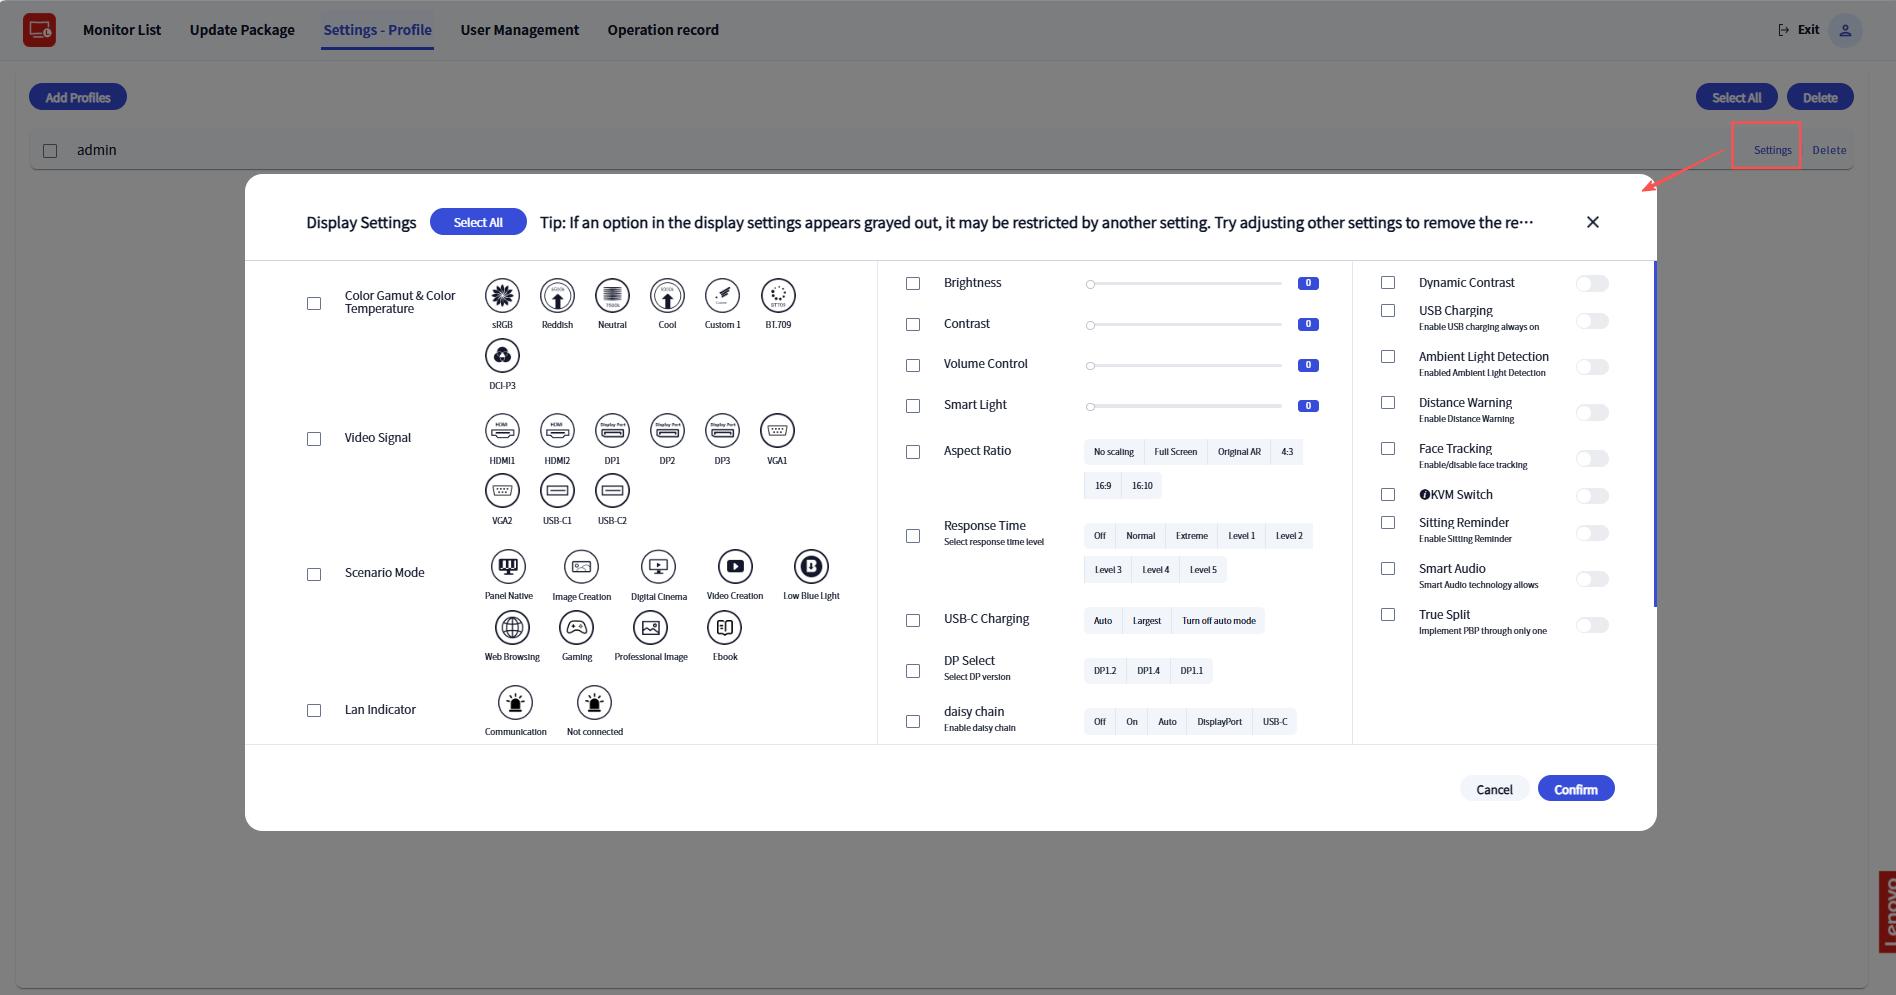
- Select a monitor and then click the "Settings" button.
- Select and set the options you wish to modify.
- In the lower-left corner, you can also choose a Set Profile.
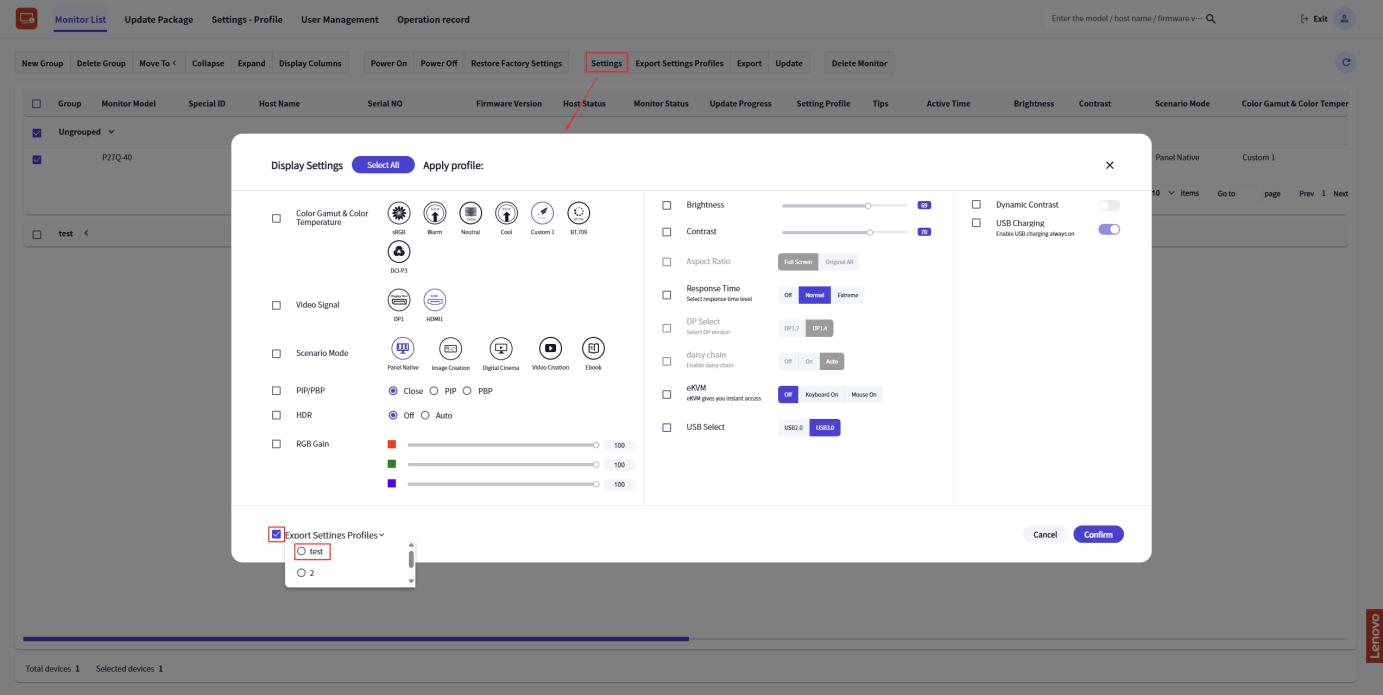
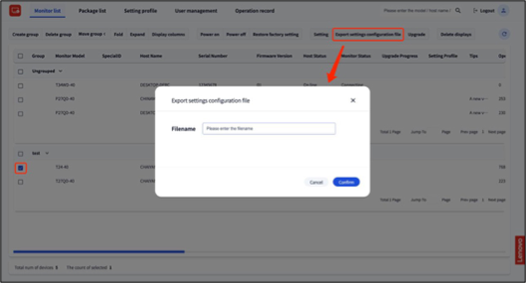
4.4 Export Settings Profile
- Select a monitor and then click the "Export Settings Profile" button.
- Input Filename.
- Click the "Confirm" button.
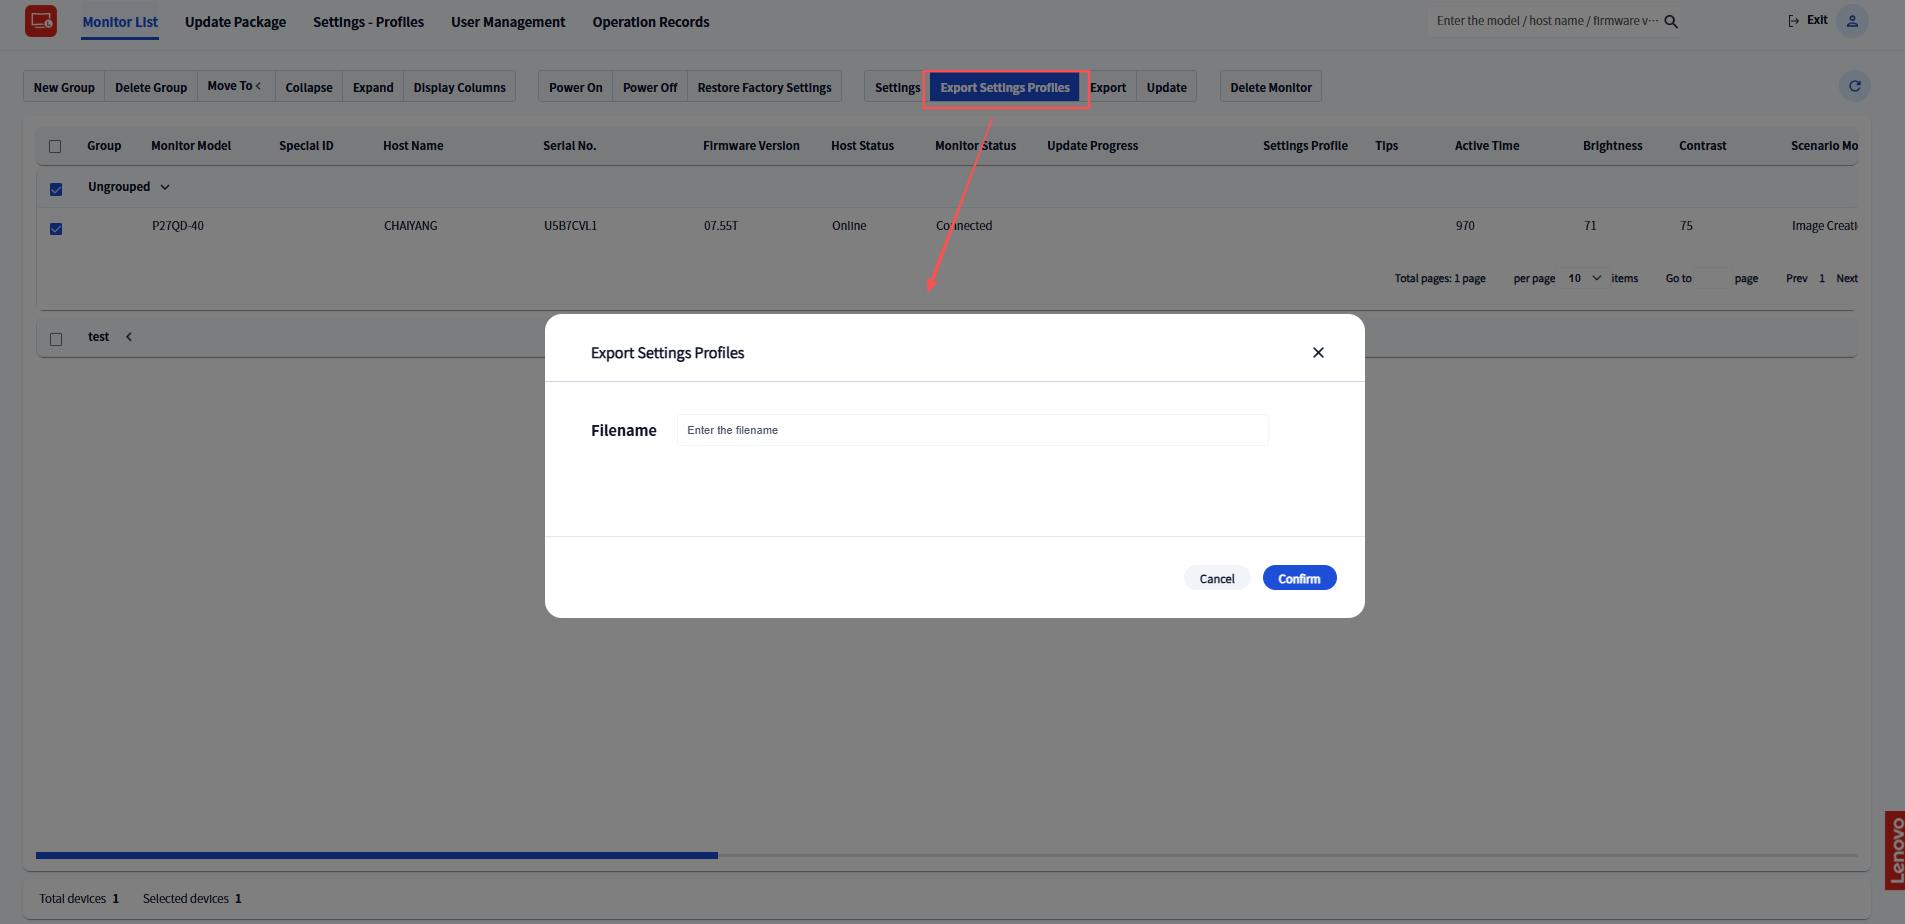
- Then, a new profile will be stored in the "Settings - Profile"
list.
- Click the "Settings" button, and you will see the details of
the
profile.
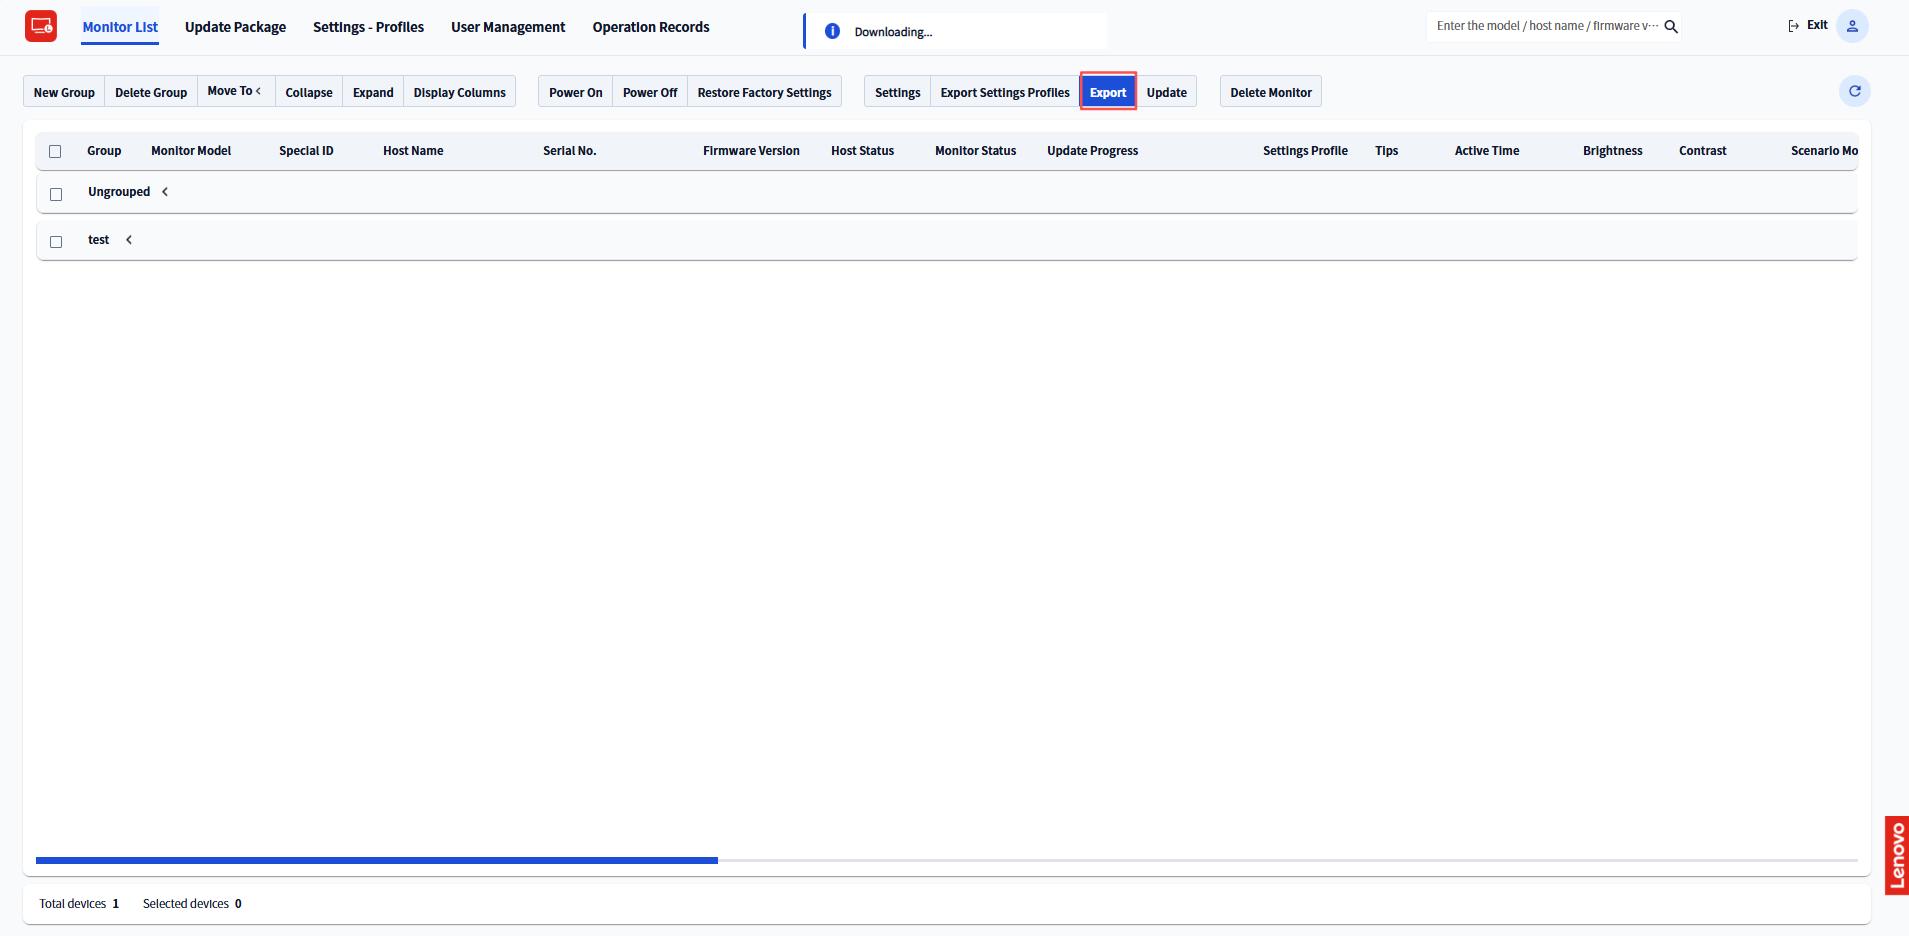
4.5 Export
Click the "Export" button, and the display list document will be downloaded to your local device.
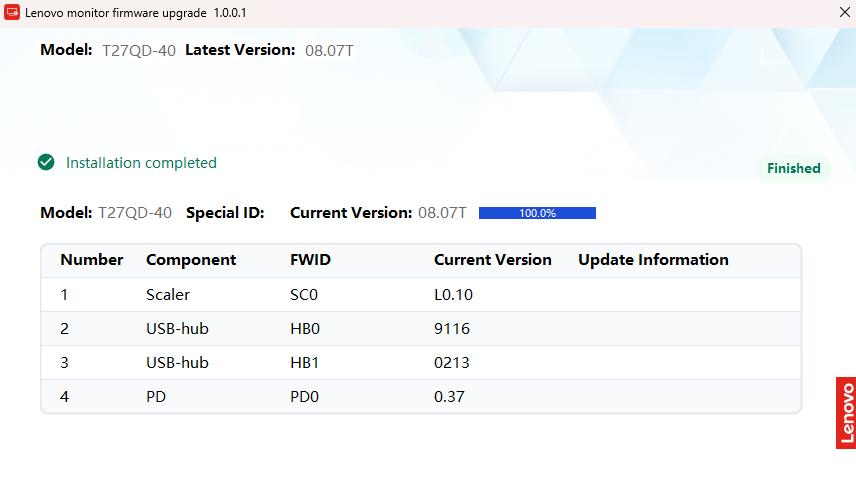
4.6 Update
4.6.1 Create Update Task
- Select a monitor and then click the "Update" button.
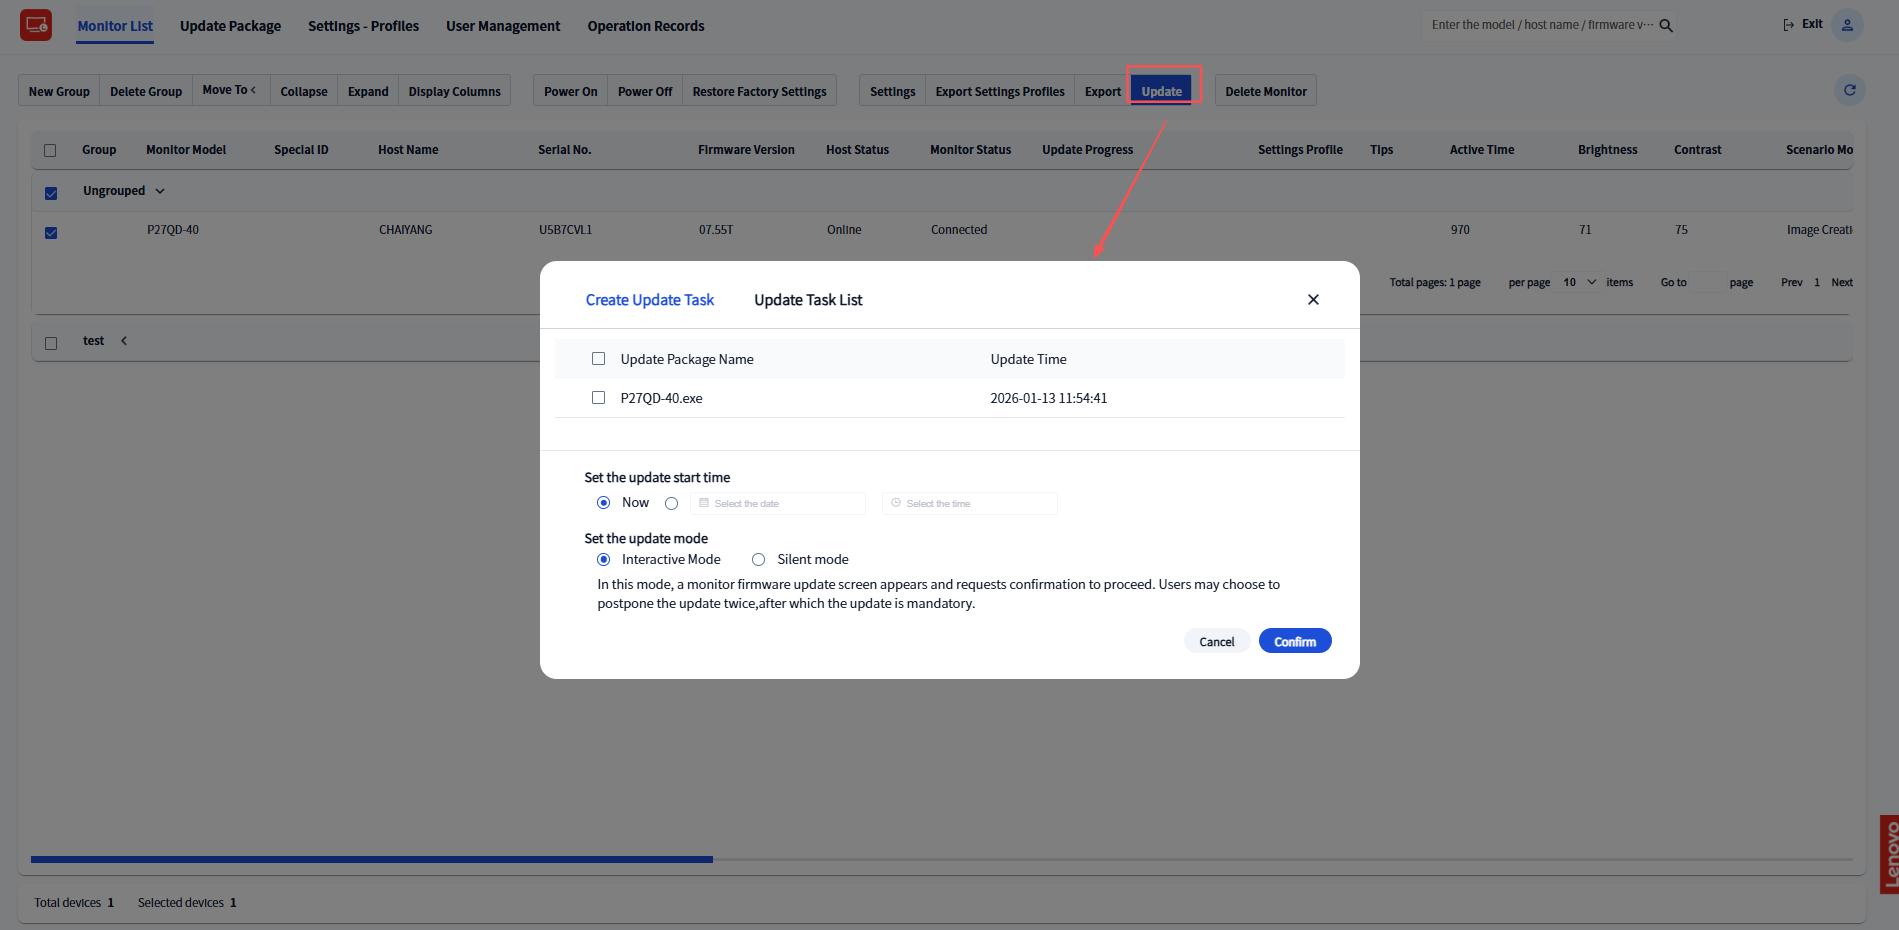
- Select the latest update package. Upload the update package. Please refer to 5. Installation Package List.
- Then, select the update start time (either "Now" or "a specified time").
- Set the update mode (either "Interactive" or "Silent"). If you select silent mode, you can specify when the reboot takes effect.
- Click "Confirm", and then the update task will start after
it
is successfully
issued.

- If the administrator chooses to send the upgrade package in interactive mode, the client will automatically pop up a window.
- Client users can jump to a web page to view the documentation by clicking on the buttons "Lenovo Software License Agreement","Lenovo Privacy Statement" and "Third Party License".
- Then check "I have read and agree to Lenovo Software License Agreement Lenovo Privacy Statement and Third Party License".
- Click "Next" can directly enter installation, then skip to
step
12
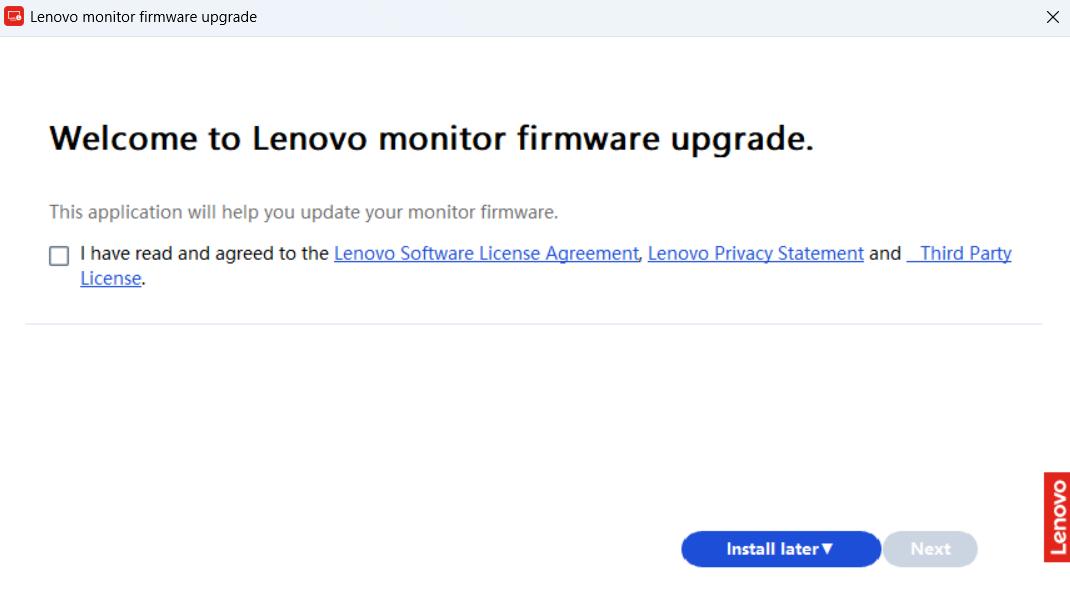
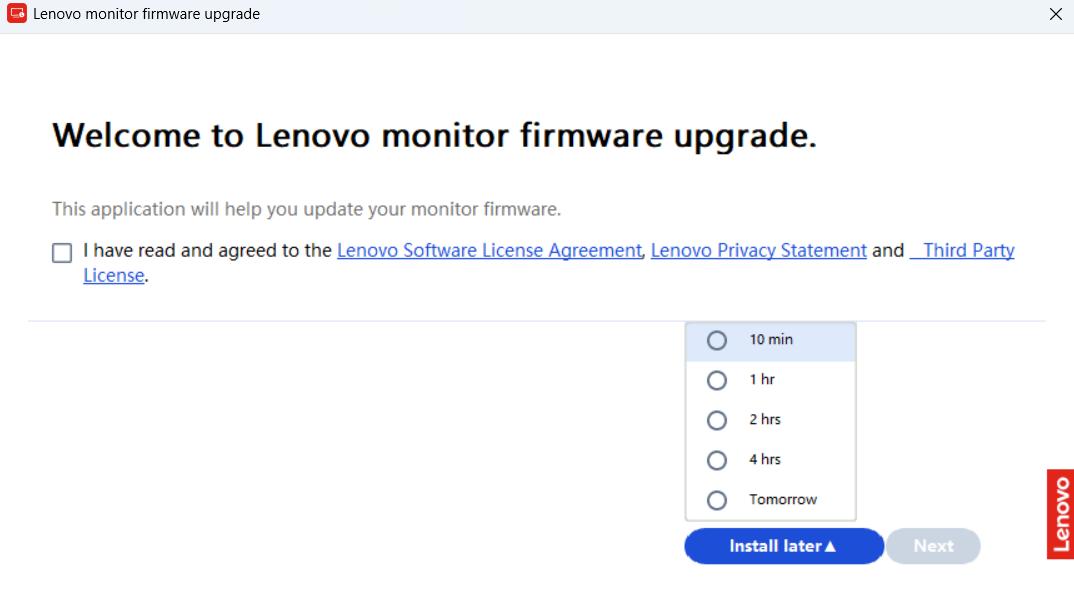
- Click the "Install later",choose the time you want.
- When the selected installation time arrives, the upgrade window will pop up automatically. Then, please click "Next" to proceed with the installation.
- Confirm pre-installation checks, such as FW information. After
passing
these tests, you can click"Install"; if not passed, contact
administrator for help.
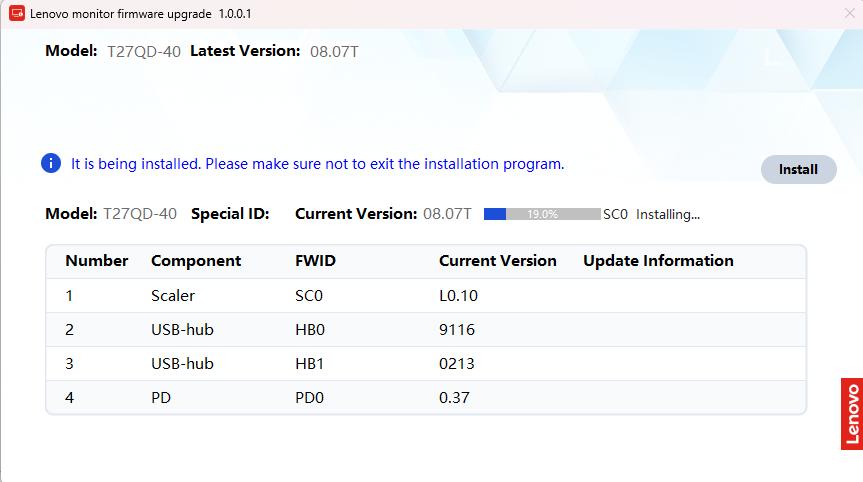
- Wait for the installation progress, then close it. If you fail, contact the
administrator for help.
- During the installation package runtime, the upgrade progress will be
displayed on LDFM. If you have selected silent installation, the above
upgrade
package progress interface will not be shown.
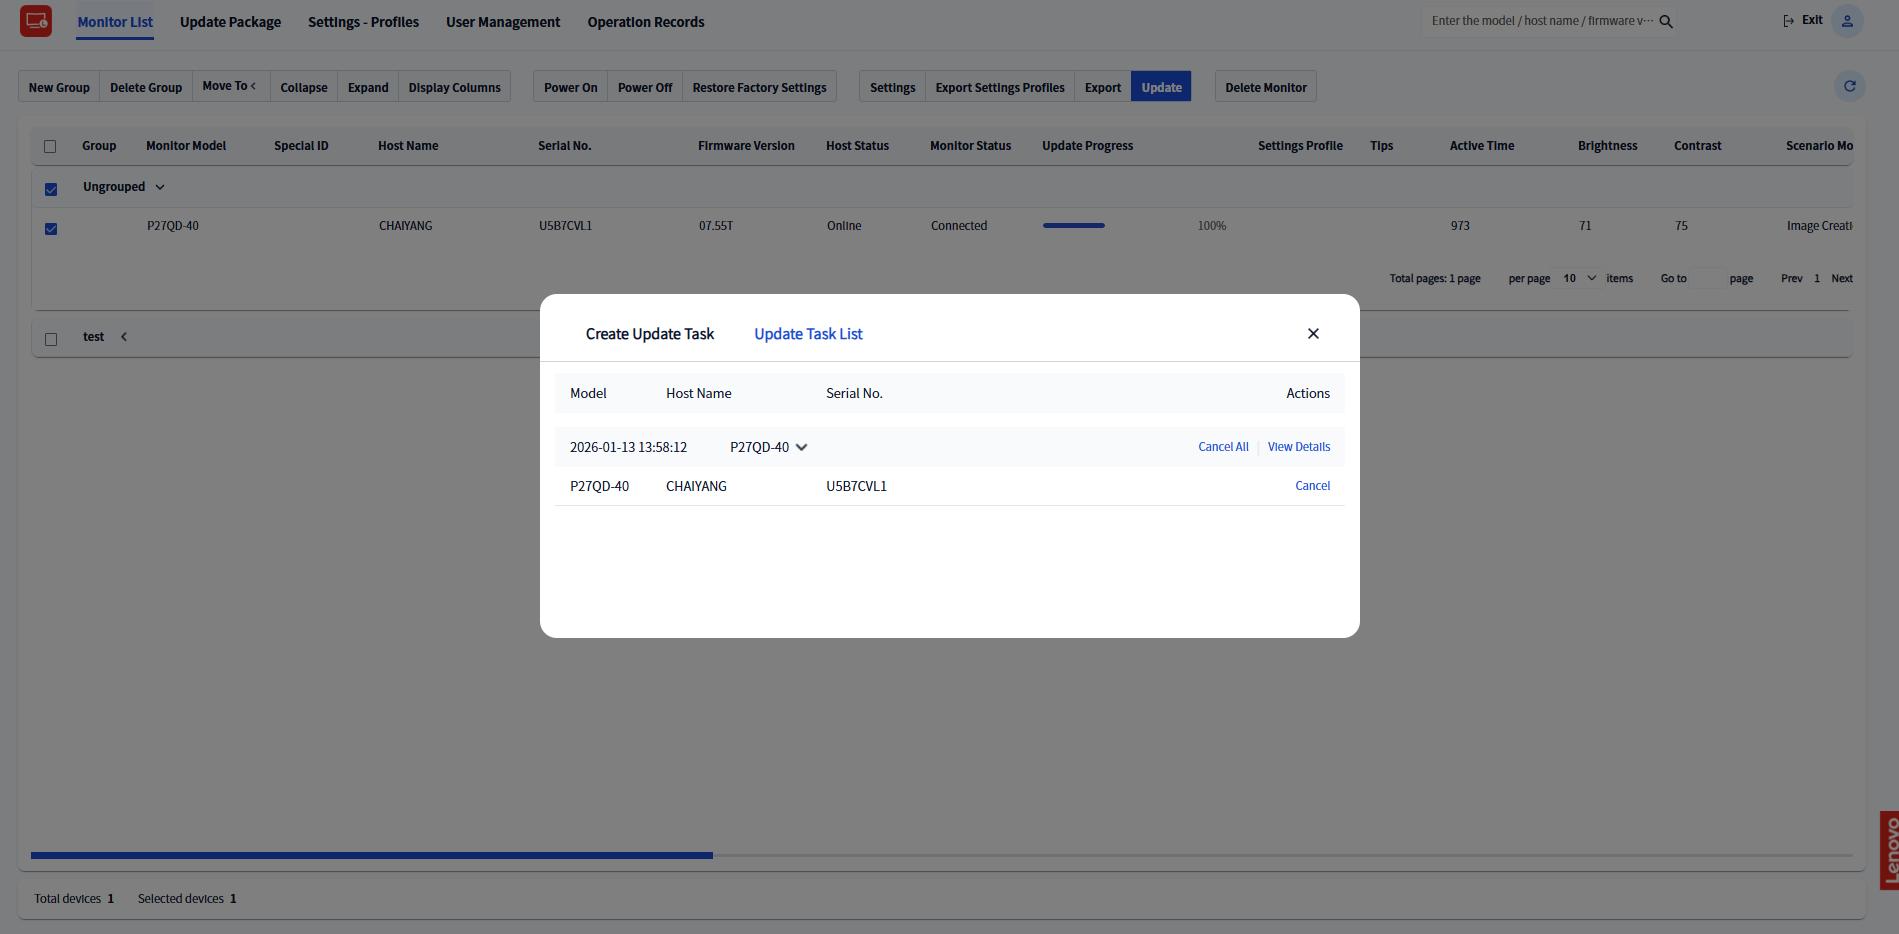
4.6.2 Update Task List
- If you have selected to specify a time for an update task, you can view the generated task in the update task list.
- Then, click the "View Details" button when you want to check the upgrade details.
- Click the "Cancel" or "Cancel All" button when you want to cancel this specific update or cancel all updates.
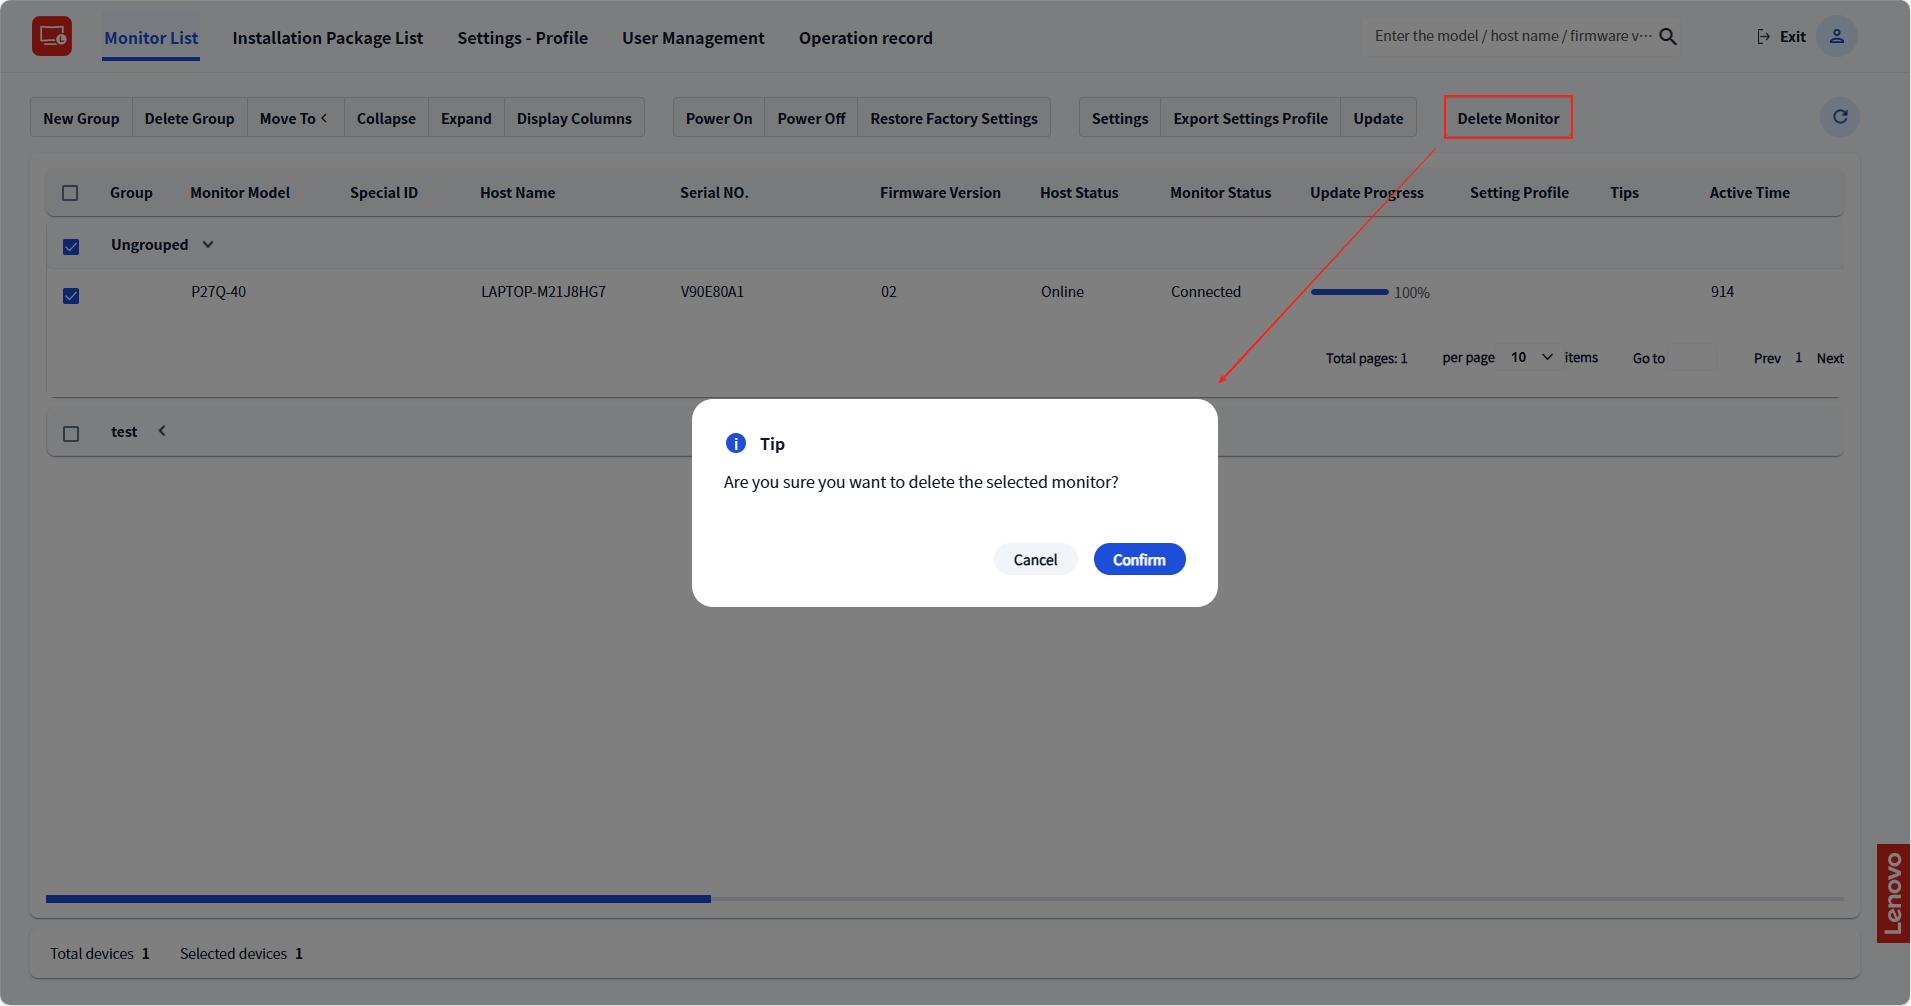
4.7 Delete Monitor
Select monitors, then click the "Delete Monitor" button to delete the selected monitors.
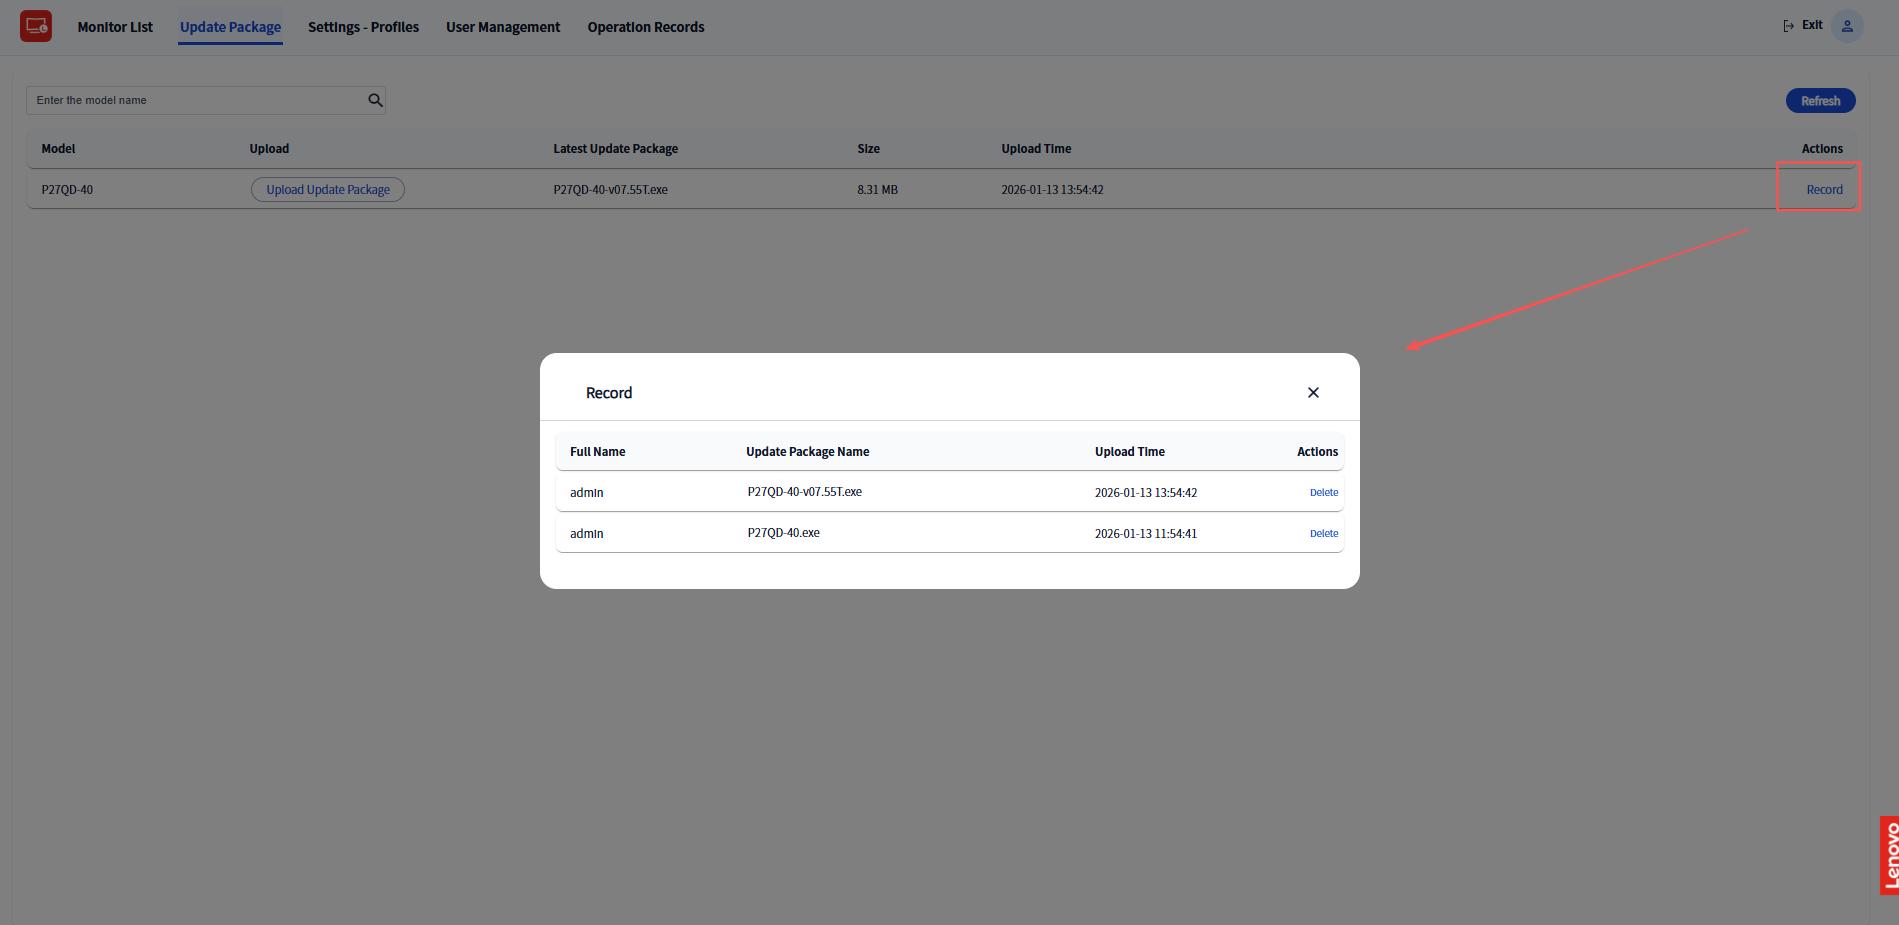
5. Update Package
- Select a model and click the "Upload Update Package" button to upload an update package.
- Select the update package on your local computer and click "Open".
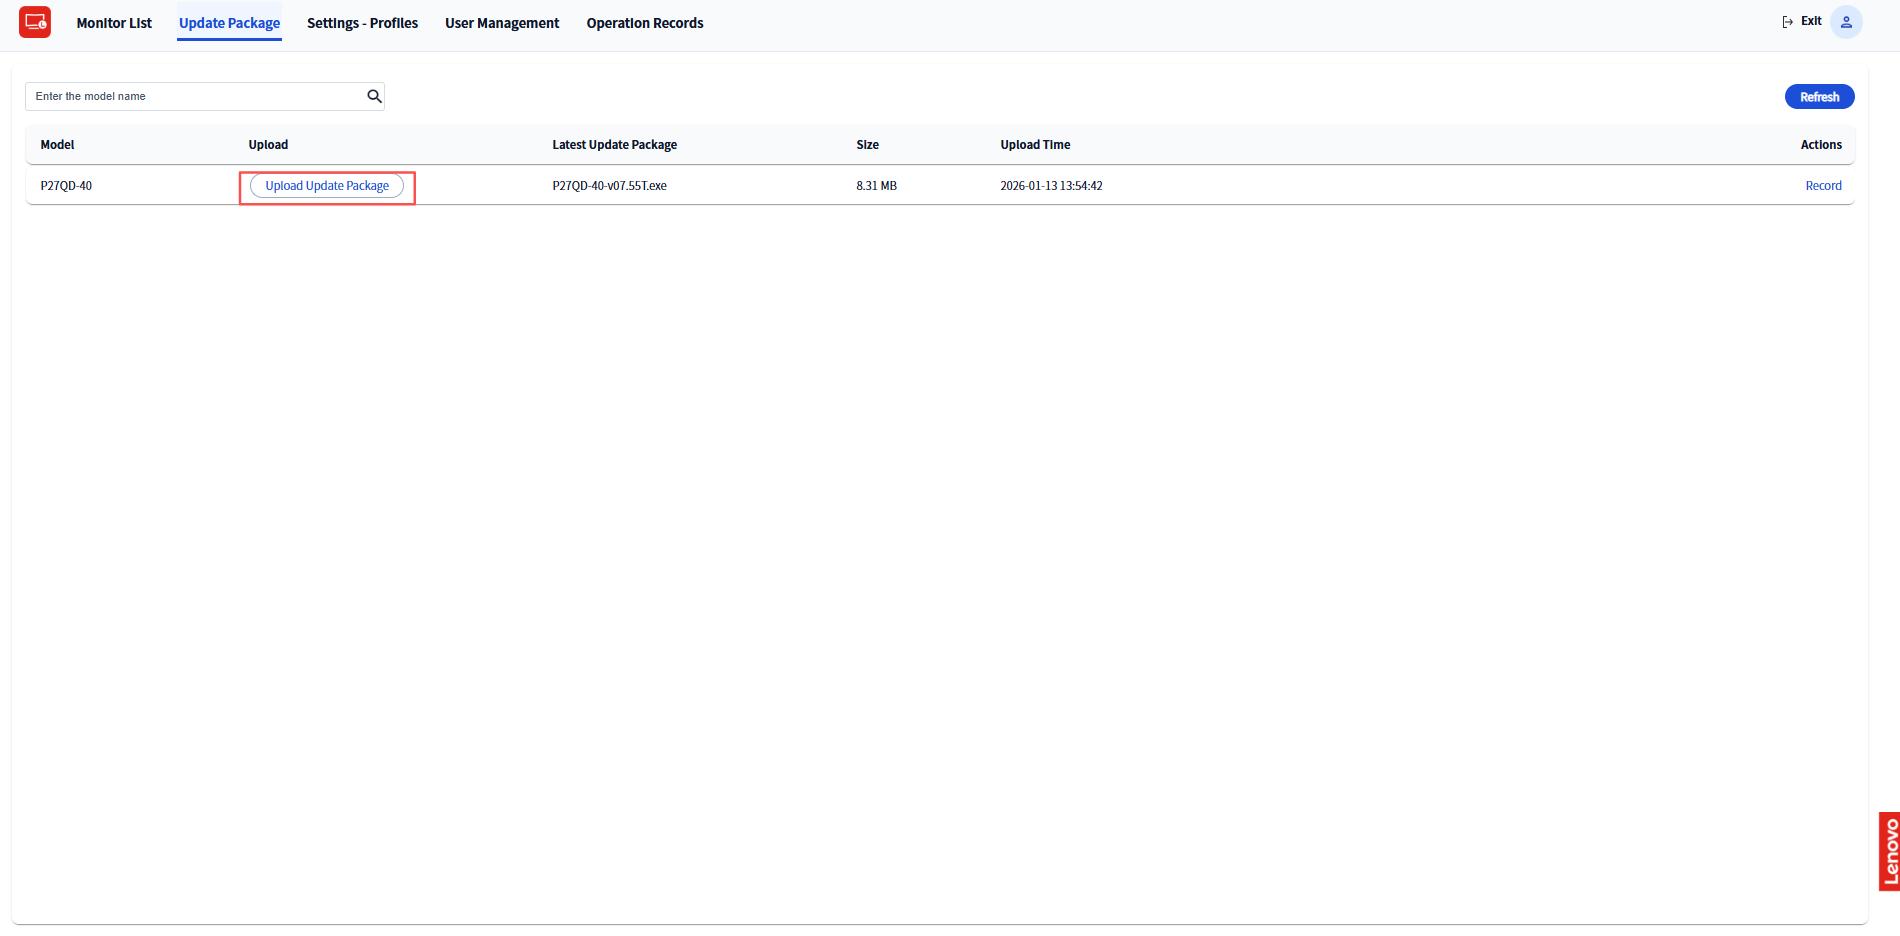
- After a successful upload, the name, size, and upload time of the new update package will be recorded.
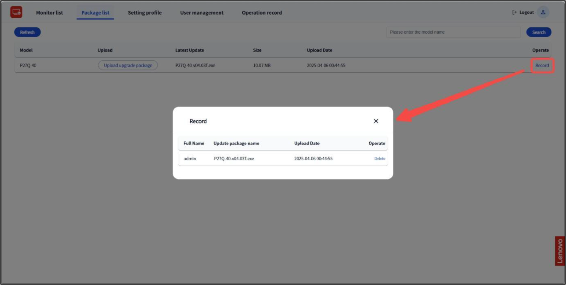
- Click the "Record" button to check if this update package.
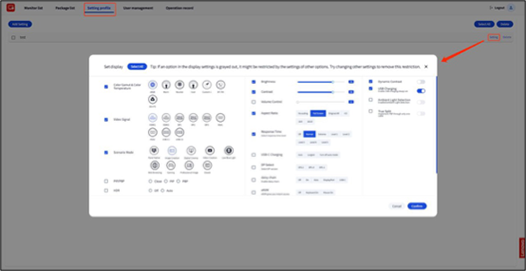
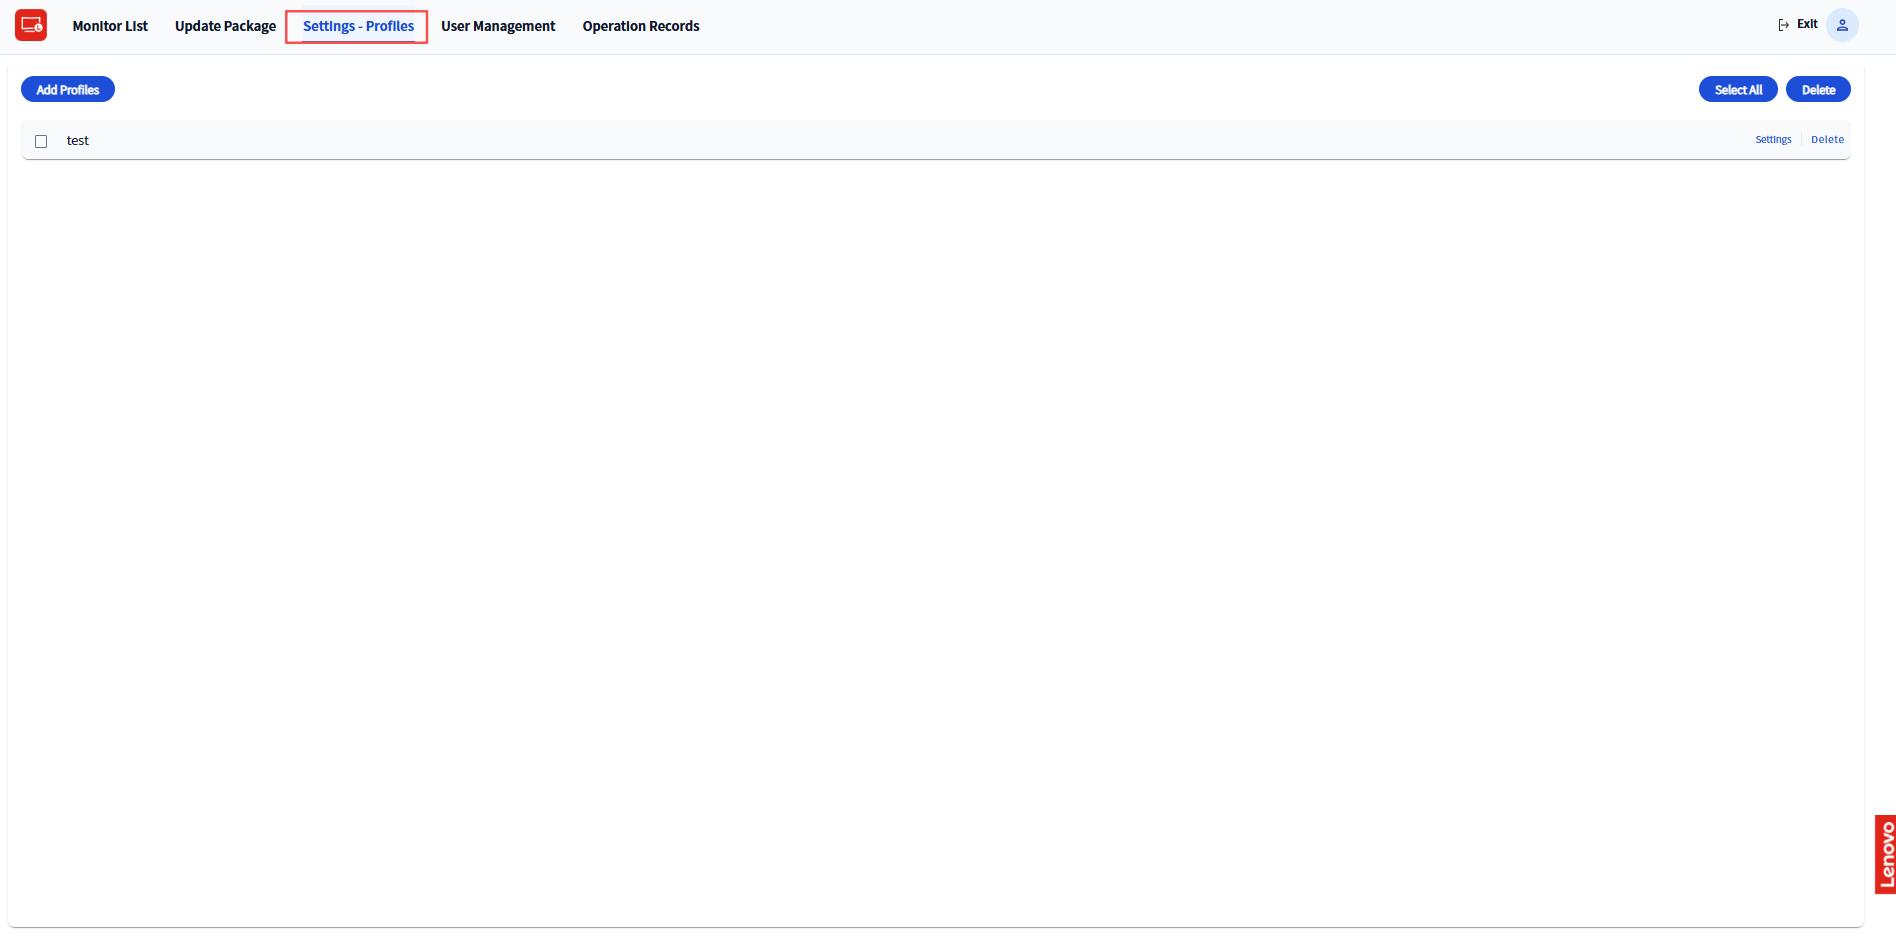
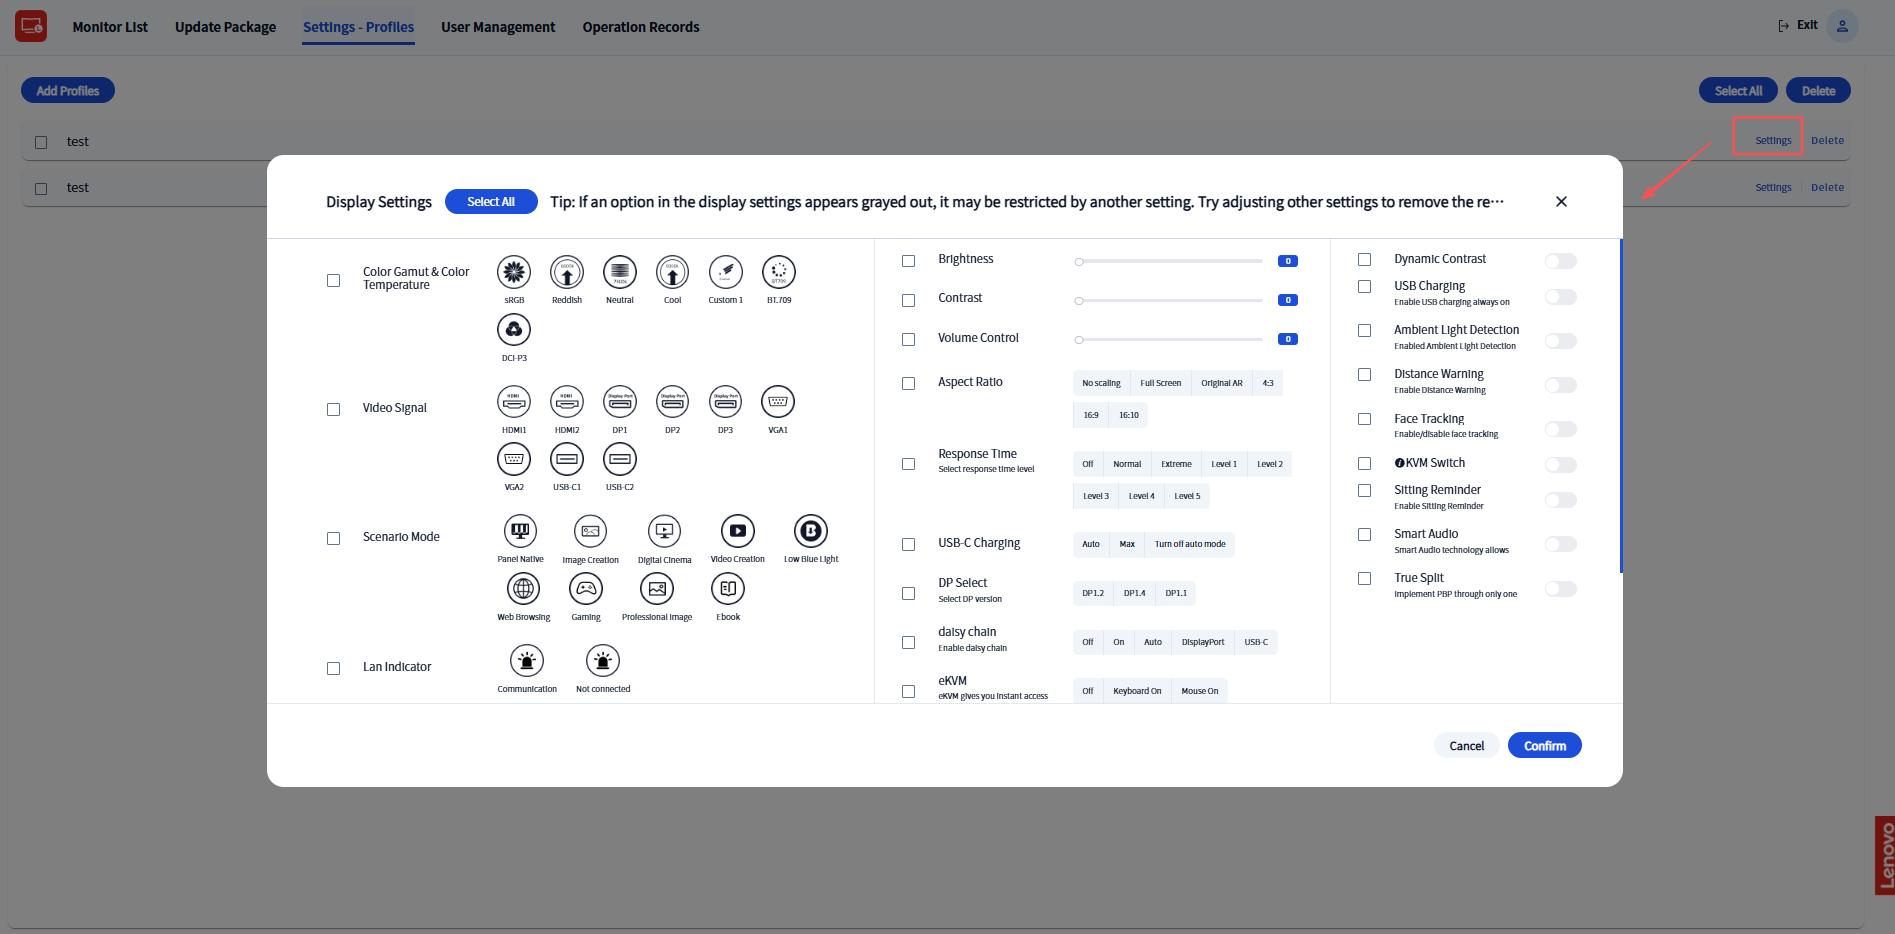
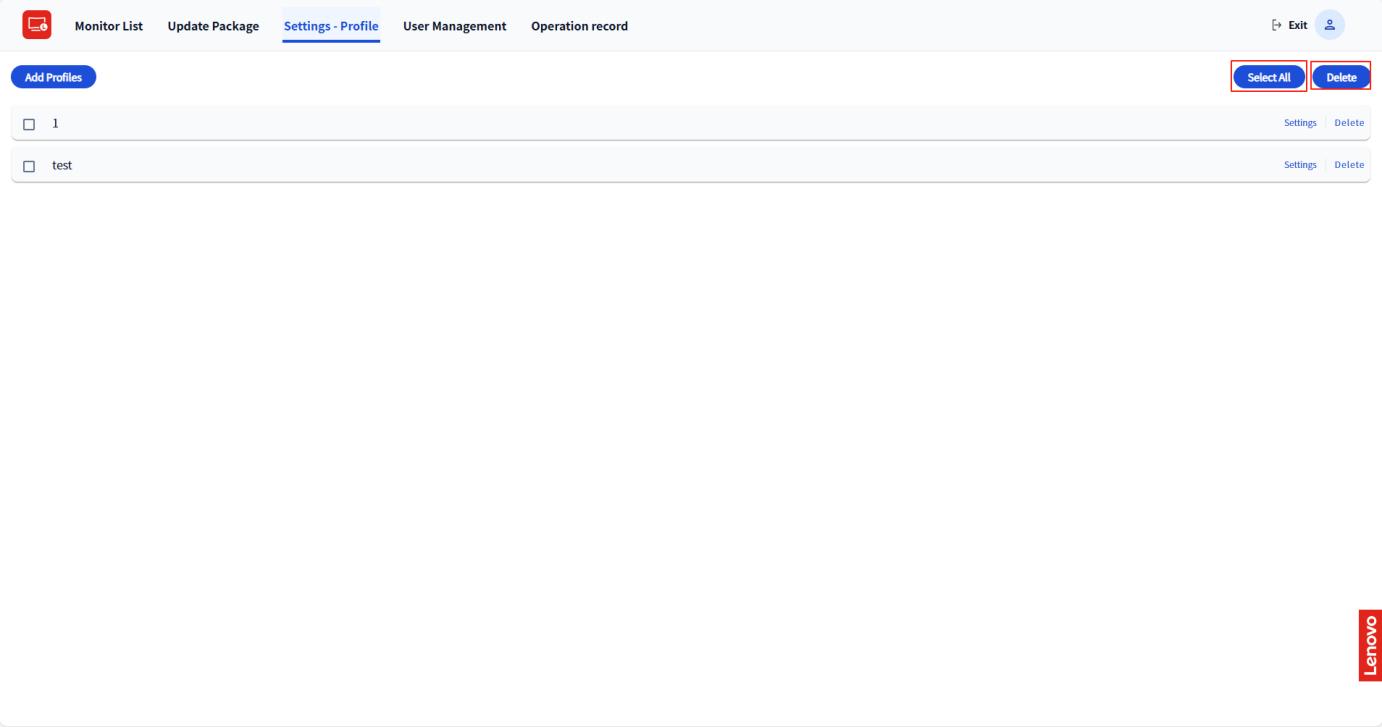
6. Settings - Profile
6.1 Add Profiles
- Click "Settings - Profile".
- Click "Add Profiles", and then enter the setting name.

- Click the "Settings" button, then configure the options you
want
and click "Confirm".
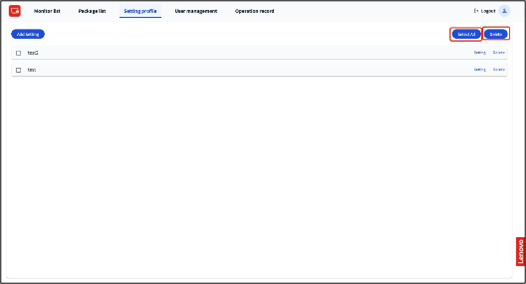
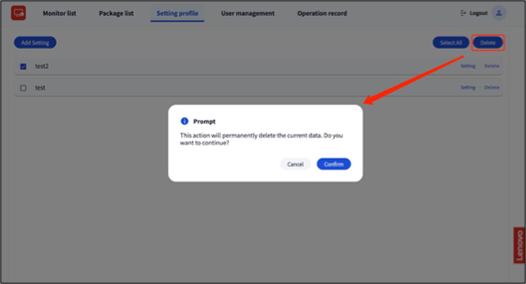
6.2 Delete Setting Profile
Select a setting profile or click "Select All", and then click the "Delete" button.
7. User Management
The functions of this part can only be used by users whose role is "Admin".
7.1 Add Users
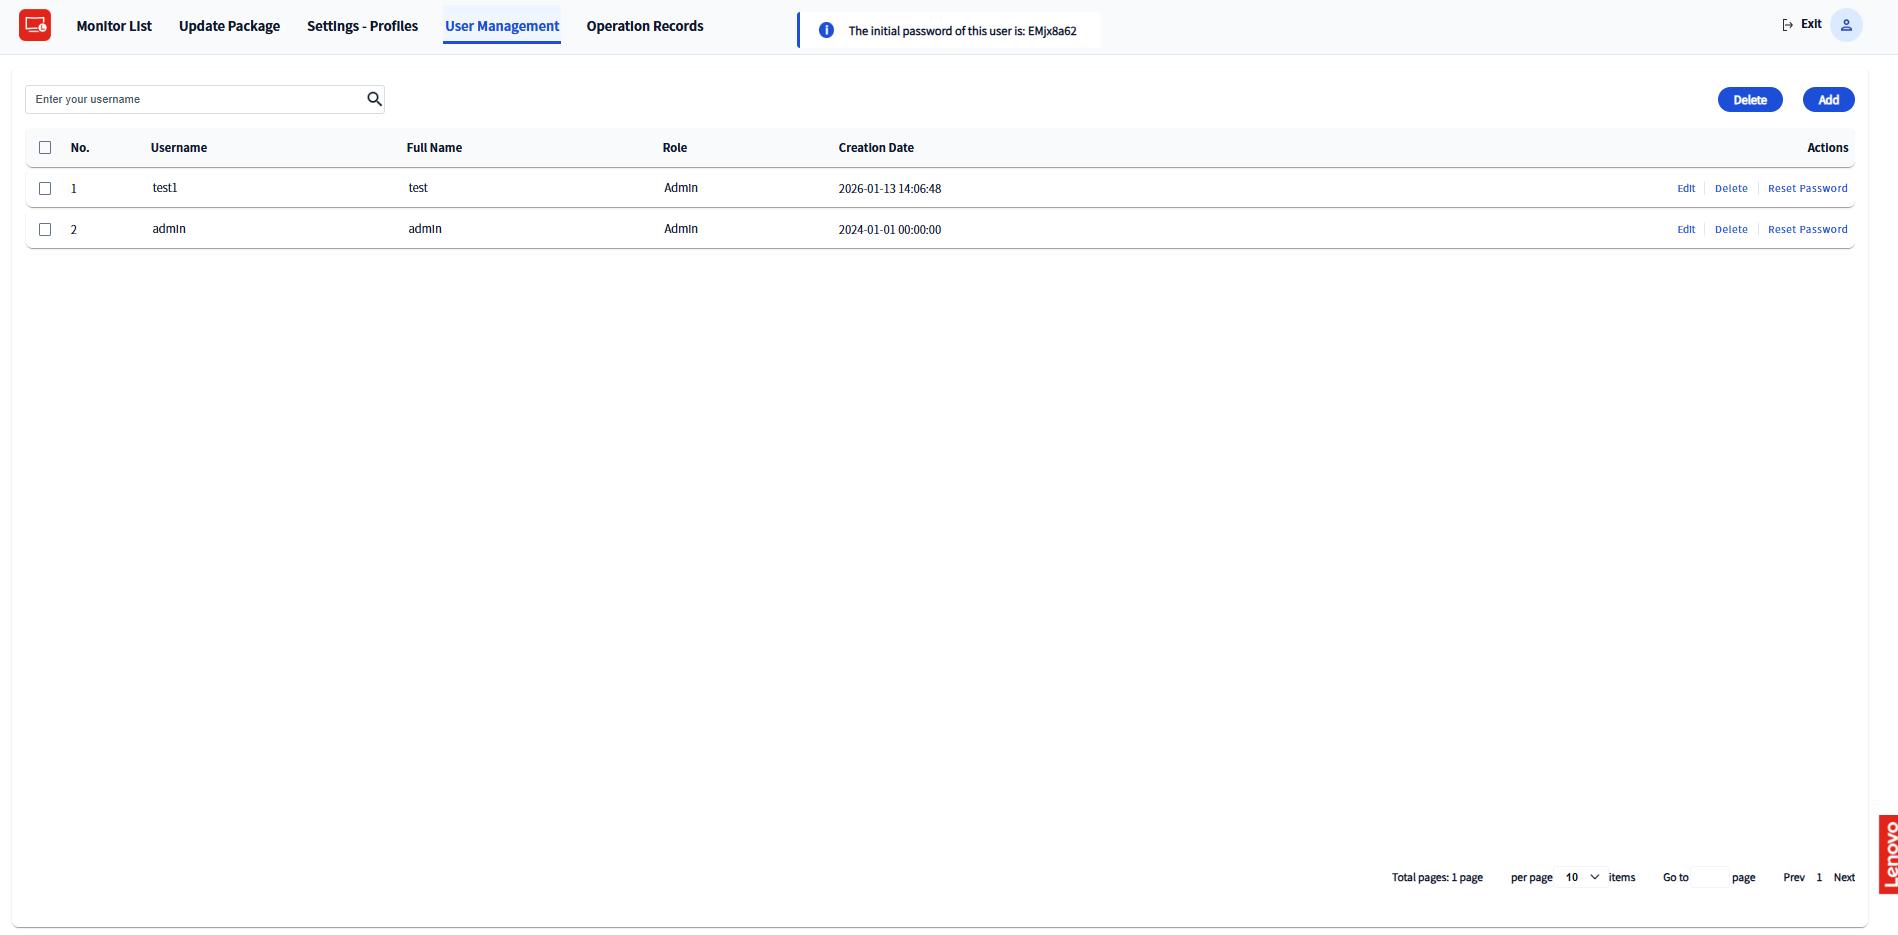
- Click the "User Management" button, and then click the "Add" button.
- Add a new line and fill in corresponding information and click the
"Save" button.
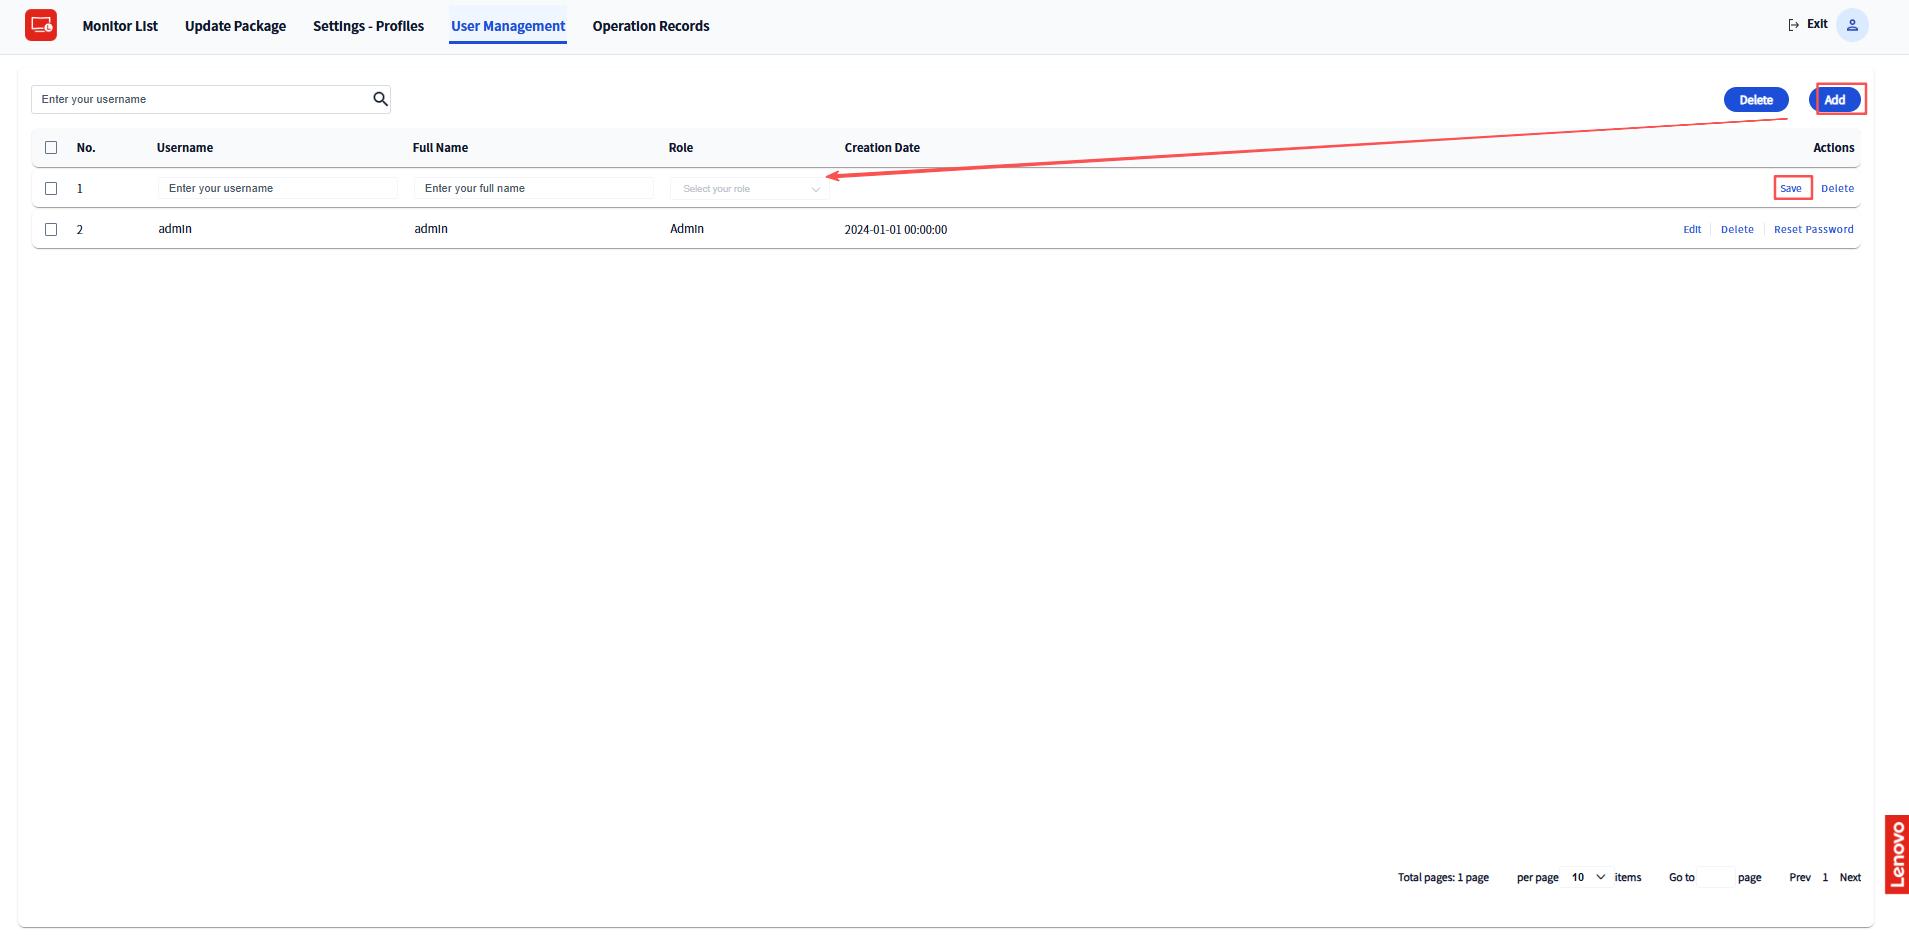
- Copy the random password at the top and give it to the user you have created.
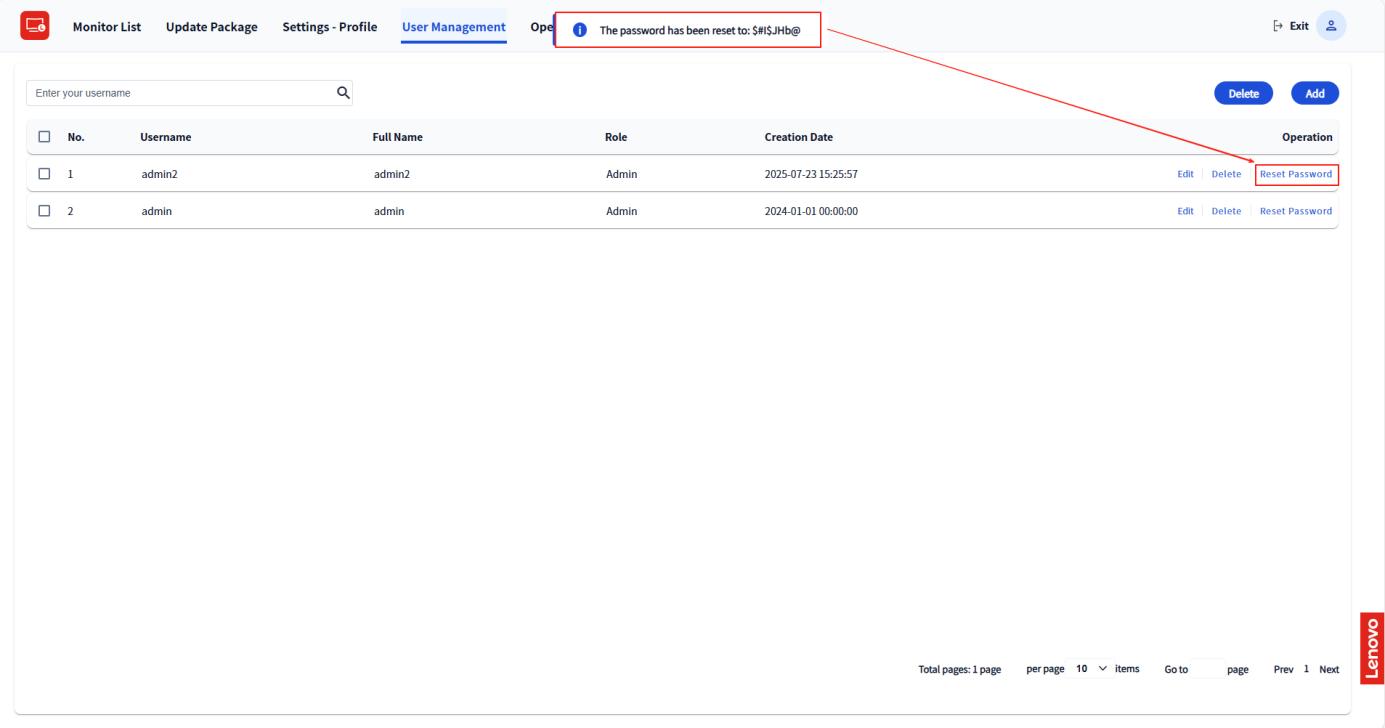
7.2 Reset User Password
- Select the user you want to reset.
- Click "Reset Password" in the operation area, then get a random password.
- Copy and send the password to the user.
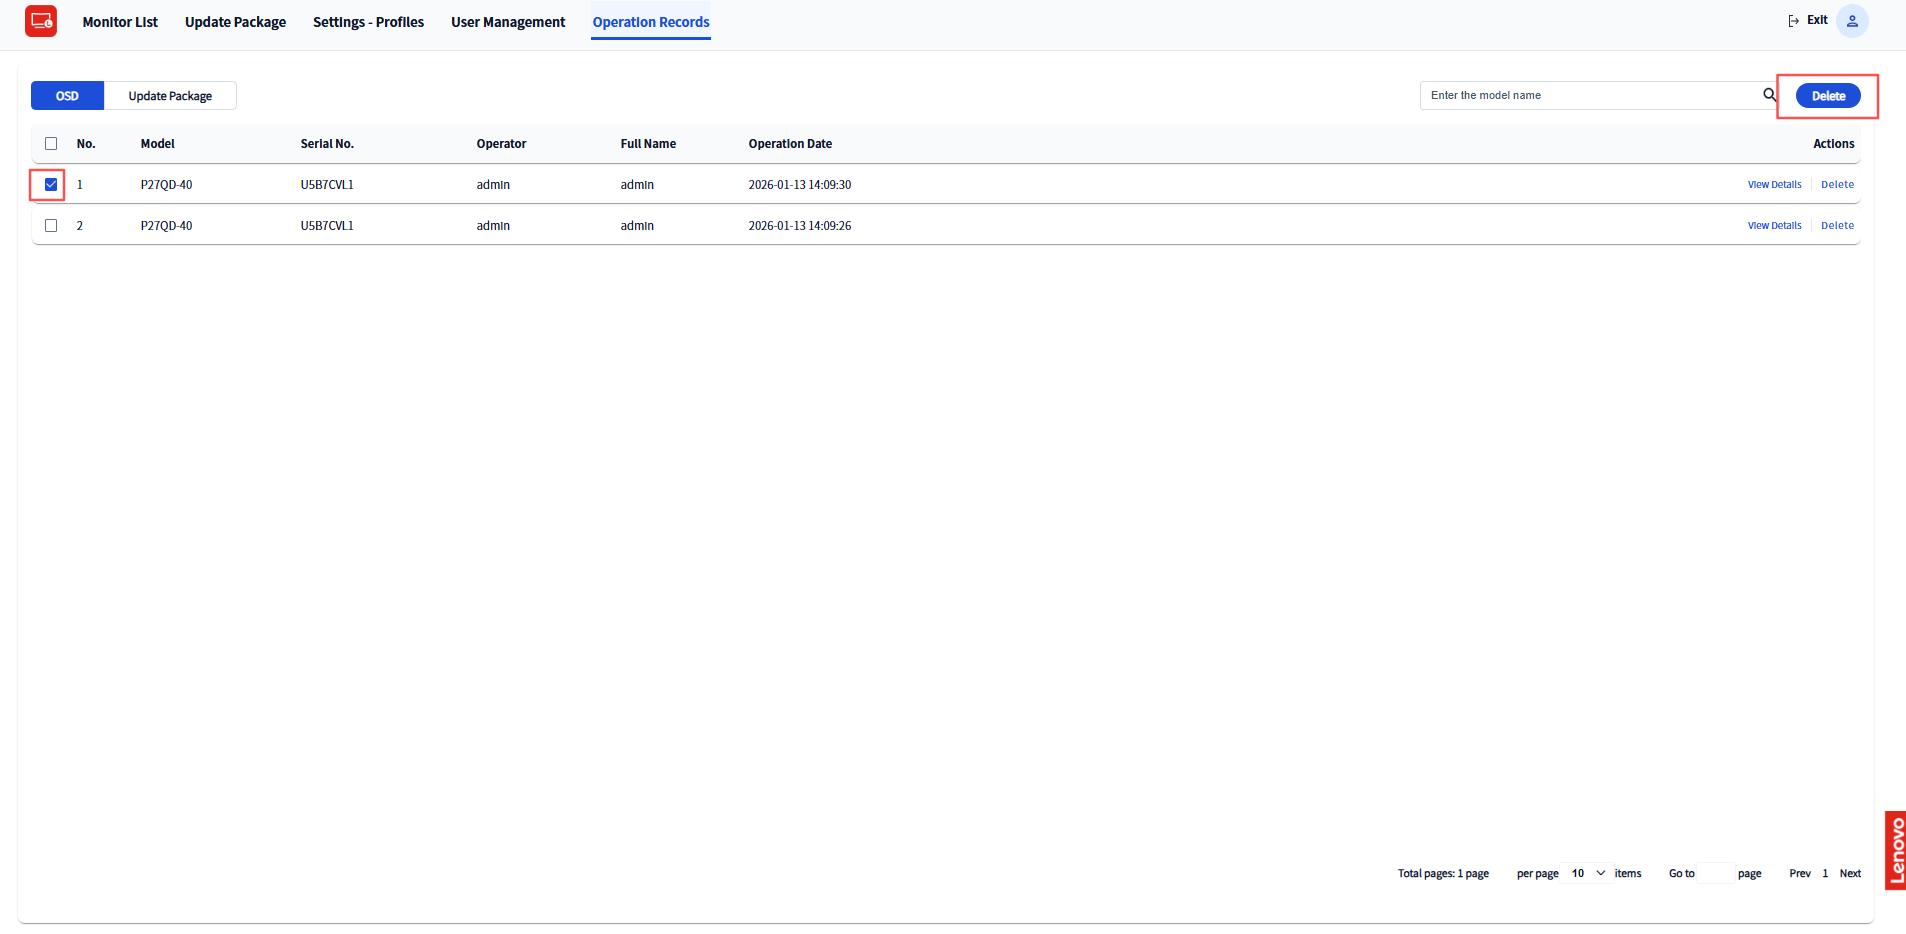
8. Operation Record
The functions of this part can only be used by users whose role is "Admin".
- Click the "Operation Record" option.
- You can click the "OSD" or "Installation Package"
option to view the corresponding operation records.
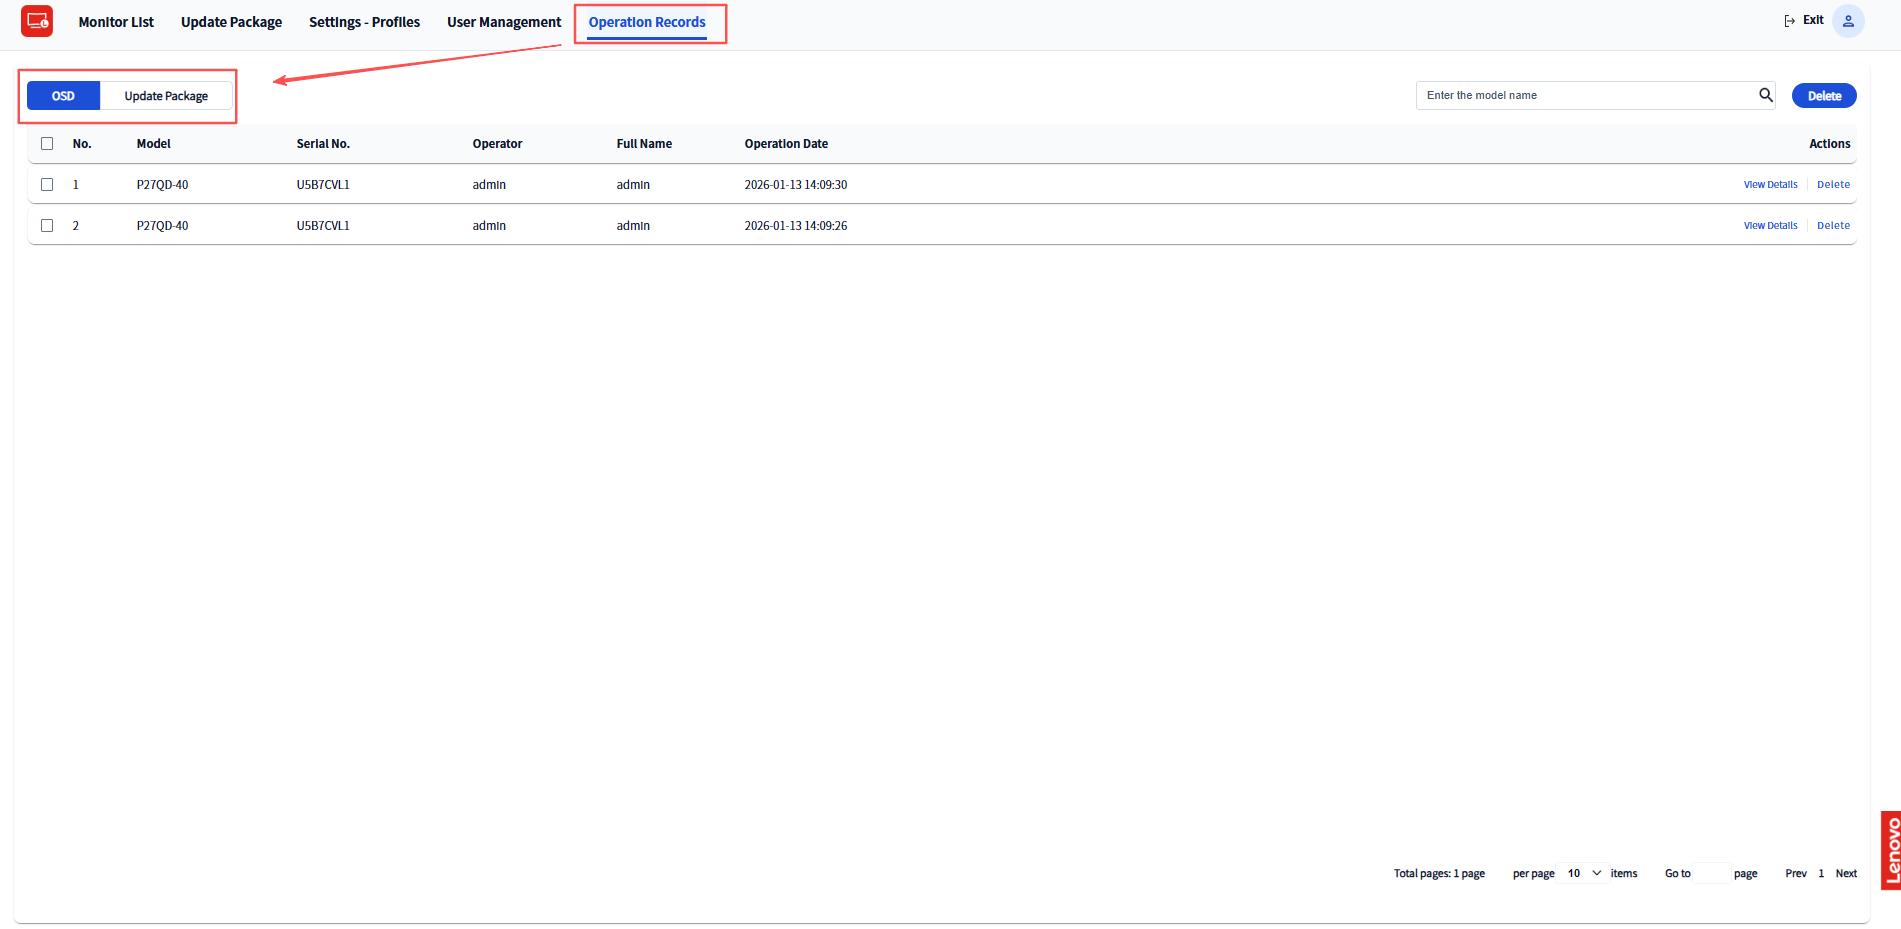
- Click "View details" to see specific records.
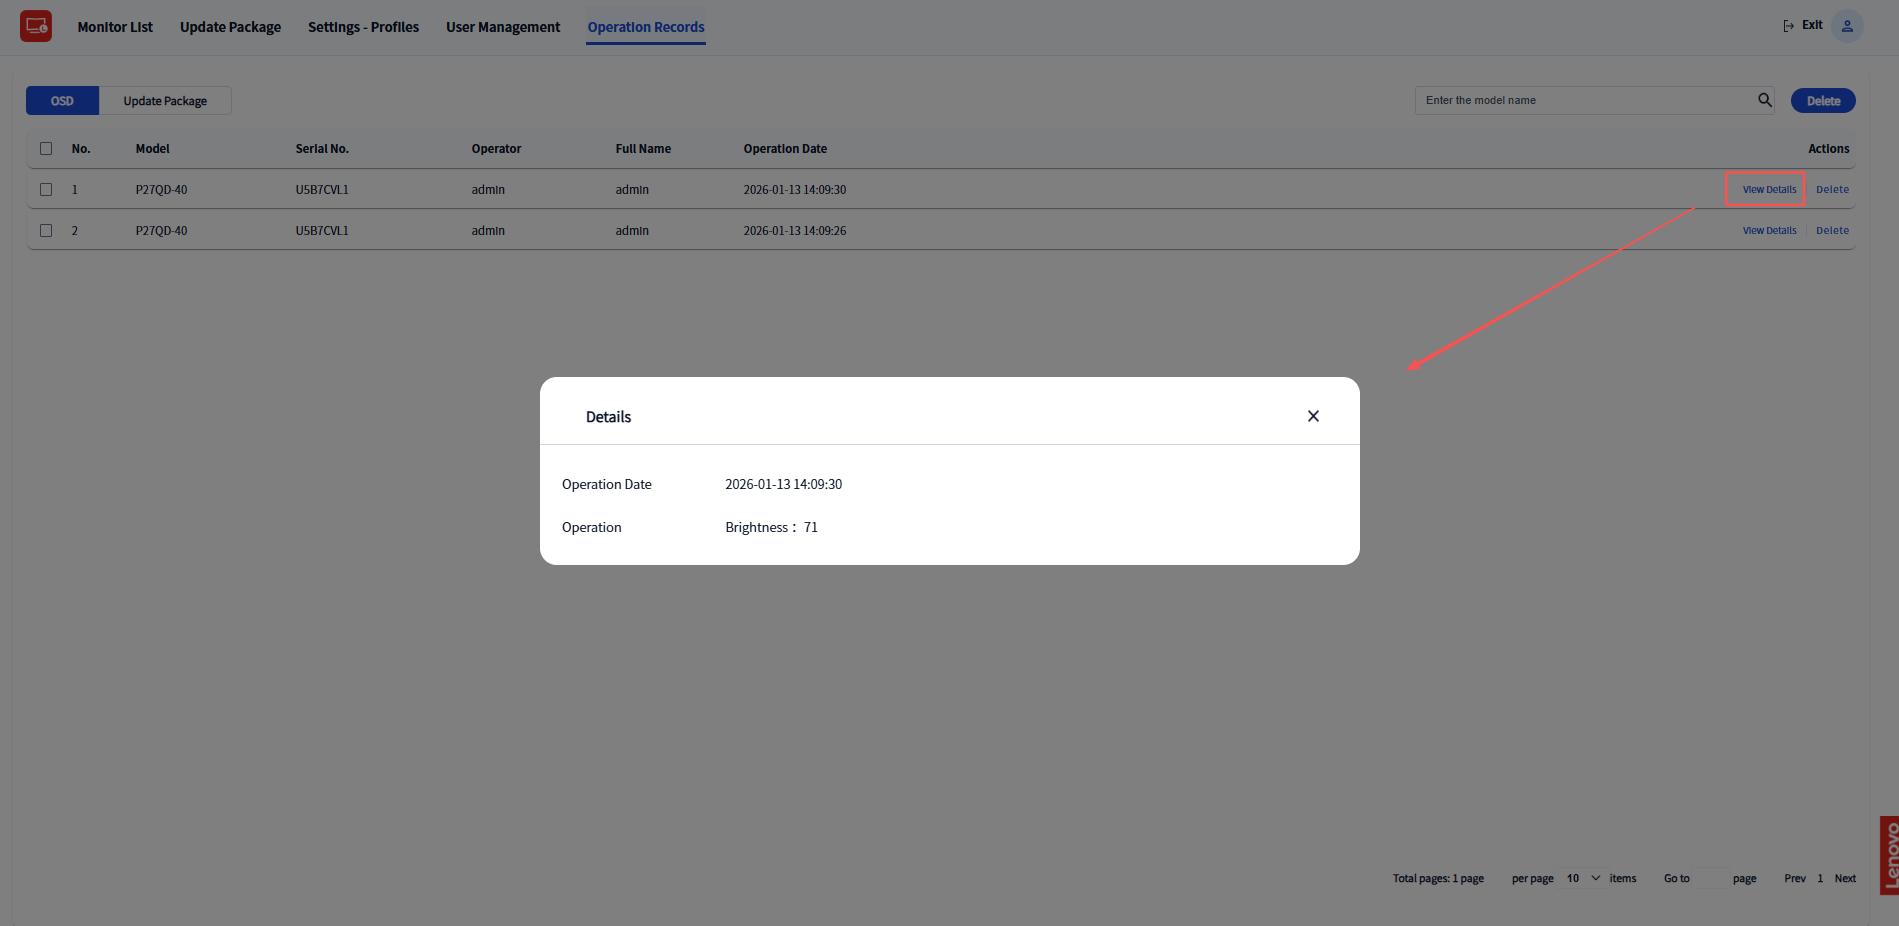
- To delete a record, select it and click the "Delete" button.
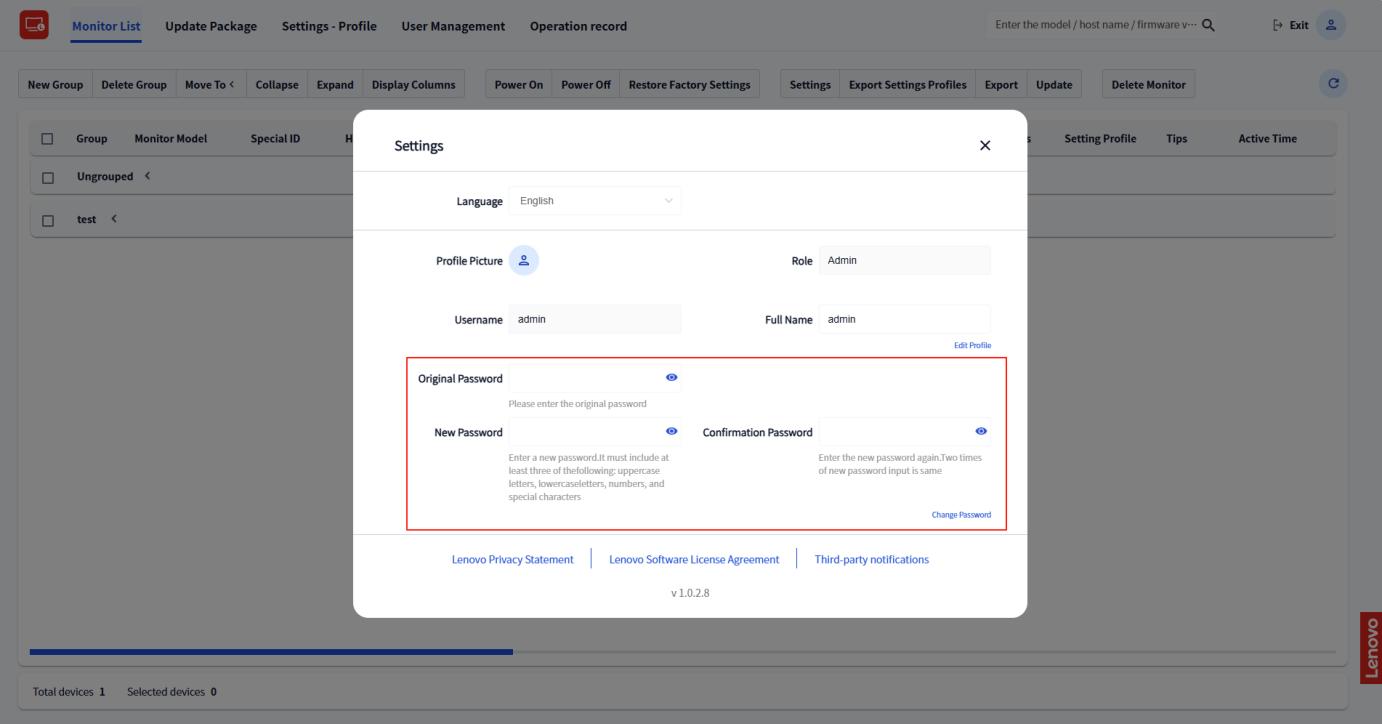
9. Personal Center
9.1 Change Password
- Click the avatar icon.
- Enter the original password, the new password, and confirm the new password.
- Then, click the "Change Password" button.
10 Execute the upgrade package via the command line
There are two formats for upgrade packages on Windows: EXE and MSI. The filename formats fall into two categories:
Official versions:
[model name]-v[version number].exe
[model name]-v[version number].msi
For example: P27QD-40-v03.exe, P27QD-40-v03.msi
Test versions:
[model name]-v[major version number].[minor version number]T.exe
[model name]-v[major version number].[minor version number]T.msi
For example: P27QD-40-v03.05T.exe, P27QD-40-v03.05T.msi
10.1 Manually execute the EXE Upgrade Package
Under normal circumstances, official versions only support upgrading, i.e., upgrading from a lower version to a higher version. For example, use the following command without any command-line parameters to upgrade the firmware version to version 03:
Command line: P27QD-40-v03.exe
In certain special cases, it may be necessary to downgrade to an older official
version.
In such cases, the command-line parameter -f can be used to force the
downgrade. For instance, if the firmware version in the monitor is 03 and you want
to
downgrade it to 02, use the following command line:
Command line: P27QD-40-v02.exe -f
However, if the upgrade package is a test version, it can be downgraded arbitrarily without the need for command-line parameters. For example, if the firmware version is 03 and you want to downgrade it to 02.01T, use the following command line without parameters:
Command line: P27QD-40-v02.01T.exe
10.2 Deploy the MSI Upgrade Package via SCCM/InTune
10.2.1 Deploy the MSI Upgrade Package via Intune
In the "Program" tab, use the default configuration:
Installation command line:
msiexec /i "T27QD-40-v11.10T.msi" /qn
Uninstallation command line:
msiexec /x "{6828A268-4F48-4216-A7BF-C06FAFE6B1C1}" /qn
In the "Requirements" tab, enter "Windows 10 1607" in the minimum operating system version field.
10.2.2 Deploy the MSI Upgrade Package via SCCM
Installation command line:
msiexec /quiet /i "\\SCCM\gx\T27QD-40-v11.10T.msi"
Here, /quiet enables silent installation, /i specifies
the
installation operation, and \\SCCM\gx\T27QD-40-v11.10T.msi is the
network path of the actual MSI package (please replace it with the real storage
path
according to the project).
Uninstallation command line:
msiexec /x "\\SCCM\gx\T27QD-40-v11.10T.msi" /qn /norestart
Guide to LDFM Key Features
1. Asset Management
Manage your display groups and assets with these features.
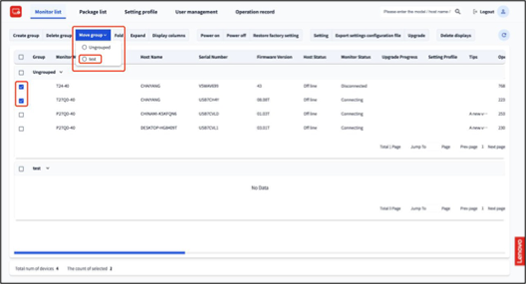
1.1 Create, Move, and Rename Groups
- Click the "Create Group" button to create a new group.
- Press the Enter key to save the group name.
- To rename a group, double-click the group name and enter the new name.
- To move monitors between groups:
- Select the monitors you want to move.
- Click the "Move Group" button and choose the target
group.
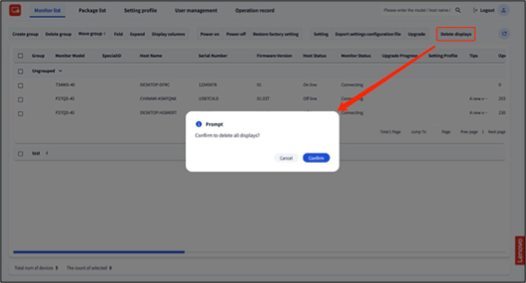
1.2 Delete Displays
- To delete all displays, click the "Delete
Displays"
button.
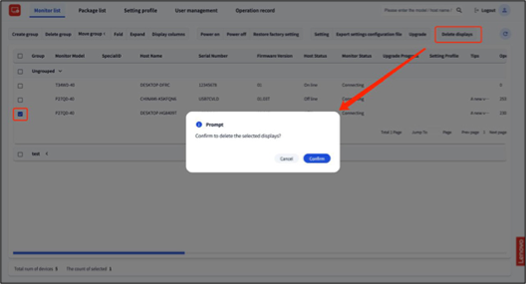
- To delete specific displays:
- Select the desired monitors from the list.
- Click the "Delete Displays" button.
2. Conduct Firmware Upgrades
Manage firmware upgrades for your display fleet.
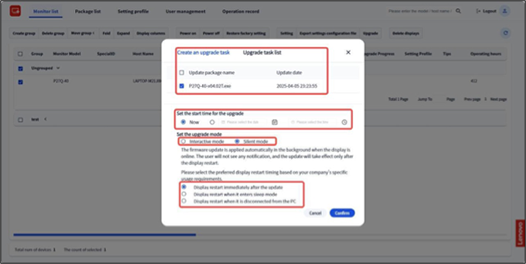
2.1 Create an Upgrade Task
To create and execute a firmware upgrade:
- Select a display, then click the "Upgrade" button.
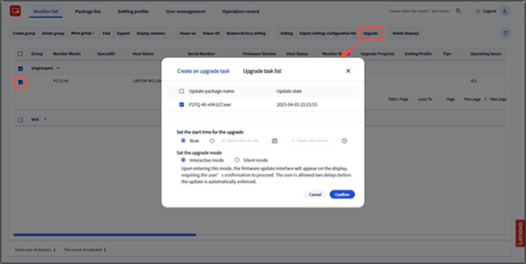
- Select the latest upgrade package. If the package has not been uploaded yet, refer to 3.2.3 Upgrade Package List for instructions.
- Choose the upgrade time:
- Now - start the upgrade immediately.
- Specified time - schedule the upgrade for a later time.
- Set the upgrade mode:
- Interactive - requires user confirmation on the Client side.
- Silent - runs in the background. If selected, you can specify when the reboot should occur.
- Click "Confirm". The upgrade task will be created and issued to the
selected display(s).
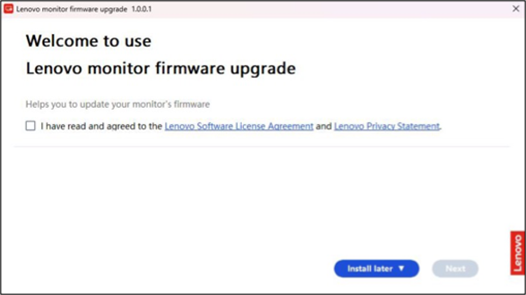
- If interactive mode is selected, the Client will automatically display an upgrade window.
- You can click "Lenovo Software License Agreement" and "Lenovo Privacy Statement" to review the related documents.
- Users must check: "I have read and agree to Lenovo Software License Agreement and Lenovo Privacy Statement".
- Click "Next" to proceed directly to installation. (Skip to
Step 12if you clicked "Next")
- Alternatively, click "Install later" and select a preferred
time.
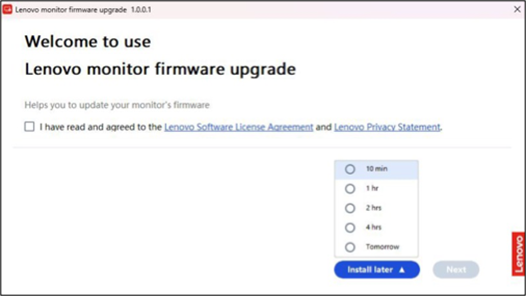
- At the selected time, the upgrade window will appear automatically. Click "Next" to proceed.
- Confirm pre-installation checks (e.g., firmware version, compatibility).
- If the checks pass, click "Install".
- If the checks fail, contact your administrator.
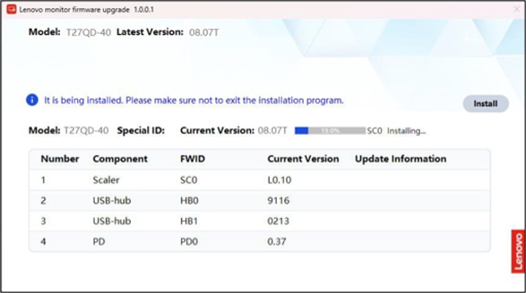
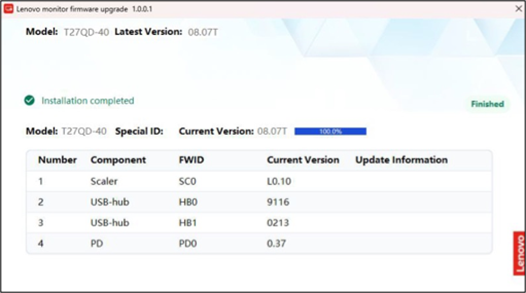
- Wait for the installation to complete. Once finished, close the upgrade window.
- If the installation fails, contact your administrator.
- If the installation fails, contact your administrator.
-
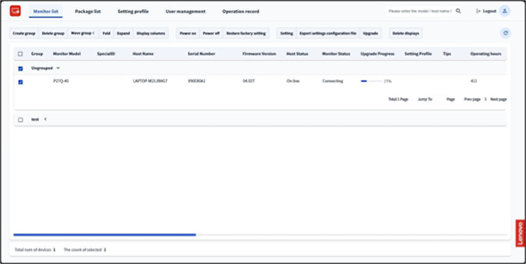
During the upgrade, the progress will be displayed in LDFM.
Note: In silent mode, the LDFM Client-side upgrade progress UI will not be shown.
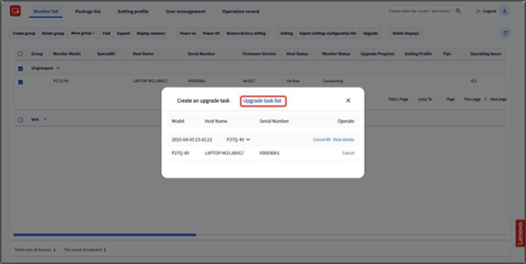
2.2 Upgrade Task List
You can view and manage scheduled upgrade tasks:
- If you chose "Specified time" for an upgrade, the task will appear in the Upgrade Task List.
- Click "View Details" to check the task status and configuration.
- Use "Cancel" to remove a specific upgrade task, or click
"Cancel All" to stop all
pending tasks.
2.3 Upgrade Package List
To upload and manage firmware upgrade packages:
- Select the appropriate device model.
- Click the "Upload Upgrade Package" button.
- In the file dialog, select the upgrade package from your local system and click
"Open".
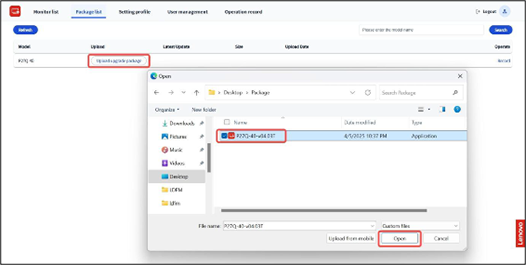
- After a successful upload, the name, file size, and upload time will be recorded.
- Click the "Record" button to verify that the package has been
successfully recorded in
the
system.
3. Manage On-Screen Display (OSD) Settings
3.1 Configure Profiles
3.1.1 Create and Edit Profiles
To create and configure a new setting profile:
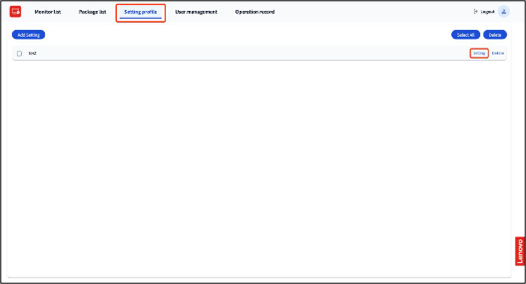
- Click the Setting profile tab.
- Click the Add Setting button
and
enter a profile
name.
- Click Setting to open
configuration panel.
- Adjust the settings according to your needs.
- When done, click “Confirm” to save the
profile.
3.1.2 Delete Profiles
To delete one or more profiles:
- Select a specific profile or click “Select All”.
- Then click the “Delete” button to remove the selected
profiles.
3.2 Customize Display Columns
The Monitor list shows all OSD settings in columns by default. To customize the view:
- Click the "Display Columns" button.
- Select or deselect the columns you wish to display or hide.
3.3 Adjust OSD Settings
To change OSD settings for a specific display:
- Select the display and click the "Setting" button.
- Adjust the individual settings as needed.
- In the lower-left corner, you can also select a Setting profile to
automatically apply
predefined configurations.
3.4 Turn Display(s) On/Off Remotely
To power displays on or off remotely:
- Select the group(s) of displays you wish to manage.
- Click the "Power On" button to turn displays on, or click the "Power Off" button to turn them off remotely.
3.5 Export Settings Configuration File
To export configuration settings as a file:
- Select the display you want to export from.
- Click the "Export settings configuration file" button.
- Enter a filename for the export.
- Click "Confirm".
- The new configuration will be stored in the Setting profile
list.
- Click the "Setting" button to view or modify the details of the
configuration
file.